
With iOS 10, Apple introduced two new frameworks for doing deep learning on iOS: BNNS and MPSCNN.
BNNS, or
bananasBasic Neural Network Subroutines, is part of the Accelerate framework, a collection of math functions that take full advantage of the CPU’s fast vector instructions.MPSCNN is part of Metal Performance Shaders, a library of optimized compute kernels that run on the GPU instead of on the CPU.
So… as iOS developers we now have two APIs for deep learning that appear to do pretty much the same thing.
Which one should you pick?
In this blog post we’ll put BNNS and MPSCNN head-to-head to examine their differences. We also make both APIs take a speed test to see which is fastest.
Why use BNNS or MPSCNN in the first place?
Let’s start by discussing what both these frameworks do.
In their current form, BNNS and MPSCNN are useful for performing inference on convolutional neural networks.
Nothing more, nothing less.
Compared to something like TensorFlow, where you build your neural network from the ground up by constructing a computational graph, both BNNS and MPSCNN are higher level APIs — you don’t have to worry about the math.
This also has a downside: BNNS and MPSCNN are much less capable than other frameworks such as TensorFlow. It’s easier to get them going but it limits the kind of deep learning you can do.
Apple’s deep learning frameworks are tuned for just one single purpose: pushing data as quickly as possible through the network’s layers.
It’s all about the layers
You can think of a neural network as a pipeline that your data flows through. The different stages in the pipeline are the network’s layers. These layers transform your data in different ways. With deep learning we use neural networks that can have many — 10s or even 100s — of layers.
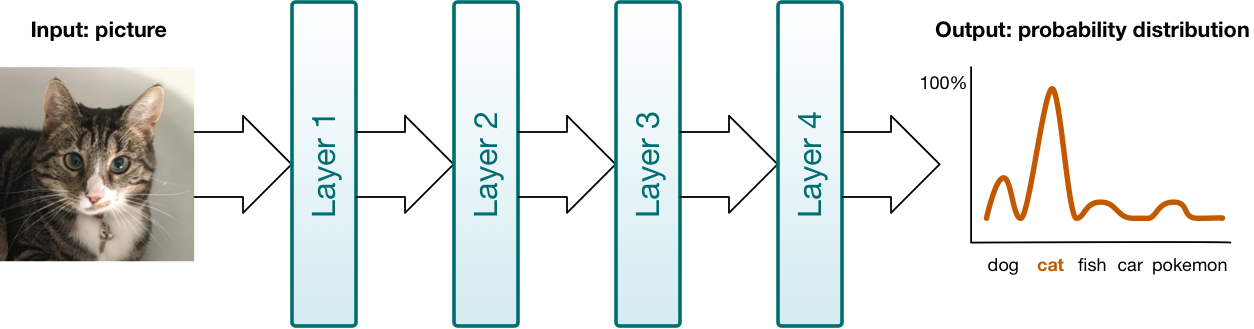
There are different types of layers. The ones provided by BNNS and MPSCNN are: convolutional layer, pooling layer, fully-connected layer, and normalization layer.
Layers are the primary building blocks in BNNS and MPSCNN. You create layer objects, put data into them, and read the results out of the layer again. By the way, BNNS calls them “filters” instead of layers: data goes into the filter in one form and comes out of the filter in another form.
To illustrate this idea of layers being the building blocks, here is how data flows through a simple neural network in BNNS:
// Allocate memory for storing intermediate and final results.
var tempBuffer1: [Float] = . . .
var tempBuffer2: [Float] = . . .
var results: [Float] = . . .

// Apply the first layer to the input data (for example an image).
BNNSFilterApply(convLayer, inputData, &tempBuffer1)

// Apply the second layer to the output of the first layer.
BNNSFilterApply(poolLayer, tempBuffer1, &tempBuffer2)

// Apply the third and final layer. The results are typically a
// probability distribution.
BNNSFilterApply(fcLayer, tempBuffer2, &results)
Building a neural network with BNNS and MPSCNN is just a matter of setting up your layers and then sending data through them. The framework takes care of what happens inside the layers, but connecting the layers is your job.
This can be a little tedious, unfortunately. For example, there is no way to load in a nice pre-trained caffemodel file and get back a fully configured “NeuralNetwork” object. You’ll have to replicate the network design by hand in code, by painstakingly creating the layers and configuring them. It’s easy to make mistakes.
BNNS and MPSCNN don’t do training
Before you can use a neural network, you first have to train it. Training requires a massive amount of data and a lot of patience — at least hours, but more likely days or weeks, depending on how much computing power you can throw at it.
Training is definitely not something you want to do on a mobile phone. (It would probably set the phone on fire.)
Once you have a trained network, you can use it to make predictions. This is called “inference”. While training requires a number of dedicated, heavy-duty computers, doing inference is perfectly possible on a modern mobile phone.
And that’s exactly what BNNS and MPSCNN are designed to do.
Convolutional networks only
But both APIs have limits. Right now, BNNS and MPSCNN only support one type of deep learning: convolutional neural networks (CNNs).
The primary application of CNNs is computer vision tasks. For example, you can use a CNN to describe the objects that are in a given photo.
CNNs are cool, but there is no support in BNNS or MPSCNN for other deep learning architectures such as recurrent neural networks.
However, the provided building blocks — convolutional layers, pooling layers, and fully-connected layers — are fast and provide a good foundation for building more complicated neural networks, even if you have to write some code by hand to fill up the gaps in the API.
Note: The Metal Performance Shaders framework also comes with compute kernels for doing fast matrix multiplications on the GPU. And Accelerate framework includes the BLAS library for doing the same thing on the CPU. So even if BNNS or MPSCNN do not include all the layer types you need for your deep learning architecture, you can probably roll your own with the help of these matrix routines. And if necessary, you can write your own GPU code in the Metal Shading Language.
Seek the differences
Why is Apple giving us two APIs if they do the same thing?
It’s simple: BNNS runs on the CPU, MPSCNN runs on the GPU. Sometimes using the CPU is faster, sometimes using the GPU is faster.
Wait a minute… aren’t GPUs supposed to be highly parallel compute monsters? Shouldn’t we always run our deep neural networks on the GPU?!
Nope. For training you definitely want to benefit from the massive parallelism of the GPU — even a cluster of many GPUs — but for inference it might just be faster to use the boring old 2- or 4-core CPU.
I’ll talk more about the speed differences below, but first let’s look at how the two APIs are different.
Note: Metal Performance Shaders is only available for iOS and tvOS, not for the Mac. BNNS also works on macOS 10.12 and later. If you want portability of your deep learning code between iOS and macOS, BNNS is your only choice (or use a third-party framework).
Is it Swifty?
BNNS is really a C-based API. That’s fine if you’re working in Objective-C but using it from Swift gets a bit cumbersome. MPSCNN, on the other hand, adapts quite well to Swift.
Still, you’ll have to deal with the fact that these APIs are lower level than, say, UIKit. Not everything is abstracted away behind convenient Swift types. You’ll often have to work with pointers to raw bytes, using Swift’s UnsafeRawPointer.
Swift also does not have a native 16-bit floating point type but both BNNS and MPSCNN are at their most speedy with such half-precision floats. You will have to use Accelerate framework routines to convert between regular and half floats.
In theory you don’t have to write any GPU code yourself when using MPSCNN but in practice I found that certain preprocessing steps — such as subtracting the mean RGB value from each image pixel — were easiest to implement with a custom compute kernel in the Metal Shading Language (which is based on C++).
So be prepared to do some low-level bit hacking with both of these APIs, even if you use them from Swift.
Activation functions
As data flows from one layer to the next in a neural network, each layer transforms the data somehow. As part of this transformation, the layer applies an activation function. Without these activation functions, neural networks would not be able to learn very interesting things.
There is a wide choice of activation functions and both BNNS and MPSCNN support the most common ones:
- ReLU and leaky ReLU
- logistic sigmoid
- tanh and scaled tanh
- absolute value
- the identity function, which passes the data through without changing it
- linear (MPSCNN only)
You’d think this would be as straightforward as APIs go, but strangely enough BNNS has a different way of defining these activation functions than MPSCNN.
For instance, BNNS defines two types BNNSActivationFunctionRectifiedLinear and BNNSActivationFunctionLeakyRectifiedLinear but in MPSCNN there’s just a single MPSCNNNeuronReLU that has an “alpha” parameter for making the ReLU leaky or not. Likewise for tanh and scaled tanh.
It’s safe to say that MPSCNN takes a more flexible and customizable approach than BNNS. This is something that happens throughout the API.
Case in point: MPSCNN lets you create your own activation function by subclassing MPSCNNNeuron and writing some GPU code. You can’t do this with BNNS since there is no API for making your own activation functions; they’re just enum values. If the activation function you want is not on the list, then with BNNS you’re out of luck.
Update 10-Feb-17: The above is a bit misleading, so I should clarify. Since BNNS runs on the CPU, you can simply take the output of a layer and modify it whichever way you like. If you need a special kind of activation function, you can just write it yourself in Swift — preferably using the Accelerate framework — and apply it to the output of the previous layer before it goes into the next layer. So BNNS isn’t any less capable here than Metal.
Update 29-Jun-17: A clarification on subclassing MPSCNNNeuron: if you do this, you cannot actually use your subclass with MPSCNNConvolution. That’s because MPS uses a trick where it performs the activation function inside the GPU kernel, but this only works for Apple’s own MPSCNNNeuron subclasses and not for any subclasses you make yourself.
In fact, in MPSCNN everything is a subclass of MPSCNNKernel. This means you can use an activation function such as MPSCNNNeuronLinear on its own, as if it were a separate layer. This is useful for scaling your data up or down by a constant amount as a preprocessing step. (By the way, BNNS has no equivalent for this “linear” activation function.)
Note: To me, it feels like BNNS and MPSCNN were created by different groups within Apple. They have very similar functionality but there are some weird discrepancies between their APIs. I don’t work at Apple so I have no idea why these differences exist. Maybe it is done for technical or performance reasons. But you should be aware that BNNS and MPSCNN are not “hot pluggable”. If you want to try which is fastest, inference on the CPU or on the GPU, you’ll have to implement your deep learning network twice.
Layer types
I mentioned that deep neural networks are made up of different types of layers:
- Convolutional
- Pooling (average and max)
- Fully-connected
Both BNNS and MPSCNN implement these three layer types, but there are small differences in how each API goes about it.
For example, in BNNS the pooling layers can take an activation function while in MPSCNN they don’t. However, in MPSCNN you can add the activation function as a layer of its own behind the pooling layer, so in the end both APIs allow for the same functionality but they get there by different paths.
In MPSCNN the fully-connected layer is treated as a special case of convolution, while in BNNS it’s implemented as a matrix-vector multiplication. This shouldn’t make any difference in practice, but it shows that the two frameworks take different approaches to solving the same problems.
In my opinion, MPSCNN is a bit more convenient to use for the developer.
When you apply a convolution kernel to an image, the output image gets shrunk a little unless you add “padding” pixels. With MPSCNN you don’t have to worry about this: you only have to tell it how big you want your input and output images to be. With BNNS you have to calculate the amount of padding yourself. It’s small things like this that make MPSCNN the nicer API to use.
In addition to the basic layers, MPSCNN also provides the following layers:
- Normalization (spatial, cross channel, local contrast)
- Softmax
- Logarithmic softmax
- You can use the activation functions as layers
These additional layer types are nowhere to be found in BNNS.
For the normalization layers this might not be a big deal as I don’t think they are very common anyway, but softmax is something that most convolutional networks will need to do at some point (usually at the end).
The softmax function takes the output from the neural network and turns it into a probability distribution: “I’m 95% certain this photo is of a cat but only 5% sure it is a Pokémon.”
It’s a little weird that softmax isn’t provided in BNNS. It’s not too hard to roll your own using the vDSP functions in Accelerate framework — but not very convenient either.
The learned parameters
When you train a neural network, the training procedure adjusts a set of numbers that represent what the network is learning. These numbers are called the learned parameters.
The learned parameters are made up of so-called weights and bias values, which are just a bunch of floating-point numbers. When you send data through the neural network, the different layers essentially multiply your data by these weights, add the bias values, and then apply an activation function.
When creating your layers, you need to specify the weights and bias values for each layer. Both APIs simply take a raw pointer to a buffer of floating-point values. It’s up to you to make sure these numbers are organized in the right fashion. If you get this wrong, the neural network will output nonsense.
You may have guessed it… BNNS and MPSCNN use a different memory layout for the weights. 😅
For MPSCNN the weights array looks like this:
weights[ outputChannel ][ kernelY ][ kernelX ][ inputChannel ]
But for BNNS the order is different:
weights[ outputChannel ][ inputChannel ][ kernelY ][ kernelX ]
I think the reason why MPSCNN puts the input channels last is so that this maps nicely to the RGBA pixels in the MTLTextures that store your data. But for the CPU vector instructions used by BNNS it’s faster to treat the input channels as separate chunks of memory.
This difference is not a huge issue for the developer but you do need to be aware of the memory layout for the weights when you import your trained model.
Note: You’ll probably have to write a conversion script to export the data from your training tool, e.g. TensorFlow or Caffe, and convert it to the format that BNNS or MPSCNN expects. Neither API can read models that are saved with these tools, they only accept buffers of naked floating-point values.
MPSCNN always copies the weights and bias values and stores them as 16-bit floating point internally. Since you have to provide them as single precision floats, this effectively cuts the precision of your learned parameters in half.
BNNS is a bit more open-minded here: it lets you choose the format in which you want to store the learned parameters, and it also gives you the option of not making a copy.
Loading the weights into the network is only important during app startup time when you’re creating the network. But if you have large numbers of weights, you still need to be smart about it. My VGGNet implementation does not work on the iPhone 6 because the app runs out of memory trying to load all the weights into MPSCNN at once. (An improvement would be to create the big layers first, followed by the smaller layers.)
The input data
Once you’ve created all your layer objects you can — finally! — start using the neural network for inference.
As you’ve seen, neither BNNS or MPSCNN really have the concept of a “neural network”, they only see individual layers. You need to put your data into each of these layers one-by-one.
As the user of the neural network, the data you care about is the input that goes into the very first layer (for example, a picture) and the output that comes out of the very last layer (the probability the picture is of a cat). Everything else, the data that moves in between the various layers, is just temporary intermediate results and is not very interesting.
So what format does your input data need to be in?
MPSCNN requires all data to be placed inside a special MPSImage object, which is really a collection of 2D textures. This makes a lot of sense if you’re using pictures — but if your data is not pictures, you need to convert it to these Metal textures. This has a performance cost and it needs to happen on the CPU. (You can use the Accelerate framework to help with this.)
Note: iOS devices employ a unified memory model, meaning that the CPU and GPU read from the same RAM chips. You don’t need to copy data to the GPU, unlike what may be the case on a desktop computer or server. So at least your iOS app does not have to eat that cost.
BNNS, on the other hand, just takes a pointer to a buffer of floating-point values. There is no need to load the data into a special object. So that seems faster than using textures… or is it?
There is an important restriction: with BNNS the different “channels” in the input cannot be interleaved.
If your input is a picture, then it has three channels: one for the red pixels, one for the green pixels, and one for the blue pixels. The problem is that an image file such as a PNG or JPEG is loaded into memory as interleaved RGBA values. And that’s not what BNNS wants.
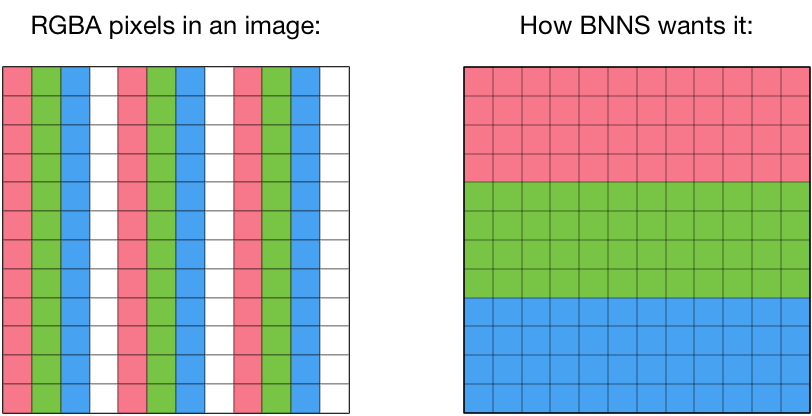
There is currently no way to tell BNNS to use the red pixel values as channel 0, the green pixel values as channel 1, the blue values as channel 2, and skip the alpha channel. Instead, you will have to rearrange the pixel data so that your input buffer first contains all the R values, then all the G values, and then all the B values.
It is unfortunate we need to resort to this kind of preprocessing since it takes up valuable compute time. Then again, perhaps these restrictions allow for BNNS to make certain optimizations in how its layers perform their computations, and the whole thing is a net gain. Who knows.
In any case, if you’re using BNNS for processing images — the primary thing CNNs are used for — then you may need to do some munging of your input data to get it in the proper format.
There is also the question of data types.
Both BNNS and MPSCNN allow you to specify the input data as floating-point values (16-bit and 32-bit) or as integers (8, 16, or 32-bit). You want to use floats for the data that flows through the network but you may not have a choice what format your input data is in.
Often when you load a PNG or JPEG image, or grab a still from the phone’s camera, you get a texture that uses unsigned 8-bit integers for the pixels’ RGBA values. With MPSCNN this is no problem: the texture is converted automatically to floats.
With BNNS you can specify Int8 as the datatype for the image but I couldn’t really get this to work. To be fair, I didn’t spend a lot of time on it either — since I already had to rearrange the channels of the input picture anyway, it was just as easy to convert the pixel data to floats at the same time.
Note: Even though BNNS lets you specify integer as the data type for your data and your weights, it will convert the data internally to floats, do the computation, and then convert the result back to integers. For the best speed, you probably want to skip this conversion step and always work directly in floats, even if they take up 2 or 4 times as much storage space.
Temporary data
With both BNNS and MPSCNN you’re working at the level of individual layers. You put data into a layer and you get data out of a layer.
A deep network will have many layers. We really care only about the output from the very last layer, and not so much about the output of all the other layers. But we still need to store these intermediate results somewhere, even if they only get used for a short while.
MPSCNN has a special object for this, MPSTemporaryImage. This is like an MPSImage but for one-time use only. You write to it once and read from it once. After that, its memory will be recycled. (If you’re familiar with Metal, they are implemented using Metal resource heaps.)
You should really use MPSTemporaryImage as much as possible, since this avoids lots of allocations and deallocations.
With BNNS you’re on your own. You need to manage the temporary data buffers yourself. Fortunately, it is very straightforward: you can just allocate one or two big arrays and reuse them between the layers.
Multithreading
You probably want to construct the network layers in a background thread. It might take a few seconds to load all the data for the learned parameters.
It’s also a good idea to perform the inference on a background thread.
With a deep enough neural network, inference may take somewhere between 0.1 and 0.5 seconds and such a delay is definitely noticeable to the user.
With MPSCNN you create a command queue and a command buffer, then tell all the layers to encode into that command buffer, and finally commit the work to the GPU. When the GPU is done, it will notify you using a callback.
The encoding of each piece of work can happen in a background thread and you don’t need to do anything special to synchronize this.
Note: In a real-time scenario — for example, when feeding live video frames from the camera into the neural network — you want to keep the GPU busy and want to avoid the CPU and GPU having to waiting on each other. The CPU should already be encoding the next video frame while the GPU is still processing the previous frame. You’d need to use an array of MPSImage objects and synchronize access to them with a semaphore — but to be honest I’d be very surprised if the current generation of mobile devices is capable of running deep learning in real time.
BNNS already happens on the CPU, so you can just start the work in a background thread, which will then block until BNNS is done.
It’s probably best to let BNNS figure out how to split up the work over the available CPU cores, but there is a configuration option that tells BNNS how many threads it can use to perform its computations. (This isn’t needed for MPSCNN, which will use as many GPU threads as it can get its hands on.)
Note: You shouldn’t share MPSCNN objects or BNNS objects between multiple threads. They’re OK to use from a single background thread but not from more than one thread at once.
Give me speeeeed!
The decision whether to use BNNS or MPSCNN is based on a trade-off: is the CPU faster for your data or is the GPU faster?
Not all data is suitable for processing by a GPU. Images or video are a natural fit, but something like time-series data might not be.
There is a cost to loading the data into the GPU because you need to pack it into a MTLTexture object. And to read the result once the GPU has finished you need to pry it out of the texture object again.
With the CPU-based BNNS you don’t have that overhead, but you also can’t take advantage of the massive parallelism of the GPU to do the calculations.
In practice a developer would probably try both and see which one is faster. But that does require writing the code twice since BNNS and MPSCNN have different APIs, as you’ve seen.
Because I was curious, I decided to set up a very basic convolutional neural network with both BNNS and MPSCNN to measure which one was faster.
My neural network design looks like this (tap the image to expand it):

This sort of network design can be used to classify images. The network takes a 256×256 RGB image (no alpha channel) as input and produces an array with 100 Float values. The output represents a probability distribution over 100 possible categories of objects.
In practice the neural network would need to have more layers to be really useful. It would also have a softmax layer at the end, but because BNNS doesn’t come with a softmax function I left it out.
I did not actually train this neural network to learn anything useful — instead, it is initialized with reasonable random values. This is a silly neural network that computes nonsense. However, it does allow us to compare what it takes to build a neural network in BNNS versus building the same network in MPSCNN, and how fast each one runs.
If you want to follow along, here is the code on GitHub. Open this project in Xcode and run it on an iOS 10-compatible device with at least an A8 processor (it doesn’t run on the simulator).
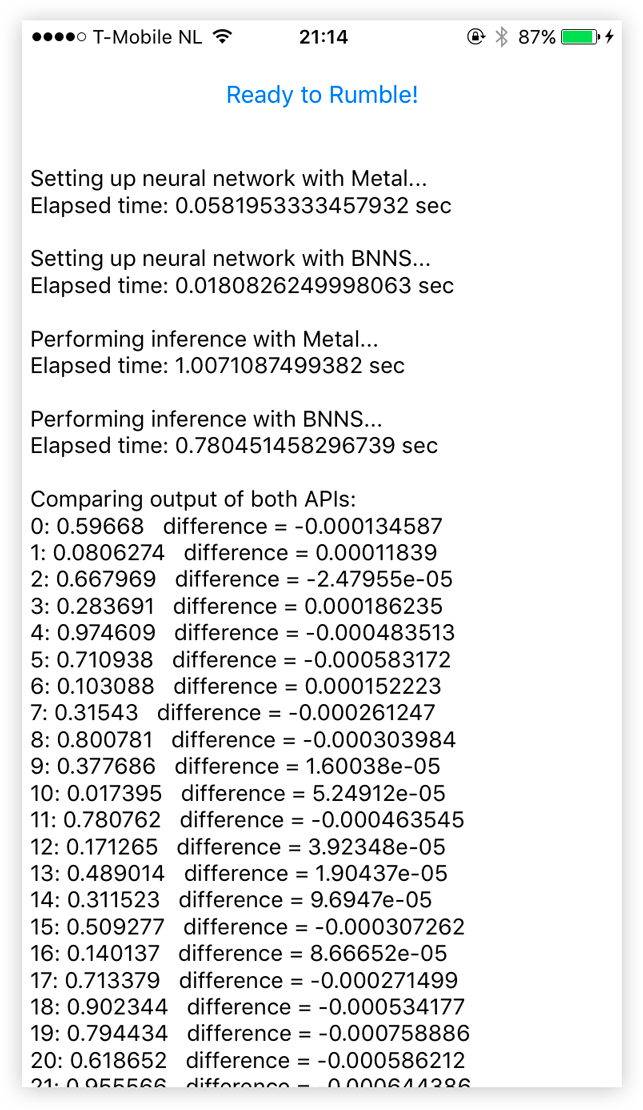
After you tap the button the app freezes up for a few seconds while it performs 100 separate predictions on each of the neural networks. The app shows how long it took to create the network (not very interesting) and how long it took to do the 100 repeated predictions.
The app also prints out the results computed by each network. Since I didn’t train the network these numbers mean absolutely nothing, but it is useful for debugging purposes. I wanted to make sure both networks actually computed the same thing, to make this a fair test.
The small differences in the answers are due to floating-point rounding — we only get 3 decimals of precision because of the 16-bit floats that Metal uses internally — and possibly due to differences in how each framework performs its computations. But the results are close enough.
How the app works
The app creates a neural network with 2 convolutional layers, 1 max pooling layer, 1 averaging pooling layer, and a fully-connected layer. Then it measures how long it takes to sends the same image 100 times through the network.
The main source files of interest are BNNSTest.swift and MetalTest.swift.
The BNNSTest class creates the neural network using — you guessed it — BNNS functions. Here is a short snippet of what it takes to create the first convolutional layer:
inputImgDesc = BNNSImageStackDescriptor(width: 256, height: 256, channels: 3,
                   row_stride: 256, image_stride: 256*256,
                   data_type: dataType, data_scale: 0, data_bias: 0)

conv1imgDesc = BNNSImageStackDescriptor(width: 256, height: 256, channels: 16,
                   row_stride: 256, image_stride: 256*256,
                   data_type: dataType, data_scale: 0, data_bias: 0)

let relu = BNNSActivation(function: BNNSActivationFunctionRectifiedLinear,
                          alpha: 0, beta: 0)

let conv1weightsData = BNNSLayerData(data: conv1weights, data_type: dataType,
                           data_scale: 0, data_bias: 0, data_table: nil)

let conv1biasData = BNNSLayerData(data: conv1bias, data_type: dataType,
                        data_scale: 0, data_bias: 0, data_table: nil)

var conv1desc = BNNSConvolutionLayerParameters(x_stride: 1, y_stride: 1,
                    x_padding: 2, y_padding: 2, k_width: 5, k_height: 5,
                    in_channels: 3, out_channels: 16,
                    weights: conv1weightsData, bias: conv1biasData,
                    activation: relu)

conv1 = BNNSFilterCreateConvolutionLayer(&inputImgDesc, &conv1imgDesc,
                                         &conv1desc, &filterParams)
With BNNS you need to create a lot of “descriptor” helpers that describe the data you’ll be using as well as the properties of the layer and its weights. Repeat this for all the other layers. You can see why I called this tedious earlier.
The MetalTest class does the same thing but using MPSCNN:
conv1imgDesc = MPSImageDescriptor(channelFormat: channelFormat, width: 256,
                                  height: 256, featureChannels: 16)

let relu = MPSCNNNeuronReLU(device: device, a: 0)

let conv1desc = MPSCNNConvolutionDescriptor(kernelWidth: 5, kernelHeight: 5,
                    inputFeatureChannels: 3, outputFeatureChannels: 16,
                    neuronFilter: relu)

conv1 = MPSCNNConvolution(device: device, convolutionDescriptor: conv1desc,
            kernelWeights: conv1weights, biasTerms: conv1bias, flags: .none)
Here you also create various descriptor objects, but the code is a bit shorter.
You’ve already seen how inference works with BNNS: you call BNNSFilterApply() once for each layer:
if BNNSFilterApply(conv1, imagePointer, &temp1) != 0 {
  print("BNNSFilterApply failed on layer conv1")
}

if BNNSFilterApply(pool1, temp1, &temp2) != 0 {
  print("BNNSFilterApply failed on layer pool1")
}

if BNNSFilterApply(conv2, temp2, &temp1) != 0 {
  print("BNNSFilterApply failed on layer conv2")
}

if BNNSFilterApply(pool2, temp1, &temp2) != 0 {
  print("BNNSFilterApply failed on layer pool2")
}

if BNNSFilterApply(fc3, temp2, &results) != 0 {
  print("BNNSFilterApply failed on layer fc3")
}
Here, imagePointer points at a Swift array of Float values. Likewise, temp1 and temp2 are regular Swift Float arrays. We keep reusing these arrays to store the intermediate results. The final output of the network is written into results, yet another [Float]. Once the network is done, we can immediately read the results from this array and use them elsewhere in our app.
With MPSCNN the process is very similar:
let commandBuffer = commandQueue.makeCommandBuffer()

let conv1img = MPSTemporaryImage(commandBuffer: commandBuffer,
                                 imageDescriptor: conv1imgDesc)
conv1.encode(commandBuffer: commandBuffer, sourceImage: inputImage,
             destinationImage: conv1img)

let pool1img = MPSTemporaryImage(commandBuffer: commandBuffer,
                                 imageDescriptor: pool1imgDesc)
pool1.encode(commandBuffer: commandBuffer, sourceImage: conv1img,
             destinationImage: pool1img)
. . .

fc3.encode(commandBuffer: commandBuffer, sourceImage: pool2img,
           destinationImage: outputImage)

commandBuffer.commit()
You create an MPSTemporaryImage object to hold the results of the current layer, then you tell the layer to encode() itself into the Metal command buffer. These MPSTemporaryImage objects are the equivalents of temp1 and temp2 we used in the BNNS code. MPSCNN manages their storage behind the scenes.
The inputImage and outputImage are the input into the network and the output from the network, respectively, and are therefore stored in permanent MPSImage objects.
Note that the GPU won’t do any work yet until you call commit() on the command buffer. With BNNS, every call to BNNSFilterApply() immediately goes to work. But layer.encode(...) in MPSCNN merely creates the GPU commands, it does not execute them right away. After the call to commit() the GPU starts crunching the numbers and the CPU is free to do more work.
What we really want is for the output of the neural network to be an array of Float values. BNNS already works on regular Swift arrays so we don’t need to do anything special there. But with MPSCNN we need to convert the textures from the output MPSImage object into something we can use from Swift. The app includes some helper code for this in the MPSImage+Floats.swift file.
Note: If you use 16-bit floats with BNNS — and you probably should — then at some point you do need to perform a conversion back to 32-bit floats. In the demo app that happens just before the final layer, not after, since I couldn’t actually get the fully-connected layer to work with 16-bit floats.
What I measured
I wanted to make a fair comparison between the running times of the exact same neural network created in BNNS and MPSCNN.
I did not measure the time it takes to put the input data into the right format. If the input data is images then with MPSCNN you can just load it into a texture and off you go. This doesn’t work for BNNS: you’ll need to rearrange the image data in memory first, which might be costly.
However… this really depends on what you’re using the neural network for, which is why I didn’t want to measure it. But in our speed test it does give a slight advantage to BNNS because getting the input data in the right shape is slower for BNNS.
For the output data, I did measure the time it takes to convert it back into a Swift array. Here, MPSCNN is slower while BNNS has no cost at all (if using 32-bit floats). So this also favors BNNS a little.
This time, however, I think it’s fair to include the conversion in the measurement since converting the network’s output is something that you’ll pretty much always need to do. It’s a downside of using the GPU for general purpose computation work and therefore lowers any performance gains you got from using the GPU.
For a fair test, I wanted to use 16-bit floats for both MPSCNN and BNNS. MPSCNN always stores weights as float16 internally, so to stay impartial we should also let BNNS use 16-bit floats where it can. The downside is that Swift doesn’t have a “half float” type so we always need to convert back-and-forth with “real” 32-bit Floats, even when using BNNS.
Note: In the file ViewController.swift are a few options that let you change what gets tested. In particular, it lets you change the data type of the learned parameters and the data type that the layers use to perform their calculations. There’s also an option for making the network larger, which increases the number of required computations, since the initial network is smallish and not necessarily representative of a real-world deep learning architecture.
The results
Are you ready for it?
On the basic 5-layer convolutional network, using 16-bit floats for everything, BNNS is about 25% faster than MPSCNN on my iPhone 6s.
So that’s a win for the CPU.
However, if we make the network bigger by giving it more channels to process in each layer (change the multiplier value in the app), MPSCNN easily pulls ahead of BNNS.
When using 32-bit floats, MPSCNN is also faster than BNNS. (Probably because MPSCNN always uses 16-bit floats internally but BNNS now has twice the work.)
As a totally handwavy guideline, if a single inference pass through your network does more than 300 million or so floating-point operations, it makes sense to switch to MPSCNN.
I arrived at this number in the following way:
Number of flops per layer = 2 × kernelWidth   × kernelHeight   ×
                                inputChannels × outputChannels ×
                                outputWidth   × outputHeight
And then I added up the flops for each layer and experimented with the size of the network to see at which point MPSCNN became faster than BNNS.
Warning: This was a super unscientific experiment and my calculations could be way off. However, if you do a back-of-the-envelope calculation for your deep network and you find it requires 1 Gflops or more, then it’s immediately clear that BNNS is out of the question.
But note that this depends on a number of factors:
- The device. I only tested on an iPhone 6s. Performance may be different on the slower iPhone 6 or the faster iPhone 7.
- Your data. As I pointed out, MPSCNN can easily load an image into a texture but for BNNS you need to completely rearrange the pixel data first. The amount of preprocessing you need to do will have an impact on performance.
- Likewise, any data conversions on the network’s output so that you can use it in Swift may slow down your predictions.
- Memory bandwidth. In my VGGNet implementation the learned parameters take up about 260MB of RAM. For each prediction, the neural network not only has to do a ton of calculations but it also needs to access millions of memory locations. At some point you’re going to run into a bandwidth bottleneck.
I tried to make the test as fair as possible, but it’s not perfect due to bugs and other weird behavior in both frameworks.
For instance, the BNNS fully-connected layer did not want to accept 16-bit floats so I had to convert the data back to 32-bit floats first. Since a fully-connected layer does quite a lot of computations, BNNS might have been faster had it supported these half-precision floats. Some of the MPSCNN layers had their own oddities (see the source code for details).
Note: I did not test batching. Both APIs have the ability to process more than one input image at a time. This simply increases the amount of data you send through the network at once. However, the GPU may have an advantage here as batching may make more optimal use of GPU bandwidth.
Conclusion
Which API should you use? It depends™.
Both APIs are somewhat limited and still have a few rough edges.
BNNS is faster for smaller networks but slower for bigger networks. BNNS also has fewer features and you’ll have to write more code of your own. Overall the BNNS API feels a bit more unwieldy than MPSCNN, probably because it is a C API that got imported into Swift.
However, BNNS has one advantage over MPSCNN: it also runs on macOS.
Tip: use 16-bit floats. Even though 16-bit floats are not a native type for Swift, they allow BNNS to perform much better, even if it means you have to convert your regular arrays to 16-bit floats and back again.
Personally, I’ll probably stick with MPSCNN. It’s more flexible and you can combine it with the fast matrix multiplication routines from Metal Performance Shaders and your own compute kernels.
What matters in the end is how fast your app works — and how good the predictions are.
If you’re on a deadline and need to hurry, go for MPSCNN. But if you can spare the time, it’s probably worth implementing your neural network with both APIs and see which one you can tune for optimum speed.
First published on Tuesday, 7 February 2017.
If you liked this post, say hi on Twitter @mhollemans or LinkedIn.
Find the source code on my GitHub.
 New e-book: Code Your Own Synth Plug-Ins With C++ and JUCE
Interested in how computers make sound? Learn the fundamentals of audio programming by building a fully-featured software synthesizer plug-in, with every step explained in detail. Not too much math, lots of in-depth information! Get the book at Leanpub.com