
2020 is the year where machine learning on mobile is no longer the hot new thing. Adding some kind of intelligence to apps has become standard practice.
Fortunately, that doesn’t mean Apple has stopped innovating. 😅

In this blog post, I’ll summarize what’s new in Core ML and the other AI and ML technologies from the Apple ecosystem.
Core ML
Last year was a big update for Core ML, but this year the improvements are much more modest: a few new layer types, support for encrypting models, and the ability to host model updates on CloudKit.
It looks like the version number got dropped. Last year’s update was called Core ML 3, but now the name is simply Core ML without a number. However, coremltools did get bumped to version 4.
Note: The internal mlmodel specification version number is now 5, so new models will show up as “Core ML v5” in Netron.
New layer types in Core ML
The new layers are:
Convolution3DLayer,Pooling3DLayer,GlobalPooling3DLayer: these are especially useful for processing video data, something you can now do with the Vision framework. (Core ML still has no explicit support for 1D convolutions, although you can use the regular 2D convolution layer for that.)OneHotLayer: for one-hot encoding the input.ClampedReLULayer: a ReLU activation that has a maximum value (useful for making ReLU6).ArgSortLayer: for sorting the input tensor. This returns the sorted indices instead of the actual sorted values. There is no regular sorting layer, but you could use aGatherLayerto reorder the elements from the argsort output.CumSumLayer: computes the cumulative sum of the input tensor.SliceBySizeLayer: Core ML already had several types of slicing layers. This one lets you pass in a tensor containing the index to start slicing from; the size of the slice is always fixed.
These layer types can only be used with specification version 5 or greater, which means iOS 14 and macOS 11.0 or higher.
Another useful improvement is 8-bit quantized operations for the following layers:
InnerProductLayerBatchedMatMulLayer
In previous versions of Core ML you could quantize the weights, but they would be dequantized back to floating point when the model got loaded. With the new int8DynamicQuantize feature, the weights stay 8-bit integer values and the actual computations are performed using integers as well.
Computations with INT8 have the potential to be much faster than floating point operations, but I wonder if that is only an advantage for the CPU and not the GPU, since GPUs really like floating point. Perhaps the upcoming Neural Engine update will support INT8 operations natively. (Apple did buy Xnor.ai a while back…)
Core ML on the CPU can now also use 16-bit floating point operations instead of 32-bit floats (on A11 Bionic and up). As mentioned in the Explore numerical computing in Swift video, Float16 is now a first-class Swift data type. With 16-bit floats supported natively on the CPU, Core ML can be more than twice as fast!
Note: Core ML already used Float16 on the GPU and Neural Engine, so this only makes a difference when using the CPU.
Other (small) changes:
UpsampleLayercan now have a fractional scaling factor. InBILINEARmode, there are new options for how the grid points are sampled (“align corners”). This should solve most of the issues I pointed out in this blog post.ReorganizeDataLayerParamshas aPIXEL_SHUFFLEmode. This is another method for doing upsampling. Previously you could implement pixel shuffle using several permute and reshape layers but it’s cool to have it built-in now.SliceStaticLayerandSliceDynamicLayernow have asqueezeMasksproperty for even more slicing fun.TileLayeraccepts a second input tensor, so that you can specify the number of repetitions dynamically.
There appear to be no changes to on-device training: still only fully-connected and convolution layers are supported. The MLParameterKey class in CoreML.framework now has a configuration option for the RMSprop optimizer but this is currently not listed in NeuralNetwork.proto. It might be added in a later beta.
The following new model types were added:
VisionFeaturePrint.Object, a feature extractor that is optimized for doing object detection.SerializedModel. Not sure what this is for. This is a “private” definition that is “subject to change with no notice or support”. Maybe this is a way for Apple to embed proprietary model formats inside an mlmodel?
Hosting model updates on CloudKit

This new Core ML feature lets you update your models independently of the app.
Instead of having to publish an app update, the existing app can simply download a new version of the mlmodel file. To be fair, this is not a new idea and several third-party vendors have SDKs for this. It’s also not that hard to build this yourself. The advantage of using Apple’s solution is that the models get hosted on Apple Cloud.
Because you may have more than one model in your app, the new concept of model collections lets you bundle multiple models together and the app will update all of them at once. You create these collections on the CloudKit dashboard.
In the app, you use the MLModelCollection class to download and manage the model updates. The WWDC video shows code snippets for this.
To prepare a Core ML model for deployment, there is now a Create Model Archive button in Xcode. This writes a .mlarchive file. You can upload this version of the model to your CloudKit dashboard and then put it into a model collection. (It looks like mlarchive is really just a zip file with the contents of your mlmodelc folder.)
A nice feature is that you can deploy different model collections to different users. For example, the camera on the iPhone is different than the camera on the iPad, so you may want to create two versions of a model and send one to iPhone users of the app and the other to iPad users.
You can create targeting rules for the device class (iPhone / iPad / TV / Watch), operating system and version, region code, language code, and app version.
There appears to be no mechanism for dividing your users into groups by other criteria, such as for A/B testing model updates, or for targeting specific device types such as “iPhone X or lower”. However, you can still do this manually by creating collections with different names and then explicitly asking MLModelCollection to fetch the appropriate collection by name at runtime.
Deploying a new model version isn’t always immediate. The app will at some point detect that a new model is available, and will automatically download it and place it in the app’s sandbox. But you don’t get any control over when or how this happens — Core ML might perform the download in the background while the phone is not being used, for example.
Because of this, it’s a good idea to already ship your app with a built-in model as a fallback option, such as a generic model that handles both iPhone and iPad.
Even though this is a convenient solution and you don’t have to worry about hosting the models yourself, do keep in mind that your app is now using CloudKit. From what I understood, the model collections do count towards your storage quotas and downloading the models counts towards your network traffic quotas.
See also:
- Use model deployment and security with Core ML (WWDC video)
- Creating and Deploying a Model Collection
- Retrieving a Model Collection from a Deployment
Note: If you want to do on-device personalization of the model, there’s no easy way to combine that with this new CloudKit update feature. There is no straightforward way to transfer what the personalized model has learned into the new model, or to combine these models somehow.
Model encryption
Until now, it was really easy for someone to steal your Core ML model and stick it into their own app. As of iOS 14 / macOS 11.0, Core ML can automatically encrypt and decrypt models so that strangers can no longer peek inside your mlmodelc folders. You can use encryption with or without the new CloudKit deployment.
Xcode encrypts the compiled model, mlmodelc, not the original mlmodel file. The model always stays in encrypted form on the user’s device. Only when the app instantiates the model, Core ML automatically decrypts it. This decrypted version only exists in memory, it is not stored as a file anywhere.
First, you need an encryption key. The good news is that you don’t need to manage this key yourself! There is now a Create Encryption Key button in Xcode’s Core ML model viewer. When you click this, Xcode generates a new encryption key that is associated with your Apple developer team account. No need to mess around with CSRs and Keychain Access for this one. 🤪
This process creates a new .mlmodelkey file. This key is stored on Apple’s servers but you also get a local copy that you need for encrypting the models in Xcode. You don’t need to embed this encryption key in your app — and shouldn’t!
To encrypt a Core ML model, you can add --encrypt YourModel.mlmodelkey to the compiler flags for the model, or, if you’re going to use CloudKit deployment, you need to supply the encryption key when creating the model archive.
To decrypt the model when the app instantiates it, Core ML will need to fetch the encryption key over the network from Apple’s servers, so that obviously requires a network connection. Core ML only needs to do this the very first time you’re using that model.
Naturally, if the network is down and the encryption key hasn’t been downloaded yet, your app won’t be able to instantiate the Core ML model. For this reason, you should use the new YourModel.load() function. This has a completion handler that lets you respond to loading errors. For example, the modelKeyFetch error code tells you that Core ML was unable to load the decryption key from Apple’s servers.
Pretty cool feature — if you’re worried that people will steal your proprietary tech — and fairly easy to implement in your app.
See also:
- Use model deployment and security with Core ML (WWDC video)
- Generating a Model Encryption Key
- Encrypting a Model in Your App
Note: According to this forum post, encrypted models cannot be used with on-device personalization. Makes sense.
CoreML.framework
The iOS API for using Core ML models hasn’t changed much. Still, there are a few interesting things to point out.
The only new class is MLModelCollection, which is for CloudKit deployment.
As you know, when you add an mlmodel file to your project, Xcode automatically generates a Swift or Objective-C source file with classes that make it easier to use the model. There are a couple of changes in these generated classes:
The default
init()is now deprecated, so writinglet model = YourModel()will result in a compiler warning. Instead, useYourModel(configuration:)or the newYourModel.load()method, which lets you handle model loading errors such as when an encrypted model cannot be decrypted.If your model works on images, instead of having to deal with
CVPixelBufferobjects, you can now create aYourModelInputobject using aCGImageor the URL to a local PNG or JPG file, and do the prediction on that. However, this doesn’t let you set thecropAndScalemethod or thecropRect, so if you want more control over how the images are resized, these new methods aren’t very useful.
A new warning has appeared in the MLModel docs:
Use an MLModel instance on one thread or one dispatch queue at a time. You do this by either serializing method calls to the model, or by creating a separate model instance for each thread and dispatch queue.
Whoops, I’m guilty of doing this. 🙈 I was led to believe that MLModel internally used a serial queue for handling requests — but this may not have been true, or perhaps it has changed. Anyway, best to follow the advice from now on.
MLMultiArray has a new init(concatenating:axis:dataType:) initializer, which makes a new multi-array by concatenating several existing multi-arrays. These must all have the same shape except for the specified axis, along which they’ll be concatenated. It looks like this was added specifically for doing predictions on videos, as with the new Action Classifier models from Create ML. Handy!
Note: The MLMultiArrayDataType enum now has static .float and .float64 properties. Not sure what these are for, as it already had .float32 and .double cases. Beta glitch?
Xcode model viewer
Xcode now shows a lot more information about models, such as the class labels and any custom metadata that you added to the model. It also shows statistics about the types of layers inside the model.
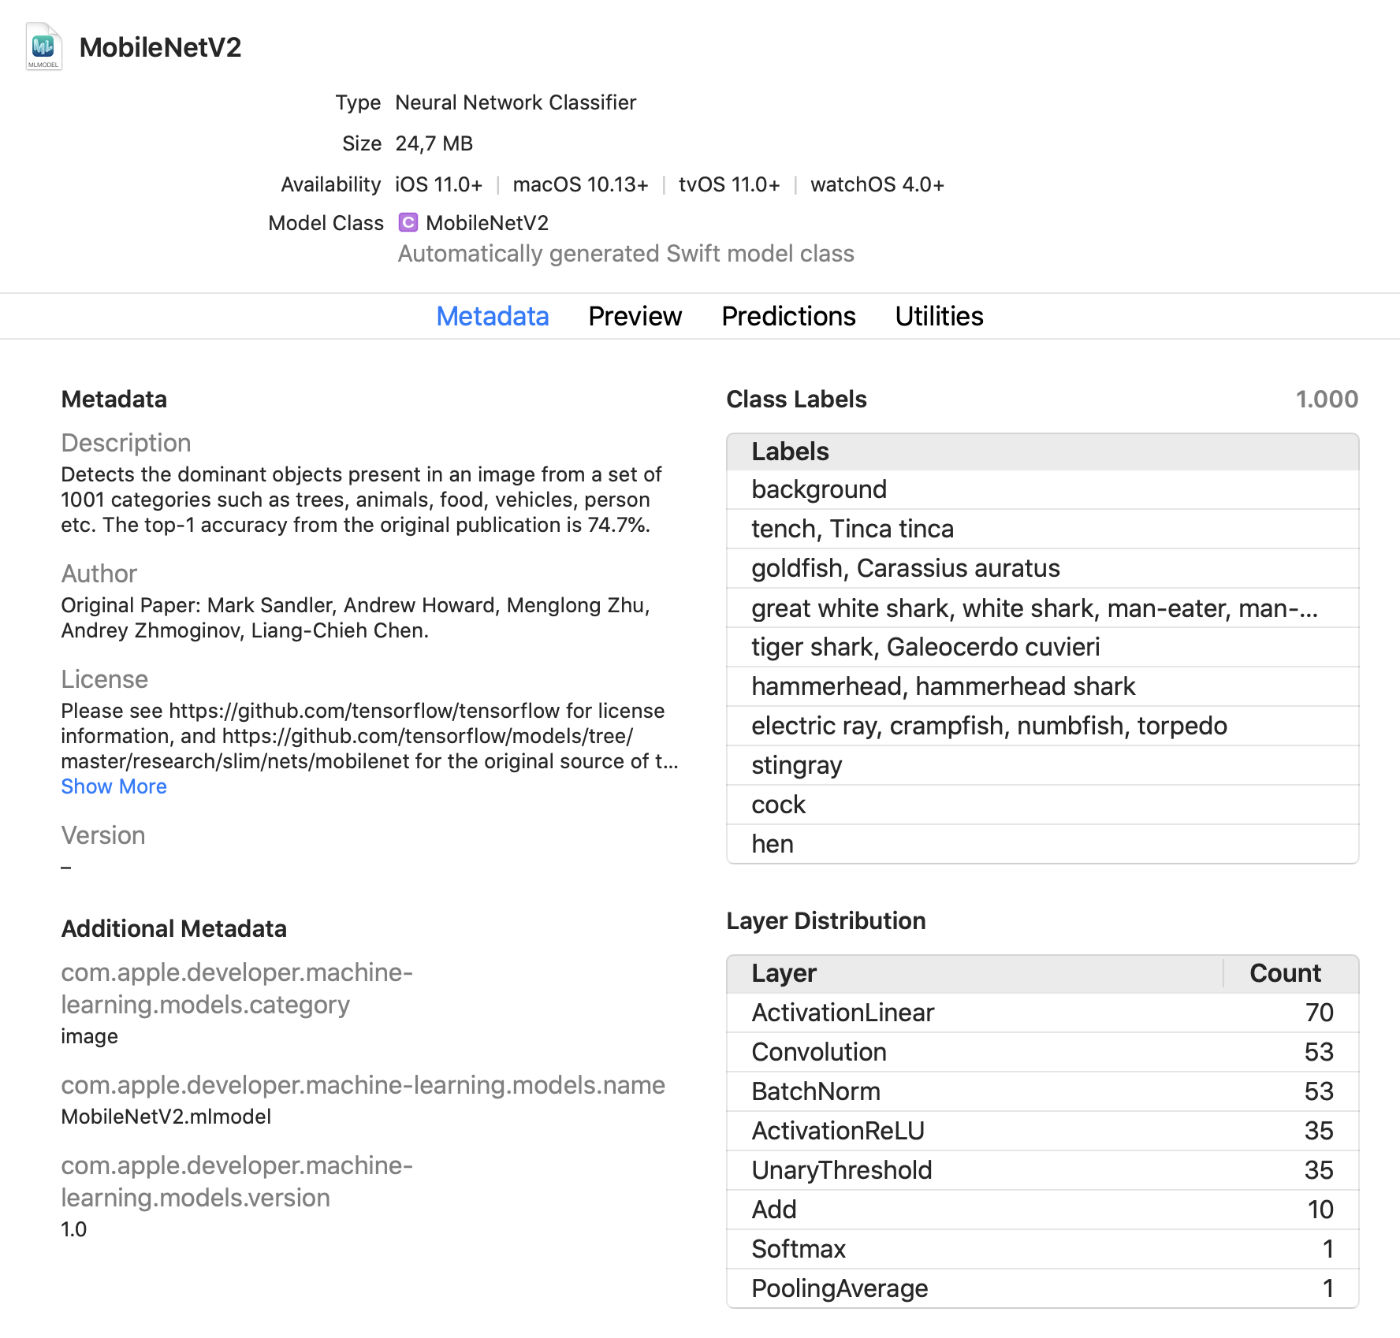
There is a handy interactive preview that lets you play with the model without having to run the app. You can drag-and-drop images, videos, or text into this preview window and immediately view the model’s predictions. Very nice!
You can also use Core ML models in playgrounds now. Xcode will auto-generate the class for it and you can use it as usual. That’s another way you can interactively play with the model before putting it into the app.
coremltools 4
Building your own models with Create ML is fun for simple projects, but it’s much more common to train in TensorFlow or PyTorch. To use such a model with Core ML, you need to convert it to the mlmodel file format first. That’s what coremltools is for.
Good news: the documentation is greatly improved. You should check it out. Let’s hope they keep this user guide up-to-date because the old documentation wasn’t always the latest version.
Note: Unfortunately, the Jupyter notebook examples have disappeared. These examples are now part of the user’s guide, but no longer as notebooks.
The way to convert models has changed quite a bit. The old neural network converters are pretty much deprecated and have been replaced by a newer, more flexible design.
There are now three types of converters:
- Modern converters for TensorFlow (both 1.x and 2.x), tf.keras, and PyTorch. All of these converters are built on the same stack and use something called MIL or Model Intermediate Language. You no longer need to use tfcoreml or onnx-coreml for these kinds of models.
- Old converters for Keras 1.x, Caffe, and ONNX neural networks. These all have their own special-purpose converter. These will not be developed further and will only get bug fixes. It’s not recommended to use ONNX to convert PyTorch models anymore!
- Converters for non neural-network models such as scikit-learn and XGBoost.
To convert a TensorFlow 1.x or 2.x, PyTorch, or tf.keras model, you use the new unified conversion API. It looks like this:
import coremltools as ct

class_labels = [ "cat", "dog" ]

image_input = ct.ImageType(shape=(1, 224, 224, 3),
                           bias=[-1, -1, -1],
                           scale=2/255.)

model = ct.convert(
    keras_model,
    inputs=[ image_input ],
    classifier_config=ct.ClassifierConfig(class_labels)
)

model.save("YourModel.mlmodel")
The ct.convert() function inspects the model file to see what format it is and automatically chooses the appropriate converter. The arguments are somewhat different than before: the preprocessing arguments are passed in using an ImageType object, classifier labels using a ClassifierConfig object, and so on.
This new conversion API converts the model into an intermediate representation called MIL. There are currently converters for TensorFlow 1.x to MIL, TensorFlow 2.x to MIL — including tf.keras — and PyTorch to MIL. If at some point a new deep learning framework becomes popular, it can get its own MIL converter.
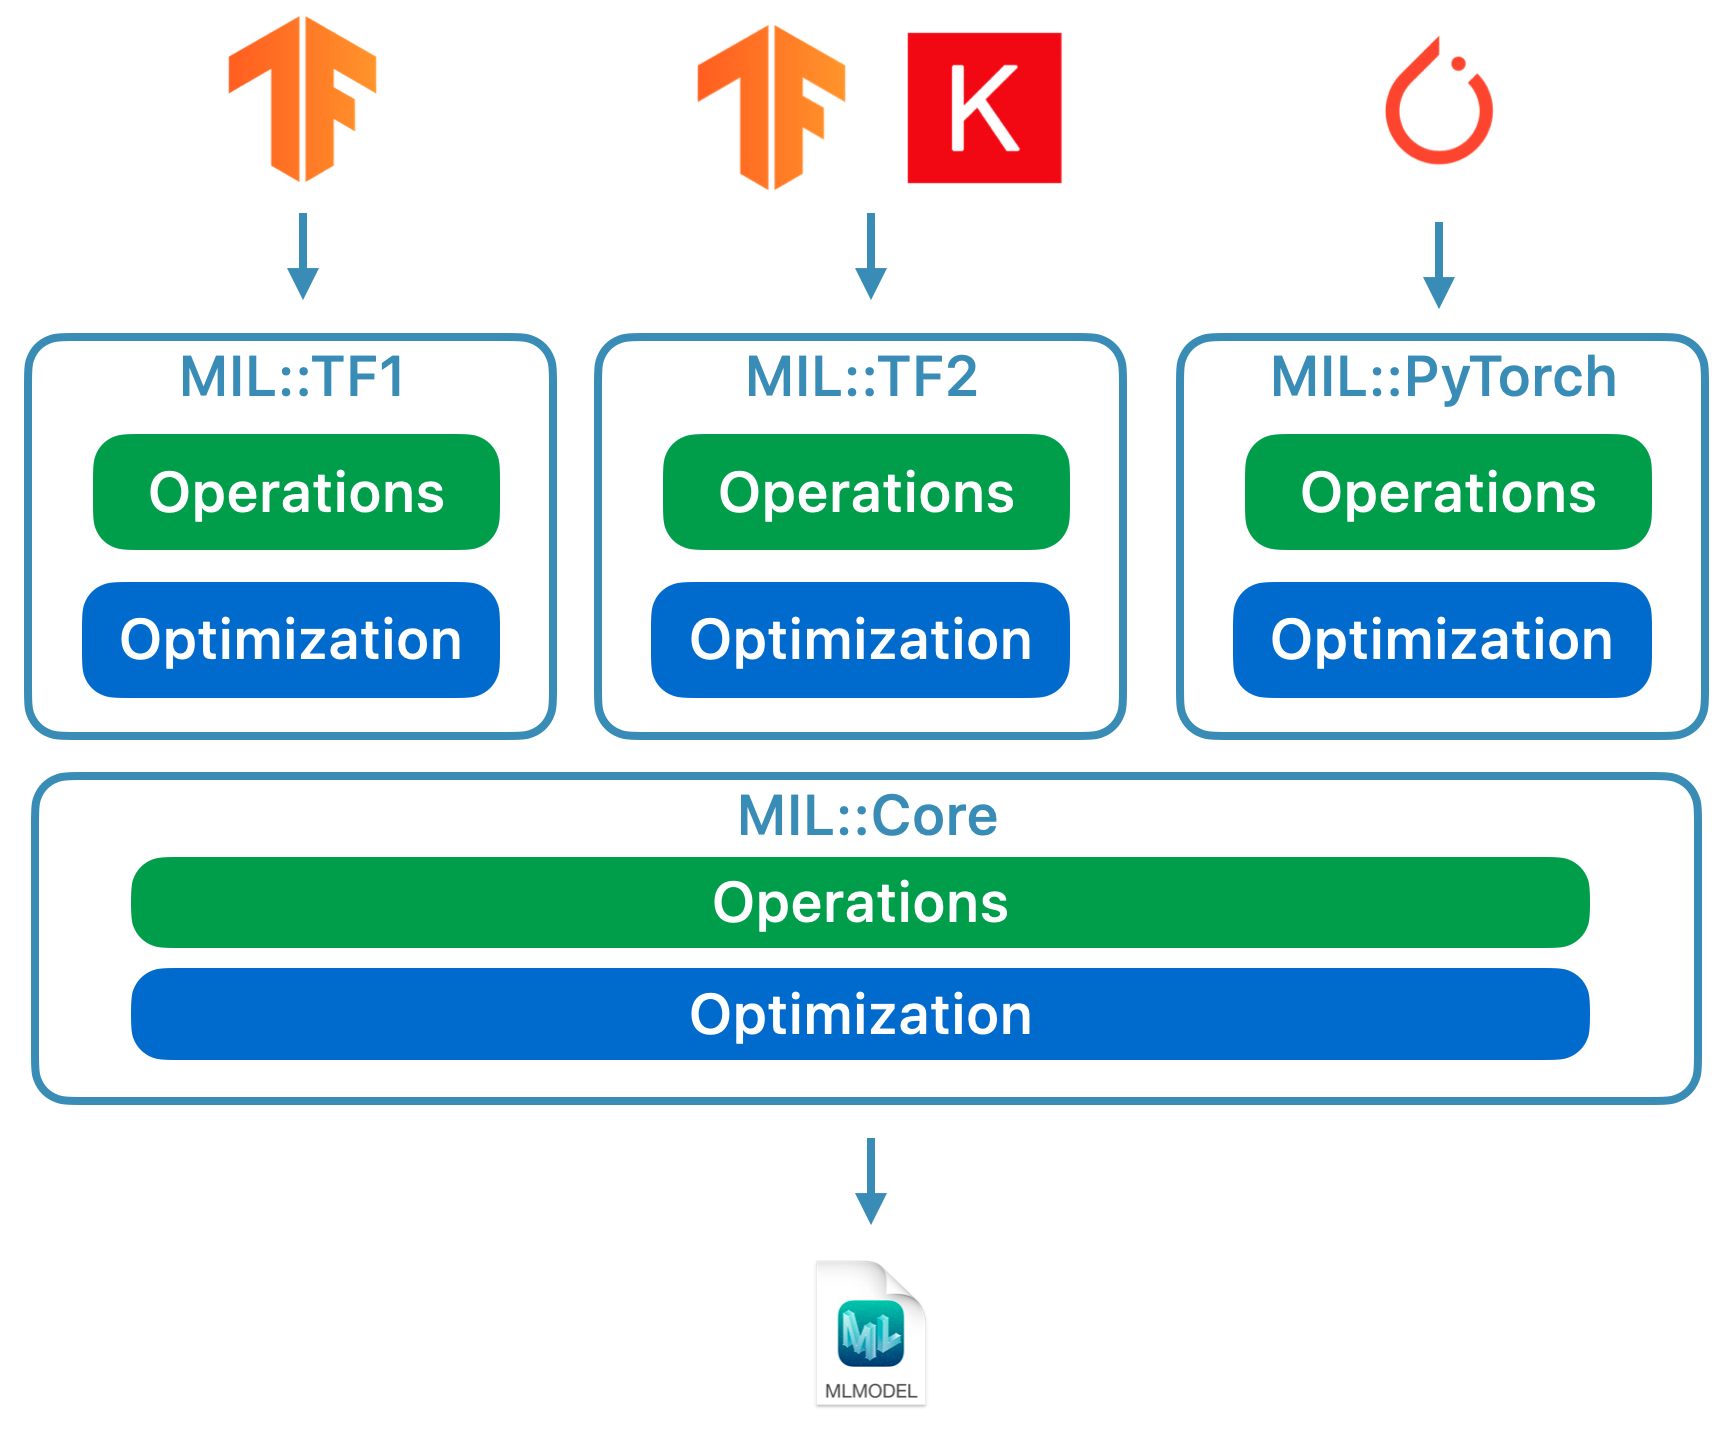
Once the model is in MIL format, it can be optimized according to general rules, such as stripping out unnecessary operations or fusing different layers together. Finally, it is converted from MIL to the mlmodel format.
I haven’t looked at it in detail yet, but this new approach makes me believe that coremltools 4 produces much more efficient mlmodel files than before, especially for TF 2.x graphs.
What I like about MIL is that it allows you to tell the converter how to deal with layers that it doesn’t understand yet. If your model has a layer that is not directly supported by Core ML, you might be able to split it up into more primitive MIL operations, such as matrix multiplications or other arithmetic.
The converter can then use this so-called “composite operation” whenever it encounters a layer of that type. That’s way easier than implementing unsupported operations with a custom layer, although that’s still possible. The documentation has a nice example of how to use such composite operations.
See also:
Other Apple frameworks that use ML
There are several high-level frameworks in the iOS and macOS SDKs that perform machine learning-related tasks. Let’s quicky look at what’s new here.
Vision
The Vision framework for computer vision got a bunch of new functionality.
Vision already had detection models for faces, face landmarks and human bodies. This new release adds the following:
- Hand pose detection (
VNDetectHumanHandPoseRequest) - Multi-person full body pose detection (
VNDetectHumanBodyPoseRequest)
It’s actually really cool of Apple to include pose estimation in the OS. There are several open source models for this but they aren’t really that great, or are slow, while commercial solutions are expensive. Now you get high-quality body pose detection for free!
Rather than just looking at static images, there is now also more emphasis on detecting things in video, both offline and from the camera in real-time. For convenience, you can use CMSampleBuffer objects straight from the camera with your request handlers.
New is VNStatefulRequest, a subclass of VNImageBasedRequest that builds up evidence over time of having detected the thing you’re looking for. Unlike a typical VNImageBasedRequest, you re-use a stateful request over multiple frames. It performs an analysis operation every N frames of the video.
Once the thing you’re looking for has been observed, the completion handler is called with a VNObservation object, which now has a timeRange property that tells you when the observation started and stopped in the video.
You don’t use VNStatefulRequest directly — it’s an abstract base class that is currently only subclassed by VNDetectTrajectoriesRequest for doing trajectory detection. This can detect shapes moving along a parabolic path, like a ball being kicked or thrown. (This appears to be the only built-in video task right now.)
To perform offline analysis of videos, you can use VNVideoProcessor. This object takes a URL to a local movie file and performs one or more Vision requests every N frames or seconds.
An important traditional computer vision technique for analyzing video is optical flow. Vision now has VNGenerateOpticalFlowRequest that computes the direction each pixel is moving from one frame to the next (dense optical flow). The output is a VNPixelBufferObservation containing a new image that has two 32-bit or 16-bit floats for each pixel.
Also new is VNDetectContoursRequest, for detecting the outlines of objects in an image. These outlines are returned as vector paths. VNGeometryUtils has helper functions for post-processing on the detected contours, such as simplifying them to basic geometric shapes.
The final new thing in Vision is a new variant of the built-in feature extractor, VisionFeaturePrint. iOS already came with VisionFeaturePrint.Scene, which is useful for making image classifiers. There is now a new VisionFeaturePrint.Object model that is optimized for extracting features that are useful for object detection.
It works on a 299×299 input image and outputs two multi-arrays of shape (288, 35, 35) and (768, 17, 17), respectively. These are not bounding box predictions yet, only “raw” features. A full object detector still needs to add logic to turn these features into bounding boxes and class labels. Create ML does that when you train an object detector using transfer learning.
See also:
- Explore Computer Vision APIs (WWDC video)
- Detect Body and Hand Pose with Vision (WWDC video)
- Explore the Action & Vision app (WWDC video)
Natural Language Processing
For NLP tasks, you can use the Natural Language framework. It works closely together with models trained in Create ML.
Only a few new features this year:
NLTaggerandNLModelcan now find multiple tags and predict their confidences. Previously, all you got was the highest scoring tag.Sentence embeddings. It was already possible to use word embeddings but now
NLEmbeddingalso supports sentences.
Sentence embeddings use a built-in neural network to encode the entire sentence into a 512-dimensional vector, in order to capture the context in which the words appear in the sentence (something that word embeddings by themselves can’t do).
See also:
- Make apps smarter with Natural Language (WWDC video)
Speech & SoundAnalysis
There do not appear to be any changes to these frameworks.
Training models
We’ve been able to train models with Apple APIs since iOS 11.3 and the Metal Performance Shaders framework. Over the years new training APIs have been added, and this year we get a few more — by my count, we now have 7 different APIs for training neural networks on iOS and/or macOS!
Currently, these are the Apple APIs you can use for training machine learning models, in particular neural networks, on iOS and macOS:
On-device training with Core ML.
Create ML: you may know this as an app but it’s also a framework that’s available on macOS.
Metal Performance Shaders: for inference and training on the GPU. This is actually two different APIs and they’re not particularly easy to use if you’re not familiar with Metal. There is now also a new “Metal Performance Shaders Graph” framework that appears to be a replacement for these older APIs.
BNNS: part of the Accelerate framework. Previously, BNNS only had routines for doing inference but this year it has added support for training.
ML compute: a brand-new framework that looks very exciting.
Turi Create: basically the Python version of Create ML. It doesn’t look like it got a lot of love recently, although it still appears to be maintained.
Let’s look at what’s new with these APIs in more detail.
On-device training with Core ML
Nothing much seems to have changed here. It’s possible more layer types have been made updatable, but I haven’t seen any documentation of this.
One new addition that might still be coming in a later beta is the RMSprop optimizer, but it’s not part of the current beta yet.
Create ML
Create ML started out as a framework that can only be used on macOS. You can use this from a Swift Playground to train your models with just a few lines of code.
Last year, Create ML was turned into a rather limited app and I’m happy to see that the app is much improved this year. It’s also still a framework so you can still use it from code. The app is really just a convenient GUI around the framework.
In the previous version of the Create ML app you could only train a model once. If you wanted to tweak something, you had to train again from scratch, which could take a long time.
With the new version from Xcode 12, you can pause training and resume later, save model checkpoints (snapshots), and preview how well the model is doing. You get much more control over the training process. This update makes the Create ML app actually useful!
In CreateML.framework there are also new APIs for setting up training sessions, handling model checkpoints, and so on. I expect most people will simply use the Create ML app, but it’s nice to see that this functionality is publicly exposed in the framework as well.
New things you can do with Create ML (both framework and app):
Style transfer on images and videos
Action classification on humans in videos
Transfer learning for object detection
Word tagging transfer learning with dynamic word embeddings
Let’s take a closer look at the new action classification model. This uses the human body pose model from Vision. The action classifier is a neural network that takes an input of shape (window_size, 3, 18) where the first dimension is the window size in number of frames (typically two seconds’ worth of video), and (3, 18) are the pose keypoints.
The neural network does not use recurrent layers but 1-dimensional convolutions. It appears to be a variation of STGCN or Spatio-Temporal Graph Convolutional Networks, a type of model that’s designed for time series predictions. You don’t need to worry about those details in order to use these models in your app, but I always like to peek under the hood. 🙃
For object detection models you can choose between training a full network based on TinyYOLOv2, or the new transfer learning mode, which uses the new feature extractor VisionFeaturePrint.Object. The rest of the model still looks like YOLO and SSD, but thanks to transfer learning it should be much faster to train than the full YOLO-based model.
See also:
- Build an Action Classifier with Create ML (WWDC video)
- Build Image and Video Style Transfer models in Create ML (WWDC video)
- Control training in Create ML with Swift (WWDC video)
Metal Performance Shaders
Metal Performance Shaders (MPS) is a framework with handy Metal compute kernels, mostly for image processing but it has had support for neural networks since 2016. I have written extensively about it here on this blog.
These days, most people would use Core ML instead of MPS. Of course, Core ML still uses MPS under the hood when running the model on the GPU. But you can also use MPS directly, especially if you want to do your own training. (However, there is now a new ML Compute framework that you should probably use instead, see below.)
This year there is not much new stuff in MPSCNN, just some refinements.
New classes are MPSImageCanny for edge detection and MPSImageEDLines for line segment detection. Very useful for computer vision tasks.
Other notable changes:
MPSCNNConvolutionDataSourcehas a newkernelWeightsDataTypeproperty, so that the data type of the weights does not have to be the same as the data type the convolution is performed with. Interestingly, the weights cannot be INT8, even though Core ML does allow this for certain layers now.If you return
.float32fromkernelWeightsDataType, convolution and fully-connected layers will run using 32-bit floats rather than 16-bit floats. Before, they could only work in 16-bit.Loss functions can now
reduceAcrossBatch.
Using MPSCNN is still fine if Metal doesn’t scare you off, but there is now a new framework that makes it easier to create and run such graphs: MPS Graph.
Note: The WWDC video also says MPSNDArray is new, but this API was introduced last year already. This is a more flexible data structure than MPSImage because not all tensors in your model will necessarily be images.
New: Metal Performance Shaders Graph
MPS has had the MPSNNGraph API for a while now, but those graphs are limited to describing neural networks. However, not all graphs need to be neural networks and that’s where Metal Performance Shaders Graph comes in.
You can use this new framework to build general-purpose graphs of GPU compute operations. MPS Graph is separate from the regular Metal Performance Shaders framework, but does sit on top of it.
One limitation of the old MPSNNGraph API is that you couldn’t put your own custom operations into the graph, but this new Graph framework is more flexible. Although it appears that you can’t actually add your own Metal compute kernels — you must express all your computations using existing primitives.
Fortunately, the MPSGraph compiler can fuse these primitives into one single compute kernel, to make it run as efficiently as possible on the GPU. However, if you have an operation that is impossible or really awkward to implement using the provided primitives, this isn’t going to work. I don’t really understand why Apple always leaves out the ability to do completely custom stuff when they introduce a new API such as this?! Oh well.
The new MPSGraph is a fairly lightweight structure that describes how a bunch of MPSGraphOperations relate to each other through MPSGraphTensors, which contain the results of the operation. You can also define control dependencies, to force certain nodes to run before others. Once you’ve set up the graph, you run it or encode it into a command buffer, then wait for the results.
MPSGraph has a whole bunch of instance methods to add all kinds of mathematical and neural network operations to the graph.
It can also do training, which consists of adding a loss operation to the graph, followed by “gradient” operations for all the layers in reverse order, just like with the old MPSNNGraph. For convenience, an automatic differentiation mode is also provided, so that MPSGraph can automatically put the gradient operations into the graph, which saves a lot of work.
I like that they’ve created a new, clean, API for building these compute graphs. It’s definitely easier to use than the old graph API — you no longer need to be an expert in Metal. It reminds me a lot of TensorFlow 1.x graphs, with the added benefit that the graph gets aggressively optimized to avoid as much overhead as possible. Still, it’s too bad that you can’t insert arbitrary compute kernels into the graph.
See also:
- Build customized ML models with the Metal Performance Shaders Graph (WWDC video)
- Adding Custom Functions to a Shader Graph
BNNS (Basic Neural Network Subroutines)
When Core ML runs on the CPU, it uses BNNS, which is part of the Accelerate framework. I’ve written about BNNS in this old blog post. Those BNNS functions are now mostly deprecated and are replaced by a whole new set of functionality.
Previously, there was only support for fully-connected layers, convolution, pooling, and activation functions. With this update, BNNS gets support for n-dimensional arrays, pretty much all the layer types from Core ML, as well as backwards versions of these layers for training — including layers that currently aren’t trainable by Core ML, such LSTM.
Also notable is the presence of a multihead attention layer, which are very common in Transformer models such as BERT. Oh, and tensor contractions, also interesting.
You probably wouldn’t use these BNNS functions yourself, just like you wouldn’t use MPS for training on the GPU. Instead, there is now a higher-level framework, ML Compute, that abstracts away the processor that’s being used. ML Compute uses BNNS and MPS under the hood, but at least you, the developer, don’t need to worry about such details.
See also: BNNS framework documentation
New: ML Compute
ML Compute is a new framework for training neural networks on the CPU or on your GPUs (but not the Neural Engine, apparently). On a Mac Pro with multiple GPUs, it can automatically use all of them for training.
I was a bit surprised to get yet another training framework, but this one will actually make things easier, as it hides away the low-level stuff from BNNS and MPS — and maybe in the future the Neural Engine. 😉
What’s interesting about ML Compute is that it also works on iOS, not just on the Mac. Curiously, there is no mention of Core ML in all of this — ML Compute seems to be a completely separate thing. You can’t use it to create Core ML models.
From what I can tell, the goal of ML Compute is mostly to accelerate third-party deep learning tools. You’re not really expected to write code to use ML Compute directly — I think the assumption (hope?) is that tools such as TensorFlow will start using this to also make hardware-accelerated training possible on the Mac.
The available layers seem to be the same as in BNNS. You put the layers inside a graph and then execute the graph. (No “eager mode” here.)
To create a graph, you instantiate an MLCGraph object and add nodes to it. The node is an MLCLayer subclass and it is connected to other nodes through MLCTensor objects, which are the outputs from other layers.
Interestingly, split, concatenate, reshape, and transpose operations are not separate layer types but are operations on the graph itself.
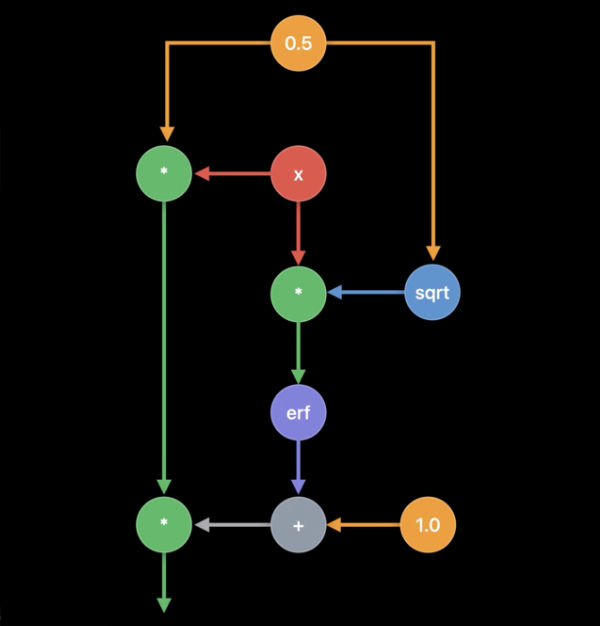
A cool feature for debugging is summarizedDOTDescription which returns a DOT description of the graph that you can then plot with a program such as Graphviz or OmniGraffle. (This is also how Keras generates its model plots.)
ML Compute makes a distinction between an inference graph and a training graph. The latter has additional nodes, such as a loss layer and an optimizer.
There does not seem to be a way to create your own custom layers, so you’re stuck with the layer types that ML Compute offers.
Strangely enough, there was no WWDC session on this new framework and the documentation is very sparse. Anyway, I’m keeping my eye on this one as it seems to be the API to use for training on Apple devices.
See also: ML Compute framework documentation
Conclusion
Core ML got some useful new features such as automatic model updates and encryption. There really isn’t much need for lots of new layer types, as the layers that were added last year basically cover everything. I’m happy enough with this update.
coremltools 4 is a big update with a new converter architecture and native support for TensorFlow 2 and PyTorch. I’m glad that we no longer have to go through ONNX to convert PyTorch models!
Vision got a bunch of cool new stuff. I like that Apple is including functionality for analyzing videos. While it’s possible to run ML on each video frame individually, doing so ignores the temporal dimension. Since mobile devices are now fast enough to perform real-time ML on video data, I expect to see video take a more prominent role in computer vision research in the near future.
About training… I’m not sure why we need 7 different APIs for this. I guess Apple doesn’t want to deprecate the old ones until the new APIs have all their kinks worked out. Not much is known yet about ML Compute — but we’re only just at beta 1 as I write this, so who knows… 😆
First published on Monday, 29 June 2020.
If you liked this post, say hi on Twitter @mhollemans or LinkedIn.
Find the source code on my GitHub.
 New e-book: Code Your Own Synth Plug-Ins With C++ and JUCE
Interested in how computers make sound? Learn the fundamentals of audio programming by building a fully-featured software synthesizer plug-in, with every step explained in detail. Not too much math, lots of in-depth information! Get the book at Leanpub.com