

Resizing feature maps is a common operation in many neural networks, especially those that perform some kind of image segmentation task.
One issue I ran into recently while converting a neural network to Core ML, is that the original PyTorch model gave different results for its bilinear upsampling than Core ML, and I wanted to understand why.
When converting models between deep learning frameworks, it’s common to find small differences between the original model and the converted one, as layers aren’t necessarily implemented in exactly the same way in every framework.
This is not always a problem. Most of the time, even if the results of upsampling are off by a few pixels, the model will still work correctly.
However, such differences do make it tricky to verify that the conversion was 100% successful, which is especially important if you have to do post-processing on the model’s predictions afterwards and you want to make sure the output is correct by comparing it to the original model.
So I wanted to find out what exactly was going on…
Tip: At the end of this post there is a handy cheatsheet that lets you look up which Core ML layer to use with your TensorFlow / Keras / PyTorch models.
Core ML has multiple ways to resize data
There are several ways to do upsampling in Core ML:
UpsamplelayerResizeBilinearlayerCropResizelayer- deconvolution
- “Pixel Shuffle”
- using a custom layer
Upsample and ResizeBilinear appear to do roughly the same thing, but there are some differences:
Upsamplehas nearest neighbor and bilinear modes, whileResizeBilinearcan only do bilinear (the name kind of gives it away).Upsampletakes an integer scaling factor (2×, 3×, etc). It can only do upscaling, not downscaling.ResizeBilineartakes a target width and height. This may be smaller than the input, so you can also use it to resize the feature maps down.- The
CropResizelayer is likeResizeBilinearbut also lets you crop out one or more rectangles (ROIs). I’m not going to talk about it in this blog post; this layer works the same way asResizeBilinearwhen it comes to resizing.
The biggest difference between these layers and an API such as Core Image’s CILanczosScaleTransform or Accelerate’s vImageScale, is that they work on feature maps that may have many more channels than the 3 or 4 channels in a regular RGBA image. Other than that, they do pretty much the same thing.
This blog post is mostly about upsampling, but convolutional neural networks also have various ways to downsample feature maps. This is typically done using a conv layer with stride 2 or using pooling layers. And of course, ResizeBilinear can also scale down.
Sampling modes
The Upsample layer doesn’t have many options, it only lets you choose between NN (nearest neighbor) and bilinear interpolation.
ResizeBilinear doesn’t have an option for nearest neighbors, but it does allow you to select the sampling mode that will be used by the bilinear interpolation. This sampling mode is actually very relevant to our investigation.
The possible sampling modes are:
- STRICT_ALIGN_ENDPOINTS_MODE
- ALIGN_ENDPOINTS_MODE
- UPSAMPLE_MODE — gives same results as
Upsamplelayer - ROI_ALIGN_MODE
The difference between these sampling modes is in how they determine which pixels to read from the source tensor. The two modes we’re going to look at in this blog post are STRICT_ALIGN_ENDPOINTS_MODE and UPSAMPLE_MODE.
When you use UPSAMPLE_MODE with a ResizeBilinear layer, it gives exactly the same results as the Upsample layer in bilinear mode. That means you can use Upsample if you have an integer scaling factor and ResizeBilinear if you don’t.
What about ALIGN_ENDPOINTS_MODE? Well, there is no real difference between STRICT_ALIGN_ENDPOINTS_MODE and ALIGN_ENDPOINTS_MODE, except when the output tensor is just one pixel wide (or tall). In “strict” align mode, this would sample from pixel 0 in the source image, but in ALIGN_ENDPOINTS_MODE it samples from the center pixel. That’s the only place they differ — in any other situations, both modes work the same.
We’ll conveniently skip over ROI_ALIGN_MODE as I don’t really know what it’s used for (but I suspect it’s intended for the CropResize layer.)
OK, but what do these sampling modes actually do? I’ll show you in moment what STRICT_ALIGN_ENDPOINTS_MODE and UPSAMPLE_MODE look like, and when you’d use these in your model.
Pixel Shuffle
An interesting way to upsample data is to use “pixel shuffle”. This can avoid pixel artifacts that may be introduced by other methods, in particular by deconvolution.
Let’s say you want to upsample a feature map with dimensions H×W by a factor 2. Pixel shuffle groups the feature map’s channels into sets of 4 and then reorganizes each group into a 2×2 block of pixels. The output feature map will have size 2H×2W but only 1/4th the number of channels. It’s the same data, just reorganized.
Illustration from the paper Real-Time Single Image and Video Super-Resolution Using an Efficient Sub-Pixel Convolutional Neural Network by Shi et al, 2016.
Pixel shuffle is not a built-in Core ML operation but is still possible. As this is really just a combination of reshape and transpose operations, you can implement pixel shuffle using a combination of different Core ML Reshape and Permute layers.
Note: I might write a future blog post on how to do pixel shuffle with Core ML. In the mean time, if you’re curious, check out how onnx_coreml does it.
What doesn’t Core ML do?
There is no NearestNeighborResize in Core ML currently, so if you want to use “nearest” resizing, you’ll have to use an Upsample layer.
The layers provided by Core ML only do nearest neighbor and bilinear scaling. Other common interpolation methods are bicubic and Lanczos scaling, but these are not supported directly by Core ML.
The biggest issue for me, however, is that for both Upsample and ResizeBilinear layers, the scaling factor / target size are hardcoded in the model. They cannot be provided by another tensor.
This might be an issue if your model needs to work with multiple input sizes, i.e. if it uses Core ML’s “flexibility” feature:
- If you need to resize the feature maps proportionally to the size of the input, you can only use
Upsample. - Unfortunately,
ResizeBilinearis only useful if you already know what the output size will be ahead of time.
On the other hand, Upsample cannot resize by arbitrary amounts, only 1×, 2×, 3×, and so on. ResizeBilinear can scale up to any size.
These restrictions put a serious limit on how flexible you can be in your models…
And it’s important to realize what these limitations are, before you start training your model (ergo, this blog post).
It would be nice if Core ML had a general-purpose “Resize” layer that can scale to any size, or by any fractional scaling factor, using a variety of interpolation methods. And that these properties can be either hardcoded into the mlmodel file or be provided dynamically by the output of another layer. (Maybe in Core ML 4?)
Note: Of course, if your model needs a method of upsampling that isn’t covered by Core ML’s built-in operations, you can always make a custom layer.
OK, let’s have a look now at what Core ML does support.
Nearest neighbors
Nearest neighbors, or NN for short, is a very simple method that basically makes everything more blocky:

In Core ML you’ll have to use the Upsample layer for this, in mode "NN".
NN scaling usually doesn’t give any problems: all ML frameworks implement this in pretty much the same way.
The only limitation of Core ML is that you always need to use an whole number as the scale factor. Other frameworks usually don’t have this limitation.
If you’re using a model that has NN upsampling but with a fractional scaling factor, the Core ML conversion may succeed but the Upsample layer may have the wrong scaling factor! So make sure to check your mlmodel file with Netron afterwards.
Note: If your model has an NN upsample layer that does not have a scaling factor but specifies a width and height, the Core ML converter may still use an Upsample layer and translate the width and height into scaling factors. Again, check the mlmodel file to make sure this was actually done correctly.
Of course, the downside of NN scaling is that the results don’t look particularly nice, so you typically want to use bilinear scaling. And that’s where the trouble starts…
Bilinear resizing
When you upsample, you go from a smaller image — or tensor in this case — to a larger one that has more pixels. The question is: how will you fill up those extra pixels?
With nearest neighbors you simply duplicate the existing pixel values, but that gives blocky results.
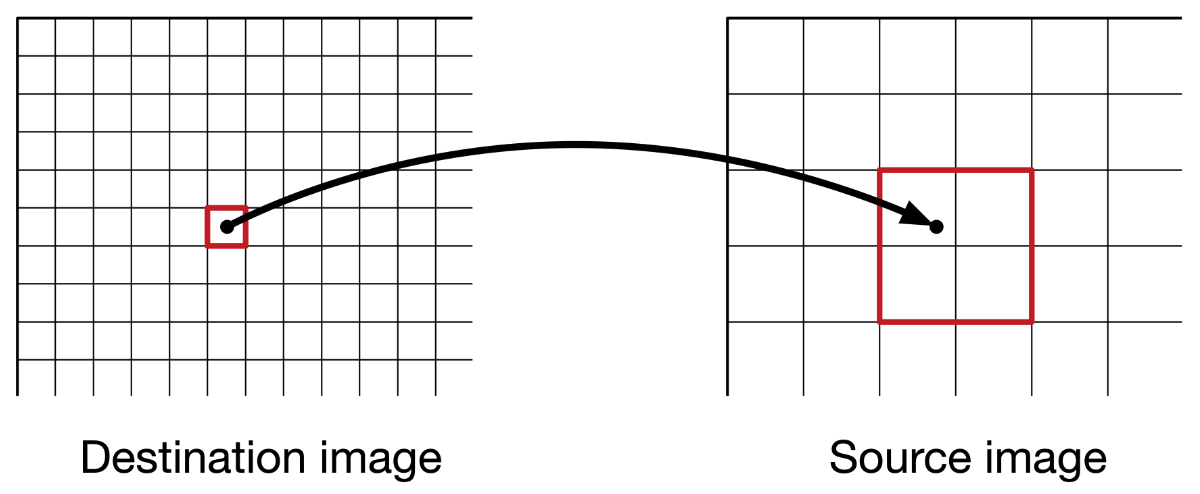
Bilinear interpolation is smarter: to figure out what value a pixel in the destination image will have, you take that pixel’s x,y-coordinate and map it to back a position in the source image.
Often you’ll end up at a fractional coordinate, somewhere in between two pixels. Nearest neighbors simply rounds off that coordinate to the nearest integer. But bilinear interpolation looks at the surrounding 2×2 pixels and figures out how much each of these pixels should contribute.
The closer our fractional subpixel coordinate is to one of these neighbor pixels, the more that pixel counts. For example, if the coordinate is right in the middle of the group of 2×2 pixels, they all contribute 25%.
The final pixel value is therefore a weighted average of the values of these four source pixels.
Just in case you’re curious, here is a simple Python routine that implements this algorithm:
def resize_bilinear(input, scale_factor_h, scale_factor_w):
    source_H = input.shape[0]
    source_W = input.shape[1]

    resized_H = int(source_H * scale_factor_h)
    resized_W = int(source_W * scale_factor_w)

    output = np.zeros((resized_H, resized_W), dtype=np.float32)

    def read_pixel(x, y):
        x = np.clip(x, 0, source_W - 1)
        y = np.clip(y, 0, source_H - 1)
        return input[y, x]

    def bilinear_interpolate(x, y):
        x1 = int(np.floor(x))
        x2 = x1 + 1

        y1 = int(np.floor(y))
        y2 = y1 + 1

        P11 = read_pixel(x1, y1)
        P12 = read_pixel(x1, y2)
        P21 = read_pixel(x2, y1)
        P22 = read_pixel(x2, y2)

        return (P11 * (x2 - x) * (y2 - y) +
                P12 * (x2 - x) * (y - y1) +
                P21 * (x - x1) * (y2 - y) +
                P22 * (x - x1) * (y - y1)) / ((x2 - x1) * (y2 - y1))

    for dst_y in range(resized_H):
        for dst_x in range(resized_W):
            src_x = (dst_x + 0.5) / scale_factor_w - 0.5
            src_y = (dst_y + 0.5) / scale_factor_h - 0.5
            output[dst_y, dst_x] = bilinear_interpolate(src_x, src_y)

    return output
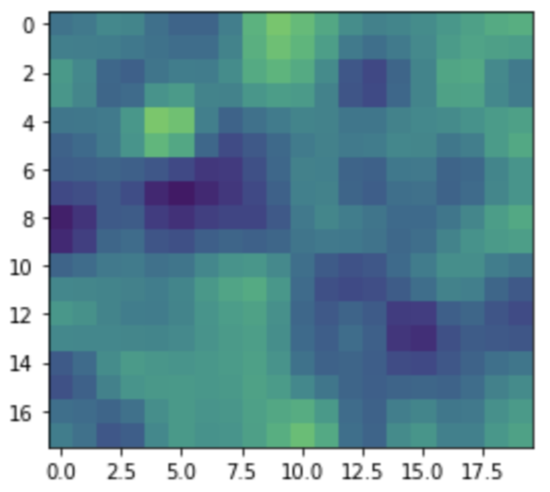
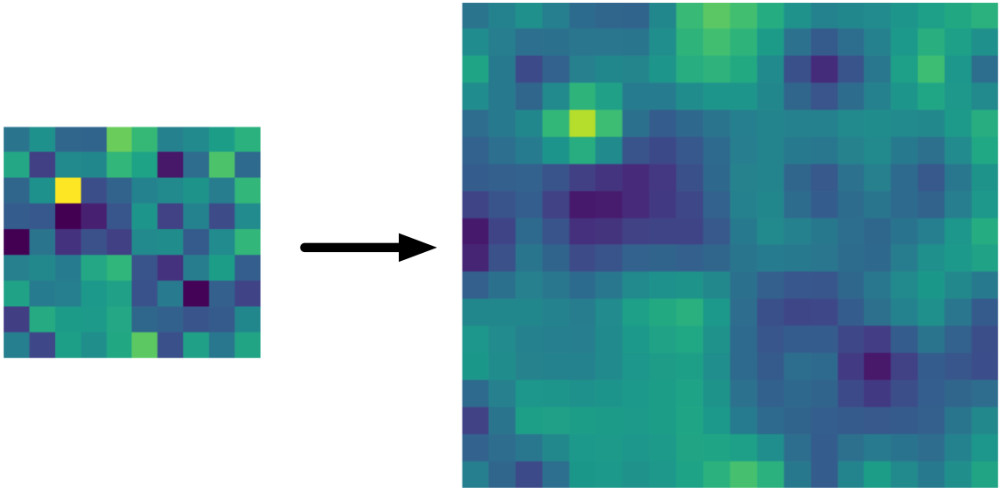
I used the following code to create the input image shown in the examples. It has width 10 and height 9:
np.random.seed(12345)
feature_map = np.random.randn(9, 10).astype(np.float32)
After bilinearly resizing it to twice the width and height, this is the result:
output = resize_bilinear(feature_map, 2, 2)
plt.imshow(output)
You’d think that everyone would implement bilinear resizing in the exact same way, but that would be too easy… There are basically three different methods in use by today’s machine learning frameworks:
- the bad method
- the so-so method
- the good method
Let’ s take a look at each of these in turn, and figure out where Core ML fits into this picture.
The bad method
You can blame TensorFlow for this one. The original bilinear image resizing function that was built into TensorFlow 1.x is incorrect. For backward compatibility reasons, this was not fixed and it has confused machine learning practitioners ever since.
Note: The discussion in this section only applies to TensorFlow 1.x and Keras. It does not apply to PyTorch or TensorFlow 2.
When you use tf.image.resize_bilinear(image, align_corners=False) or tf.image.resize_images(image, method=BILINEAR, align_corners=False), the output looks like this:
Why is this bad? One obvious place is the last row and column: you can clearly see that the pixels are duplicated here. But there’s more going on. If you compare it to the picture from the previous section, you can see that it’s much “narrower”.
Here is an animated GIF that flips between the NN version and the TensorFlow upscaling:
As you can see, the pixels shift up and to the left. That’s not supposed to happen when you resize an image…
Bad or not, if you have a TensorFlow 1.x model that uses this method, you’ll want Core ML to do the same thing. This is also true for Keras models using an UpSampling2D layer running on the TF 1.x backend (but not for Keras on TF 2.x, more about this shortly).
Well, you’re in luck! This is also the result from Core ML’s Upsample layer when used in "BILINEAR" mode and of the ResizeBilinear layer in UPSAMPLE_MODE.
It makes sense that the creators of Core ML wanted it to be compatible with TensorFlow, as that is still the world’s most popular deep learning framework. Unfortunately, this method of bilinear resizing is not compatible with pretty much any other ML framework or image library.
So if you’re using the Upsample layer in your Core ML model — or ResizeBilinear in UPSAMPLE_MODE — you’re getting the behavior from TensorFlow 1.x’s incorrect method. That’s perfectly fine if your model was trained with TF 1.x or Keras, but if your model was not made with TensorFlow, this might not be optimal!
The creators of TensorFlow realized their mistake and but it took two attempts to fix. Let’s look at the first fix now.
The so-so method
To fix the issues with the bad method, the align_corners=True parameter was introduced. For compatibility reasons this parameter defaults to False, so unless your code is explicitly setting it to True, you’re still using the old, wrong method!
When you call tf.image.resize_bilinear(image, align_corners=True), this is what the result is like:
That looks better than the wrong method indeed.

With align_corners=True, it preserves the corner points of the input tensor. Sounds like a good thing, but the consequence is that this new method is not very consistent in which pixels it reads from the input tensor. Let’s look at an example.
In the illustrations for this blog post I’m using a tensor of width 10 and height 9. (The number of channels doesn’t matter, as each channel is resized independently of the others). We’re upsampling this by a factor of 2×, to a new tensor of width 20 and height 18.
Looking just at the x-coordinates, for bilinear resizing with align_corners=True, we will sample pixels at the following x-coordinates from the source tensor:
0.0,        0.47368421, 0.94736842, 1.42105263, 1.89473684,
2.36842105, 2.84210526, 3.31578947, 3.78947368, 4.26315789,
4.73684211, 5.21052632, 5.68421053, 6.15789474, 6.63157895,
7.10526316, 7.57894737, 8.05263158, 8.52631579, 9.0
Note that there are 20 values here, spaced evenly from 0 (the first pixel on the left) to 9 (the last pixel on the right). These two corner points are whole numbers. This is what is meant by “preserves the corner points”.
The other coordinates are not whole numbers, meaning that they fall somewhere in between two pixels, but that’s OK — we will apply the bilinear interpolation formula to read the 2×2 neighboring pixels and compute a weighted average of their values.
The reason why align_corners=True still isn’t a great solution, is that we’d expect the sampling coordinates to always be the same for the same scaling factor. But if you change the size of the input tensor, the sampling coordinates also change with this method.
For example, let’s say we have a tensor of width 20 and we want to resize by 2×. The x-coordinates are now:
0.0,         0.48717949,  0.97435897,  1.46153846,  1.94871795,
2.43589744,  2.92307692,  3.41025641,  3.89743590,  4.38461538,
4.87179487,  5.35897436,  5.84615385,  6.33333333,  6.82051282,
7.30769231,  7.79487179,  8.28205128,  8.76923077,  9.25641026
...
17.05128205, 17.53846154, 18.02564103, 18.51282051, 19.0
I didn’t show all 40 numbers, but you can clearly see that the sample coordinates are slightly different. This makes the distance between successive pixels depend on the size of the image — which is strange because you’d think pixels are always the same distance apart. Not ideal.
How does this compare to align_corners=False?
A quick example to illustrate the difference with TensorFlow’s “bad” method, i.e. when align_corners=False. To upsample the width 10 tensor, we’d read from the source tensor at the following x-coordinates:
0.0, 0.5, 1.0, 1.5, 2.0, 2.5, 3.0, 3.5, 4.0, 4.5,
5.0, 5.5, 6.0, 6.5, 7.0, 7.5, 8.0, 8.5, 9.0, 9.0
Note that the distance between two consecutive pixels here is always 0.5 (because input_width / output_width = 10/20 = 0.5). This is true regardless of how big or small the image is: in other words, the step size is simply 1 / scale_factor.
With align_corners=True, however, the step size is slightly smaller than 0.5. It is in fact (input_width - 1) / (output_width - 1) or 9/19 = 0.47368421 in the first example, and 19/39 = 0.48717949 in the second.
This explains why align_corners=True has a slightly different step size if the input size is different.
Given the above, you might think that align_corners=False would actually give better, more consistent results, when I’ve been telling you it doesn’t?!
But notice how pixel 9.0 actually appears twice at the end? That explains why the last column (and row) are duplicated. It also means all the pixels end up shifted to the top and left by a small amount. Very weird, and definitely not how this is supposed to work.
Having a consistent step size is good, but align_corners=False gets the math wrong. And while align_corners=True looks better, its step size depends on the input dimensions. Neither is desirable.
align_corners=True in Core ML
You’ll be happy to know that Core ML also supports this type of bilinear resizing.
You cannot use the Upsample layer for this, you must use a ResizeBilinear layer in STRICT_ALIGN_ENDPOINTS_MODE. That will give exactly the same results as TensorFlow’s bilinear resizing with align_corners=True.
align_corners=True in PyTorch
If you’re using PyTorch, the story is also rather interesting. PyTorch has different APIs for upsampling. The preferred one is torch.nn.functional.interpolate(). All the other resizing APIs are actually implemented in terms of this interpolate() function (and are largely deprecated).
Here’s the confusing bit: PyTorch’s interpolate() also has an align_corners property but it only works the same way as in TensorFlow if align_corners=True! The behavior for align_corners=False is completely different between PyTorch and TF.
Up to version 0.3.1 of PyTorch, align_corners=True was the default. Since then, the default was switched to align_corners=False. If you have old PyTorch code, it may be assuming that this argument should be True. Beware!
Some APIs such as F.upsample_bilinear() and the nn.UpsamplingBilinear2d() layer still set align_corners to True while other APIs set it to False. So you have to pay attention to which API you’re using!
Long story short: If your PyTorch model uses align_corners=True, you get the same results as TensorFlow. You can use a ResizeBilinear layer in your Core ML model in STRICT_ALIGN_ENDPOINTS_MODE.
Plot twist: …but if you do, it is actually impossible to convert your PyTorch model to Core ML using the existing tools. More about this later.
What about using align_corners=False in PyTorch? I said it doesn’t do the same (bad) thing as TensorFlow. Does that mean…? Indeed, it does the correct thing, as we’ll talk about next.
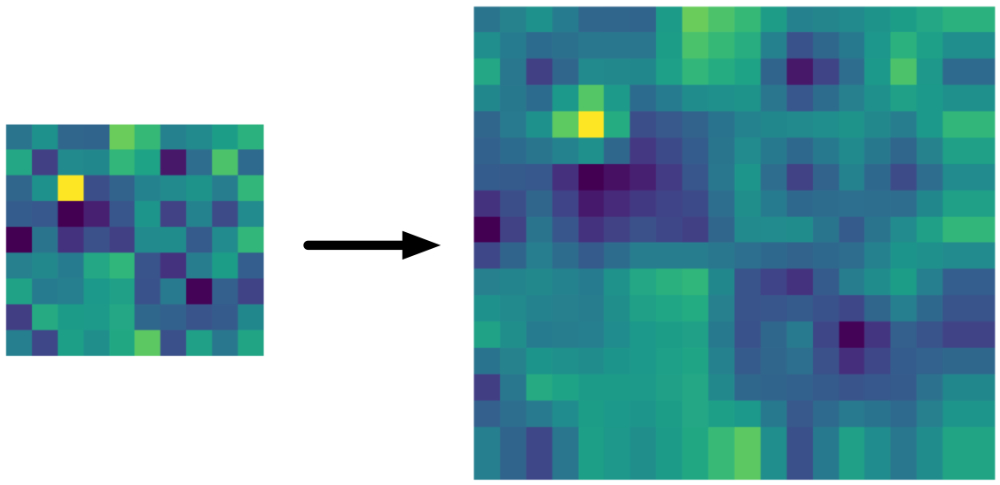
The good method
This is what the “correct” method produces:
Not surprisingly, that’s the same image we got from the Python code I showed earlier.
If you compare this to the “bad” and the “so-so” methods, it looks much more stable — the pixels remain in their original place:

Note: To be fair, we do lose the highlight from the yellow pixel in the top-left corner. That’s because the center of that pixel is no longer the center of any of the upsampled pixels, and so the yellow color gets blended with the colors of its neighbors, which are all darker. Overall the image retains the same brightness but the highlights are distributed over multiple pixels now.
For the same input tensor we looked at before, upsampling by a factor of 2, we will read from the following x-coordinates:
-0.25, 0.25, 0.75, 1.25, 1.75, 2.25, 2.75, 3.25, 3.75, 4.25,
 4.75, 5.25, 5.75, 6.25, 6.75, 7.25, 7.75, 8.25, 8.75, 9.25
Just like with TensorFlow’s align_corners=False, the distance between consecutive pixels is always 0.5. That’s great, we wanted a consistent step size.
However, we don’t start and stop exactly on the corner points. Note that the first point, -0.25, is negative and the last point, 9.25, lies outside the feature map too. That’s no problem, we can simply use the edge values for pixels that lie outside the feature map.
Recall that align_corners=True had the issue that which points get sampled depends on the size of the input tensor. The correct method doesn’t have this problem. It will always sample the same points, regardless of the input size.
For example, let’s say we have an image of width 20 and we want to upsample this by 2×. Now the following x-coordinates will be used:
-0.25,  0.25,  0.75,  1.25,  1.75,  2.25,  2.75,  3.25,  3.75,  4.25,
 4.75,  5.25,  5.75,  6.25,  6.75,  7.25,  7.75,  8.25,  8.75,  9.25,
...
14.75, 15.25, 15.75, 16.25, 16.75, 17.25, 17.75, 18.25, 18.75, 19.25
Notice how these pixels are spaced in the same way as before, there are just more of them. With this method, which points we sample depends only on the scaling factor, not on the sizes of the tensors.
In PyTorch, you can do this kind of bilinear scaling with F.interpolate(..., align_corners=False). As of PyTorch 0.3.1, this is the default behavior.
Note: But keep in mind that certain APIs such as nn.UpsamplingBilinear2d() still do align_corners=True under the hood.
In TensorFlow 2.x, you can use tf.image.resize() for this. If you use tf.keras in TF 2.x, the UpSampling2D layer also gets the correct behavior.
This also is how other image processing libraries, such as OpenCV, do their bilinear scaling. So we’re all finally on the same page…
…except for Core ML. Unfortunately, Core ML cannot do this currently.
You read that right, Core ML does not have a bilinear resizing layer that does it “the correct way”. This means Core ML’s resizing layers are incompatible with PyTorch’s align_corners=False and with TF 2.x.
So for now, if you want your Core ML model to give 100% the same results as your PyTorch model, you have to use align_corners=True. In TensorFlow 2.x, you can use the old methods from tf.compat.v1, with align_corners=True or False.
Note: As I said in the introduction, it’s usually OK if the bilinear resizing layer in your Core ML model is off by a few pixels. You’ll most likely still get reasonable predictions out of your model. Just be aware that this difference exists and where it comes from.
PyTorch conversion woes
Converting a PyTorch model to Core ML is usually done by exporting to ONNX first, then using the onnx_coreml package to do the conversion.
Let’s say you’ve decided to use align_corners=True for your upsampling layers. (Note: I’m not saying this is the correct choice. But right now it is a better choice than PyTorch’s align_corners=False if you want the Core ML model to give 100% the same results as PyTorch.)
Now you want to call torch.export.onnx() to convert the PyTorch model to ONNX format. Whoops, you’ll probably get this warning message:
UserWarning: You are trying to export the model with onnx:Upsample
for ONNX opset version 9. This operator might cause results to not
match the expected results by PyTorch. ONNX's Upsample/Resize operator
did not match Pytorch's Interpolation until opset 11. Attributes to
determine how to transform the input were added in onnx:Resize in opset
11 to support Pytorch's behavior (like coordinate_transformation_mode
and nearest_mode). We recommend using opset 11 and above for models
using this operator.
What’s going on here?
Like Core ML, ONNX has different versions. The version number determines which operators, or ops, are available. By default, when you export on ONNX graph from PyTorch it uses “opset” version 9. However, this version has certain limitations, and one of those is that upsampling with align_corners=True is not supported.
There is a newer version of the ONNX spec, opset 11, that is more capable. You can call torch.export.onnx(..., opset_version=11) to enable these new features — but unfortunately, this isn’t very useful for us.
Opset v9
The ONNX Upsample operator in opset version 9 is fairly limited. It has a mode property for choosing between nearest and bilinear. It takes as input the source tensor and a scales tensor with the scaling factors for each dimension.
You cannot export PyTorch models to ONNX using opset version 9 if they contain upsampling layers with align_corners=True. This gives an error message. You can only export if your upsampling layers use align_corners=False everywhere.
Another thing to keep in mind is how you tell PyTorch’s interpolate() function what the new tensor size is. You can either supply a scale factor or a width and height:
Using a scale factor. F.interpolate(..., scale_factor=...) will add a lot of extra operations to the ONNX graph, such as Gather, Cast, etc. These multiply the width and height of the input tensor by the scaling factors, floor the results, then divide by width and height again. The results are used as the scaling factors passed into the Upsample operation. (Not sure why they go through all this trouble.)
Having those extra ops in the graph is not a problem for onnx_coreml. It will get rid of all those and just add a regular UpsampleLayer in the Core ML model.
Using a fixed output size. F.interpolate(..., size=...) does not add any extra ops. However, it doesn’t actually pass the size to the Upsample operation in the ONNX graph — it has converted the size to a fixed scaling factor. Very convenient as that’s exactly what Core ML needs, but pay attention:
If the output size divided by the input size is not an integer, your Core ML model will now have an Upsample layer that has the wrong scaling factor. onnx_coreml will not warn about this happening! (Tested with onnx_coreml 1.2.)
Opset v11
In opset 11, there is a Resize operator that is much more powerful. It has:
coordinate_transformation_mode. This supportsalign_cornersmode, as well as several other modes, such as:- for nearest neighbors: asymmetric
- for bilinear,
align_corners=False: pytorch_half_pixel - for bilinear,
align_corners=True: align_corners
scalesorsizestensor, so nowF.interpolate(..., size=...)will actually keep the output size and not convert it to a scaling factor.
Problem: onnx_coreml currently does not support the Resize operator from opset v11 (tested with version 1.2). Trying to convert such a model to Core ML fails with the error:
NotImplementedError: Unsupported ONNX ops of type: Resize
Core ML 3 does have a lot of new operators and you can enable these by running onnx_coreml.convert(..., minimum_ios_deployment_target="13") but for me that still failed (could be a bug in the converter).
The workaround
There is no problem converting a PyTorch model to ONNX and then to Core ML if it uses align_corners=False. But as we discussed, if you train your model with align_corners=False — even if that is the correct way to do bilinear resizing — then Core ML won’t work 100% the same way.
And if you train with align_corners=True, Core ML will work correctly… but you can’t convert the PyTorch model! Catch-22.
The workaround is to train with align_corners=True, then edit your Python code to temporarily turn this into False in order to do the export.
Next, export the model to ONNX using torch.export.onnx(model, ..., opset_version=9).
Then, use onnx_coreml to convert the ONNX model to Core ML. This will give you a Core ML model with an Upsample layer (possibly with incorrect scaling factors).
Finally, use coremltools to manually replace this by a ResizeBilinear layer with mode STRICT_ALIGN_ENDPOINTS_MODE. Now your Core ML model will give the exact same results as your PyTorch model.
Tip: You can learn how to do this kind of model surgery in my Core ML Survival Guide e-book.
No dynamic scale factors
Something else to keep in mind: PyTorch is very dynamic, meaning that the scaling factor and/or target size can be computed at runtime from the properties of some tensor.
For example, if tensor a is the output of a conv layer and you want to resize another tensor b to the width and height of a. Depending on the shape of the input to the conv layer, the size of a can be different each time. Easy to do in PyTorch, impossible in Core ML.
In Core ML, the scaling factor and target size are always a hardcoded number inside the mlmodel file. The conversion to ONNX or Core ML may not be able to handle scaling factors or target sizes that are computed dynamically.
Cheatsheet
All right, no one can remember all that, so here’s a cheatsheet of what works and what doesn’t.
The bad but backwards compatible way
If you have,
- TensorFlow 1.x model with
align_corners=False - standalone Keras with TF backend,
UpSampling2Dlayer
then use:
Upsamplelayer in mode"BILINEAR"ResizeBilinearlayer withUPSAMPLE_MODE
The slightly better way
If you have,
- TensorFlow 1.x model with
align_corners=True - PyTorch model with
align_corners=True
then use:
ResizeBilinearlayer inSTRICT_ALIGN_ENDPOINTS_MODE
The best way
If you have,
- TensorFlow 2.x model with
tf.image.resize() tf.keras.layers.UpSampling2Dlayer- PyTorch with
align_corners=False
then there is no matching solution in Core ML. 😢
In this case, I suggest you try them all — the Upsample layer, or a ResizeBilinear layer in UPSAMPLE_MODE or STRICT_ALIGN_ENDPOINTS_MODE — and see which one gives the best results on your data.
Personally, I’d probably avoid UPSAMPLE_MODE in this situation because it shifts the pixels. If your model has several upsampling layers in succession, for example in a segmentation model, the repeated shifts may cause the final predicted mask to be off by multiple pixels.
Update 4 May 2020: An eagle-eyed reader pointed out that the plots of the upsampled images were incorrect. Unless you tell it otherwise, matplotlib automatically normalizes the pixel intensities, which made the upsampled images seem brighter than they should be. I fixed this by plotting all images using the same range of pixel intensities.
First published on Thursday, 6 February 2020.
If you liked this post, say hi on Twitter @mhollemans or LinkedIn.
Find the source code on my GitHub.
 New e-book: Code Your Own Synth Plug-Ins With C++ and JUCE
Interested in how computers make sound? Learn the fundamentals of audio programming by building a fully-featured software synthesizer plug-in, with every step explained in detail. Not too much math, lots of in-depth information! Get the book at Leanpub.com