
This is a transcription of a talk I gave at the Dutch CocoaHeads meetup in Rotterdam in July, 2015. Some of the code is out-of-date now that we have Swift 3. However, the ideas are still valid.
If you paid attention to this year’s WWDC, you’ve probably seen the session on Protocol-Oriented Programming — or at least heard about it.
[Lots of nodding heads in the audience.]
It’s an interesting session and definitely worth checking out. You may also have seen the following in the Xcode 7 release notes:
Protocols can have default implementations for requirements specified in a protocol extension, allowing “mixin” or “trait” like patterns.
In this post I want to talk about these things: protocol-oriented programming, the new protocol extensions, and the mixins and traits that are alluded to here.
If you have experience with other languages such as Ruby or Python — or even PHP! — you may have seen mixins and traits before, but we haven’t had this on iOS or OS X yet. It allows for a slightly different way of programming that has benefits over traditional object-oriented programming.
A quick recap of protocols
First, let’s talk a bit about protocols. I’m going to assume everyone reading this has seen protocols before, although in some languages they’re called interfaces. “Protocols” is the term we use in Objective-C and Swift.
Here’s an example:
protocol Hello {
  func sayHello() -> String
}
A protocol defines an interface. In this case the protocol Hello has one method sayHello() that is supposed to return a string.
By itself a protocol isn’t very useful, so you’d create a class or struct that conforms to this protocol and that implements the methods from the protocol:
class MyClass: Hello {
  var name = "Steve"

  func sayHello() -> String {
    return "Hello \(name)"
  }
}
And now you can instantiate that class and call the method:
let c = MyClass()
c.sayHello()        // "Hello Steve"
But the cool thing is that this also works if you just have a reference to the protocol part of the object:
let h: Hello = c
h.sayHello()        // "Hello Steve"
The variable h is an instance of MyClass behind the scenes, but to the compiler — and the programmer — it’s just a Hello object, and therefore it can only do the things specified in the protocol.
That’s the power of protocols: they let you hide the actual type of your object. The code only cares that this object does what the protocol demands of it, but it does not need to know anything else about the object’s internal structure.
This allows you to program against the interface, not the implementation, and that’s considered to be a good thing.
So even though h refers to an object that has a name property, you can’t write h.name. This property isn’t part of the Hello protocol and therefore the compiler doesn’t see it.
This is all pretty straightforward and it’s how protocols have always worked on iOS. We use them mostly for the delegate pattern.
New stuff: protocol extensions
A protocol extension is simply this:
protocol Hello {
  func sayHello() -> String
}

extension Hello {
  func sayHello() -> String {
    return "Hello, stranger"
  }
}
The protocol is still the same as before but now there is an extension that gives the sayHello() method a default implementation.
We’ve had extensions for a while — called “categories” in Objective-C — but these could only be used on classes. As of Swift 2.0 you can also create extensions on protocols.
Now your class simply looks like this:
class MyClass: Hello {
}

let c = MyClass()
c.sayHello()        // "Hello, stranger"
All you have to do to add that sayHello() method to your class is conform to the Hello protocol. You no longer have to implement that method yourself.
We call Hello a mixin or a trait because it’s a piece of functionality that you add — or mix — into another class.
By the way, you could still implement that method if you wanted to:
class MyClass: Hello {
  var name = "Steve"

  func sayHello() -> String {
    return "Hello \(name)"
  }
}

let c = MyClass()
c.sayHello()        // "Hello Steve"
This uses the version from MyClass instead of the default implementation from Hello.
You may be wondering, how is this different from inheritance? The big difference is that MyClass is not a subclass of Hello. Inside sayHello(), you can’t call super.
Right now, MyClass doesn’t have a superclass at all, but we could give it one:
class MyClass: BaseClass, Hello {
  ...
}
MyClass now consists of the code and properties from BaseClass, plus the methods from the Hello protocol. But while you can only have one base class, you can add as many other protocols as you want:
class MyClass: BaseClass, Hello, AnotherProtocol, YetAnother {
  ...
}
Inheritance is often used as a mechanism for code reuse, but protocol extensions let you reuse code without forcing you into a superclass-subclass relationship.
If you’ve worked with multiple inheritance in C++ you know this can get tricky quite fast. Protocol extensions are a way to do the same thing but simpler and it avoids most of the problems of multiple inheritance.
Composition over inheritance
So why would you want to do this? You may be familiar with the saying, “prefer composition over inheritance”. What this means is that inheritance kinda sucks.
Inheritance was supposed to be one of the big benefits of OOP but in practice it doesn’t work out so well. With inheritance, all the types in your app form this neat hierarchy, but it turns out hierarchies are a pretty limited structure for modeling real-world problems.
Hierarchies aren’t always bad. Here’s an example where inheritance works pretty well:
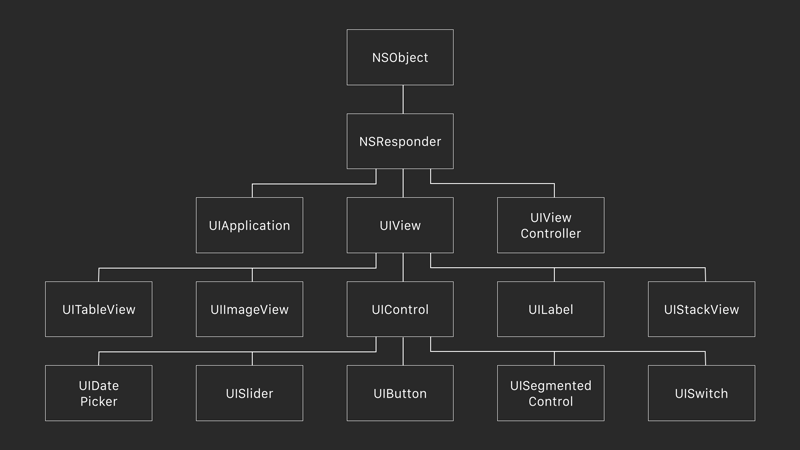
This is of course the class tree for UIKit. There is a clear hierarchical structure here: a UIButton is a UIControl is a UIView is an NSResponder. It just makes sense to use inheritance for this.
Here’s another example, from a RayWenderlich.com game tutorial:
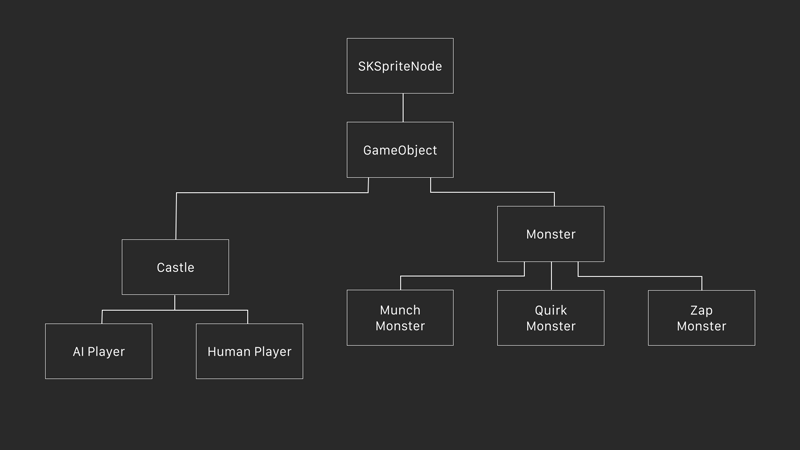
This is a castle-defense type game. The players are represented by Castle objects, one for the human player and one for the computer player. You launch monsters to attack the other player’s castle.
All the objects in the game are based on the GameObject class, which is an SKSpriteNode from Sprite Kit.
This class design looks reasonable enough, but there’s a problem. The Zap monster can shoot laser beams at enemy monsters when they come into range. All the logic and data for this shooting algorithm sit inside the ZapMonster class.
But now we also want the castles to be able to shoot lasers at enemy monsters when they come too close. That’s exactly the same logic, so how do we deal with this in our class hierarchy?
Easy solution: copy-paste the code from ZapMonster into the Castle class. But then we have duplicate code and that’s just asking for trouble.
A seemingly better solution is to simply move the shooting code into a common base class, GameObject. Makes sense, right?
Well, if you’re not careful you end up with a base class that does all the work. This is a typical issue with inheritance hierarchies: a huge base class and many tiny subclasses. (The base class also exposes these methods and their data to the subclasses that don’t need it.)
I’m not really happy with any of these solutions. The best solution I can think of is to put the shooting logic into a class of its own, ShootingHelper, and give an instance of that to both Castle and ZapMonster.
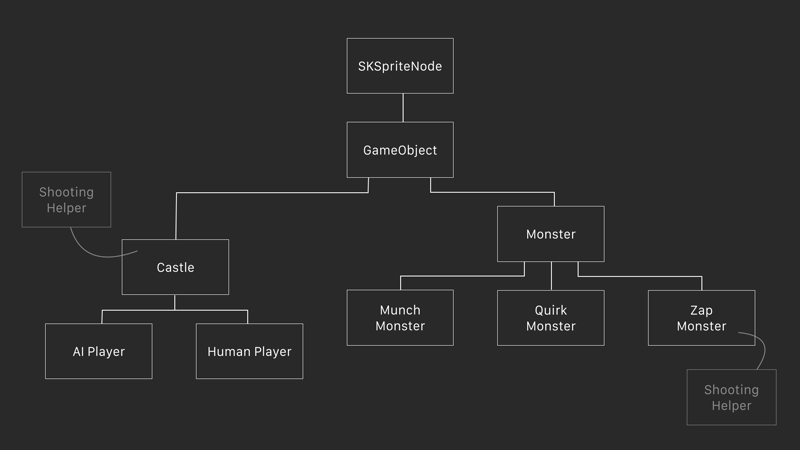
Much better, but you still have to manage that helper object — allocate it, clean up after it, and so on — and you may end up with many different types of helper objects for all the different behaviors your game objects need, so it’s not ideal either.
Traits or mixins can help with this. We can flatten the inheritance hierarchy to the following:
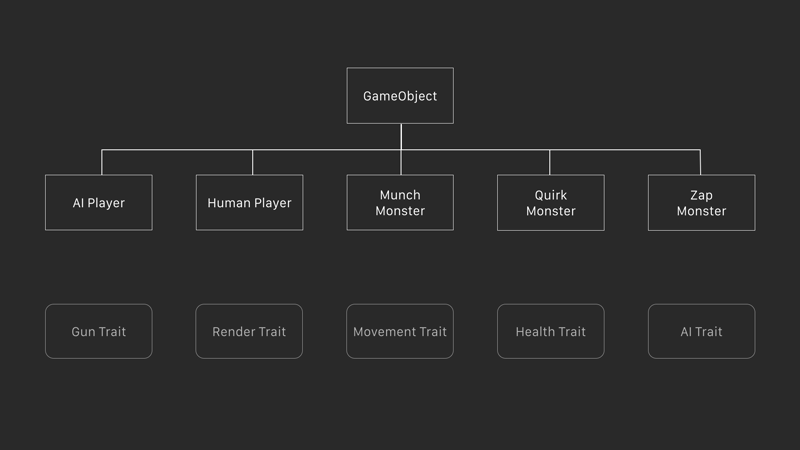
Instead of a deep and wide inheritance tree we now just have GameObject for the base class (it no longer extends from SKSpriteNode) and directly below that are the classes for the specific objects that make up this game.
In addition, we have a number of traits that describe the different behaviors of these objects.
There’s a GunTrait for shooting, a RenderTrait for drawing the object to the screen (using a sprite node), a HealthTrait for keeping track of the object’s hit points and drawing a little health bar, and so on.
These traits are all defined as protocols, not classes. And they have extensions that already implement their methods, so the game objects don’t need to implement anything themselves. Just pull in the traits you want and you’re done.
The code for the AI Player simply looks like this:
class AIPlayer: GameObject, AITrait, GunTrait, RenderTrait, HealthTrait {
  ...
}
A monster would look like this:
class ZapMonster: GameObject, GunTrait, RenderTrait, HealthTrait, MovementTrait {
  ...
}
For each specific object you just pull in the traits you want it to have. Anything that needs to be able to shoot, you make it conform to the GunTrait protocol and it immediately gets those methods and properties.
In games this is often called a component-based architecture. In fact, the new GameplayKit has an API for this but I wanted to show how you could do it using protocol extensions.
That’s really the idea behind protocol-oriented programming. You use it to simplify inheritance. The inheritance tree is now a lot flatter and if you wanted to you could probably get rid of it completely.
Besides, structs in Swift can’t use inheritance anyway, so if you want to compose a struct from different traits then you have no choice but to use protocols.
Traits vs. Mixins
I’ve been using the terms “trait” and “mixin” for a while now. So what’s the difference between a trait and a mixin? It’s a bit academic and not everyone agrees on these definitions, but it goes something like this:
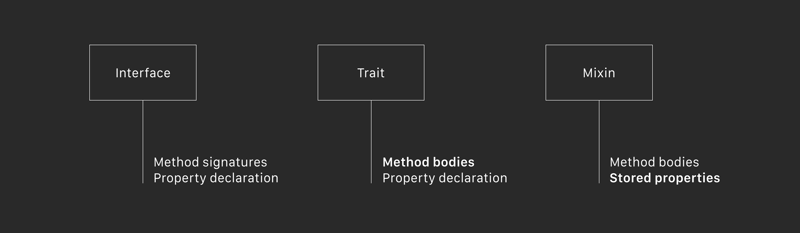
First off we have the interface. This is a protocol that just has method signatures but no actual code. This is what Objective-C and Swift 1.2 have.
A trait also has the actual method bodies. In other words, a trait adds code to an interface. This is the new thing that Swift 2.0 lets us do today with protocol extensions.
A mixin is like a trait but it also has state. We can’t really do this yet with Swift 2.0 as you’re not allowed to add stored properties to protocols.
Note: You can add a property declaration to a protocol, but then every class or struct that conforms to this protocol still needs to provide its own storage for those properties. So you can sort of do “real” mixins, but it requires some extra work on your part.
Personally, I tend to mix up these names. Sometimes trait sounds better than mixin, but whatever… they pretty much mean the same thing anyway.
Just to avoid any confusion, I want to stress that mixin and trait are the names of the programming patterns. A protocol extension is how you implement those patterns in Swift. But you also do other things with protocol extensions that wouldn’t really be considered mixins or traits.
Example: Login screen
Let’s do a more practical example. Let’s say you have a login screen that needs to validate the username and password to make sure they are well-formed — not too short, not too long, no invalid characters — before you actually send a web service request. This is a fairly common thing to do in iOS apps.
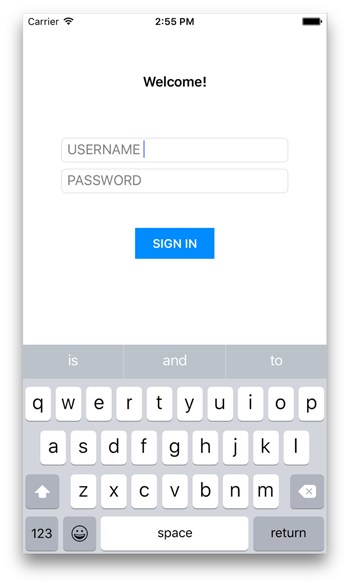
This is one way to implement it:
class LoginViewController: UIViewController {
  private func isUsernameValid(username: String) -> Bool {
    ...
  }

  private func isPasswordValid(password: String) -> Bool {
    ...
  }

  @IBAction func loginButtonPressed() {
    if isUsernameValid(usernameTextField.text!) &&
       isPasswordValid(passwordTextField.text!) {
      // proceed with login
    } else {
      // show alert
    }
  }
}
You could stuff the logic for this into the view controller, but if you do that with everything then before you know it your view controller is 1000 lines long and we all know that Massive View Controller is a bad thing.
One way to do improve on this is to make a separate UsernameValidator object and put the isUsernameValid() method into that object. Likewise for the password. That would look something like this:
class UsernameValidator {
  func isUsernameValid(username: String) -> Bool {
    ...
  }
}

class LoginViewController: UIViewController {
  let usernameValidator = UsernameValidator()
  let passwordValidator = PasswordValidator()

  @IBAction func loginButtonPressed() {
    if usernameValidator.isUsernameValid(usernameTextField.text!) &&
       passwordValidator.isPasswordValid(passwordTextField.text!) {
      // proceed with login
    } else {
      // show alert
    }
  }
}
This is a nice and clean solution. All the validation logic has been hidden away into its own objects, and you can easily reuse these validator objects in other view controllers or even other projects.
However, a cool an alternative is to put the validation method into a mixin:
protocol ValidatesUsername {
  func isUsernameValid(password: String) -> Bool
}

extension ValidatesUsername {
  func isUsernameValid(username: String) -> Bool {
    if /* username too short */ {
      return false
    } else if /* username has invalid characters */ {
      return false
    } else {
      return true
    }
  }
}
The validation logic doesn’t sit in a class but in a protocol extension. The protocol declares the isUsernameValid() method and the extension implements it.
To add this logic into the view controller, all you have to do is this:
class LoginViewController: UIViewController, ValidatesUsername, ValidatesPassword {
By making the view controller conform to the protocols for the ValidatesUsername and ValidatesPassword mixins, it automatically pulls the isUsernameValid() and isPasswordValid() methods into the code.
And you can simply call those methods as if they were the view controller’s own:
class LoginViewController: UIViewController, ValidatesUsername, ValidatesPassword {
  @IBAction func loginButtonPressed() {
    if isUsernameValid(usernameTextField.text!) &&
       isPasswordValid(passwordTextField.text!) {
      // proceed with login
    } else {
      // show alert
    }
  }
}
This is a nice trick to keep your view controllers clean without having to use extra helper objects. I think this is pretty cool. And you can also easily reuse these mixins in other view controllers and in other projects.
Example: Ruby Enumerable
I want to show you one more example. This uses an idea that’s popular in Ruby, the Enumerable mixin. Ruby has had mixins for long time and they are used to great effect.
It works like this: If you add an each() method to a class and import the Enumerable mixin, your class immediately gets a ton of useful methods for enumerating it such as map(), group_by(), find_all(), drop_if(), and so on.
We can do something similar in Swift using protocol extensions.
protocol Enumerable {
  typealias Element
  func each(block: (Self.Element) -> Void)
}
This is a generic protocol, that’s what the typealias is for. The important bit is the each() function. This is something you as the user of this protocol have to provide. It will loop through all the items in your collection, whatever that may be, and passes each item to the closure given by block.
And then there’s the extension:
extension Enumerable {
  func dropIf(predicate: (Self.Element) -> Bool) -> [Self.Element] {
    var result = [Element]()
    each { item in if !predicate(item) { result.append(item) } }
    return result
  }

  func dropWhile(predicate: (Self.Element) -> Bool) -> [Self.Element] {
    ...
  }

  func findAll(predicate: (Self.Element) -> Bool) -> [Self.Element] {
    ...
  }

  ... /* many more methods here */ ...
}
This has a whole bunch of functions that are all implemented on top of each().
For example, dropIf() will return an array with all the elements from your collection, except those that match a given predicate. It’s a way to filter out certain items from the collection. The other methods inside the extension do similar things, all using each() to step through your collection.
Note that, unlike before, the methods inside the extension aren’t listed in the protocol itself. That keeps the protocol clean and simple.
Let’s say you have some type that you want to make Enumerable. This type doesn’t have to be an array or dictionary or what we typically think of as a collection — you can treat almost any type as a collection that can be enumerated over.
We have the following type:
struct Family {
  var name = "Smith"
  var father = "Bob"
  var mother = "Alice"
  var child = "Carol"

}
(This is based on an example from a Ruby tutorial. Check it out if you want to see how it’s done in that language.)
We can make this struct enumerable as follows:
struct Family: Enumerable {
  var name = "Smith"
  var father = "Bob"
  var mother = "Alice"
  var child = "Carol"

  func each(block: (String) -> Void) {
    for i in 0...2 {
      switch i {
        case 0: block("\(father) \(name)")
        case 1: block("\(mother) \(name)")
        case 2: block("\(child) \(name)")
        default: break
      }
    }
  }

}
Just add the Enumerable protocol and implement the each() method. In this case, enumerating a Family object means that we first print out the name of the father, then the name of the mother, and finally the name of the child.
You can use it as follows:
let f = Family()
let withoutBob = f.dropIf { p in p.hasPrefix("Bob") }

// ["Alice Smith", "Carol Smith"]
This returns a new array without anyone called Bob.
Thanks to the protocol extension, we get this dropIf() method for free wherever we conform to Enumerable. Pretty cool stuff.
Of course, Swift has its own way to do enumeration, with generators. So we can make this a bit more Swift-like.
Instead of using our own Enumerable protocol, we can create the extension on GeneratorType. This is one of the built-in protocols from the Swift standard library.
extension GeneratorType {
  mutating func dropIf(predicate: (Self.Element) -> Bool) -> [Self.Element] {
    var result = [Element]()
    while true {
      if let item = next() {
        if !predicate(item) { result.append(item) }
      } else {
        return result
      }
    }
  }

  mutating func dropWhile(predicate: (Self.Element) -> Bool) -> [Self.Element] {
    ...
  }

  mutating func findAll(predicate: (Self.Element) -> Bool) -> [Self.Element] {
    ...
  }
It’s pretty much the same as before, except now we’re using the Swift generator API, which involves calling next() to iterate through the collection until you get nil.
And now we can call dropIf() on any generator! Here’s the family example again:
struct Family: SequenceType {
  var name = "Smith"
  var father = "Bob"
  var mother = "Alice"
  var child = "Carol"

  typealias Generator = AnyGenerator<String>

  func generate() -> Generator {
    var i = 0
    return anyGenerator {
      switch i++ {
        case 0: return "\(self.father) \(self.name)"
        case 1: return "\(self.mother) \(self.name)"
        case 2: return "\(self.child) \(self.name)"
        default: return nil
      }
    }
  }
}
Family now conforms to SequenceType (another protocol from the Swift standard library) and returns a generator object for iterating through the collection.
Generators are used by Swift with the for in statement. You can use it like this to step through all the members of the family:
let f = Family()

for x in f {
  print(x)
}

// "Bob Smith"
// "Alice Smith"
// "Carol Smith"
And we can now use dropIf() like this:
var g = f.generate()
let withoutBob = g.dropIf { p in p.hasPrefix("Bob") }

// ["Alice Smith", "Carol Smith"]
So again, just by making a protocol extension we can inject a whole bunch of functionality into our code without too much effort. You don’t have to copy-paste this dropIf() method into each of your generators, it’s simply just there.
I said this works on all generators, so this also works:
let array = [1, 2, 3, 4, 5, 6, 7, 8, 9, 10]
var g = array.generate()

let onlyOddNumbers = g.dropIf { i in i % 2 == 0 }

// [1, 3, 5, 7, 9]
It doesn’t matter that this is a completely different type of data structure. Because we added dropIf() to an extension on GeneratorType, it magically works anywhere. How is that for code reuse!
One final thing I should mention is that you can restrict a protocol extension to particular types, which is handy if you’re dealing with generics.
So let’s say we want to limit the dropIf() function to just generators for strings, then we could write the following:
extension GeneratorType where Self.Element == String {
  mutating func dropIf(predicate: (Self.Element) -> Bool) -> [Self.Element] {
    ...
  }

}
The only thing that’s different here is the where clause.
Now dropIf() will still work with the Family struct because its generator returns strings, but it will no longer work on the array of integers from the previous example. Generators that don’t return strings simply won’t have that dropIf() method.
The end
The takeaway is that, if you’re considering making an inheritance hierarchy with lots of superclasses and subclasses, try using protocols instead.
With inheritance the only structure you can make is a hierarchy. But by placing your reusable code in protocol extensions, you’re no longer limited to just hierarchies — you’ve got more freedom in how you stick your building blocks together to build bigger components.
First published on Wednesday, 22 July 2015.
If you liked this post, say hi on Twitter @mhollemans or LinkedIn.
Find the source code on my GitHub.
 New e-book: Code Your Own Synth Plug-Ins With C++ and JUCE
Interested in how computers make sound? Learn the fundamentals of audio programming by building a fully-featured software synthesizer plug-in, with every step explained in detail. Not too much math, lots of in-depth information! Get the book at Leanpub.com