
WWDC 2017 has made one thing very clear: Apple is going all in on machine learning on the device.
And they want to make it as easy as possible for app developers to join them.
Last year Apple announced the Metal CNN and BNNS frameworks for creating basic convolutional networks. This year we get lots of additions to Metal, a new computer vision framework, and Core ML: a toolkit that makes it really easy to put ML models into your app.
In this blog post I’ll share my thoughts on — and experiences with — the new machine learning stuff in iOS 11 and macOS 10.13.
Core ML
Core ML got most of the attention at WWDC and it’s easy to see why: this is the framework that most developers will want to use in their apps.
The API is pretty simple. The only things you can do are:
- loading a trained model
- making predictions
- profit!!!
This may sound limited but in practice loading a model and making predictions is usually all you’d want to do in your app anyway.
Previously, loading a trained model was much harder — in fact, I wrote a library to take away some of the pain. So I’m happy that it’s a simple two-step process now.
The model is contained in a .mlmodel file. This is a new open file format that describes the layers in your model, the input and outputs, the class labels, and any preprocessing that needs to happen on the data. It also contains all the learned parameters (the weights and biases).
Everything you need to use the model is inside this one file.
You simply drop the mlmodel file into your project and Xcode will automatically generate a Swift or Objective-C wrapper class that makes it really easy to use the model.
For example, if you add the file ResNet50.mlmodel to your Xcode project, you can then write,
let model = ResNet50()
to instantiate the model. And the following to make a prediction:
let pixelBuffer: CVPixelBuffer = /* your image */

if let prediction = try? model.prediction(image: pixelBuffer) {
  print(prediction.classLabel)
}
And that’s pretty much all there is to it. You don’t need to write any code to load the model or to convert its output into something you can use from Swift — that’s all taken care of by Core ML and Xcode. Sweet!
Note: To learn what happens behind the scenes, you can select the mlmodel file in the Project Navigator and then click on the button that says (Swift generated source) to see the file with the generated helper code.
Core ML will decide for itself whether to run the model on the CPU or the GPU. This allows it to make optimal use of the available resources. Core ML can even split up the model to only perform certain parts on the GPU (tasks that need to do a lot of computations) and the other parts on the CPU (tasks that need a lot of memory).
Core ML’s ability to use the CPU has another big benefit to us developers: you can run it from the iOS simulator (something that’s not possible with Metal, which also does not play well with unit tests).
What models does Core ML support?
The ResNet50 example above is of an image classifier but Core ML can handle several different types of models, such as:
- support vector machines (SVM)
- tree ensembles such as random forests and boosted trees
- linear regression and logistic regression
- neural networks: feed-forward, convolutional, recurrent
All of these can be used for regression as well as classification. In addition your model can contain typical ML preprocessing steps like one-hot encoding, feature scaling, imputation of missing values, and so on.
Apple makes a number of trained models available for download, such as Inception v3, ResNet50, and VGG16, but you can also convert your own models with the Core ML Tools Python library.
Currently you can convert models that are trained with Keras, Caffe, scikit-learn, XGBoost, and libSVM. The conversion tool is a little particular about which versions it supports — for example Keras 1.2.2 works but 2.0 doesn’t. Fortunately, the tool is open source so no doubt it will support more training toolkits in the future.
And if all else fails, you can always write your own converter. The mlmodel file format is open and fairly straightforward to use (it’s in protobuf format and the specs are published by Apple).
Limitations
Core ML is great for quickly getting a model up and running in your apps. However, with such a simple API there are bound to be some limitations.
The supported model types are for supervised machine learning only. No unsupervised learning algorithms or reinforcement learning. (Although there is support for a “generic” neural network type, so you might be able to use that.)
There is no training on the device. You need to train your models using an offline toolkit and then convert the model to Core ML format.
If Core ML does not support a certain layer type, you can’t use it. At this point it’s impossible to extend Core ML with your own compute kernels.Where tools like TensorFlow are used to build general-purpose computational graphs, the mlmodel file format is nowhere near that flexible.
Update Dec 2017: As of iOS 11.2, Core ML supports custom layers in neural networks. This fixes my above complaint. Yay!
The Core ML conversion tools only support specific versions of a limited number of training tools. If you trained a model in TensorFlow, for example, you can’t use this tool and you’ll have to write your own conversion script. And as I just mentioned: if your TensorFlow model is doing something that mlmodel does not support, you can’t use your model with Core ML.
You cannot look at the output produced by intermediate layers; you only get the prediction that comes out the last layer of the network.
I’m not 100% sure but it seems that downloading a model update could be problematic. If you need to re-train often and you don’t want to push out a new version of your app every time you update the model, then maybe Core ML is not for you.
Update 25 July: As of iOS 11 beta 4 the MLModel class has a new compileModel() function that lets you compile the .mlmodel file right inside your app, so you can download an updated model file without having to make an app update.
- Core ML hides whether it runs on the CPU or the GPU — which is convenient — but you have to trust that it does the right thing for your app. You can’t force Core ML to run on the GPU, even if you really really want it to.
Update 25 July: As of iOS 11 beta 4 there is an MLPredictionOptions with a usesCPUOnly property that lets you restrict computation to the CPU.
If you can live with these limitations, then Core ML is the right framework for you.
If not, or if you want full control, you’re going to have to roll your own with Metal Performance Shaders or the Accelerate framework — or both!
Of course, the real magic sauce is not in Core ML but in your model. Core ML is of no use if you don’t have a suitable model to begin with. And designing and training models is the hard part of doing machine learning…
A quick demo app
I put together a simple demo project to play with Core ML. As always, you can find the source code on GitHub.
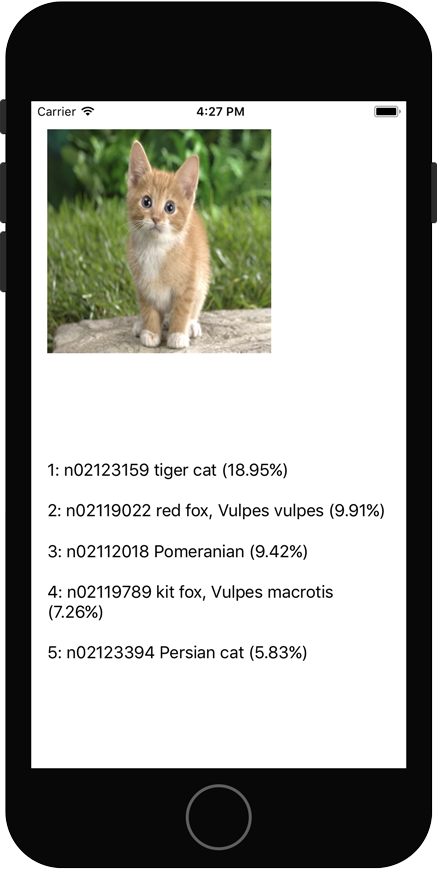
This demo app uses the MobileNet architecture to classify a picture of a cat.
Originally this model was trained in Caffe. It took me a little effort to figure out how to convert this to an mlmodel file, but once I had my converted model it was really easy to build into the app. (The conversion script is included in the GitHub repo.)
The app isn’t very exciting just yet — it just outputs a top-5 prediction for a static image — but it does show how easy it is to use Core ML. Just a few lines of code is all you need.
Note: The demo app works OK on the simulator but crashes on device. Keep reading to find out why this happens. ;–)
Of course, I wanted to know what goes on under the hood. It turns out that the mlmodel file is actually compiled into an mlmodelc folder that goes into your application bundle. This folder contains a bunch of different files, some binary, some JSON. So with a bit of spelunking you can see how Core ML transforms the mlmodel before it actually gets deployed in your app.
For example, the MobileNet Caffe model uses so-called Batch Normalization layers and I verified that these are also present in the converted mlmodel file. However, in the compiled mlmodelc the Batch Normalization layers appear to have been removed. That’s good news: Core ML optimizes the model.
Still, it looks like it could optimize the structure of the model even more, since the mlmodelc still appears to include scaling layers that aren’t strictly necessary.
Of course, we’re only at beta 1 of iOS 11 and Core ML may still improve. That said, it might be worth optimizing your model before you give it to Core ML — for example, by “folding” the Batch Normalization layers — but this is something you’ll have to measure and compare for your particular model.
Something else you’ll have to check: whether your model runs the same on CPU and GPU. I mentioned that Core ML will choose whether to run your model on the CPU (using Accelerate framework) or the GPU (using Metal). It turns out that these two implementations may work differently — so you need to test both!
For example, MobileNet uses a so-called “depthwise” convolution layer. The original model was trained in Caffe, which supports depthwise convolution by making the groups property of a regular convolution equal to the number of output channels. The resulting MobileNet.mlmodel file does the same. This works fine in the iOS simulator but it crashes on an actual device!
What happens is that the simulator uses the Accelerate framework but the device uses Metal Performance Shaders. And due to the way Metal encodes the data, the MPSCNNConvolution kernel has the restriction that you can’t make the number of groups equal to the number of output channels. Whoops!
I’ve submitted a bug report to Apple, but my point is: just because the model runs OK on the simulator doesn’t mean it runs OK on the device as well. Be sure to test!
How fast is it?
I haven’t been able to test the speed of Core ML, since my new 10.5” iPad Pro is not arriving until next week (he he).
I’m particularly interested in seeing what the speed difference is between running MobileNets using my Forge library and using Core ML (taking into consideration we’re still on a very early beta).
Stay tuned! I’ll update this section when I have data to share.
Vision
Next up on the list of things to discuss is the new Vision framework.
As you probably guessed from its name, Vision lets you perform computer vision tasks. In the past you would probably have used OpenCV for this but now iOS has its own API.
The kinds of jobs Vision can perform are:
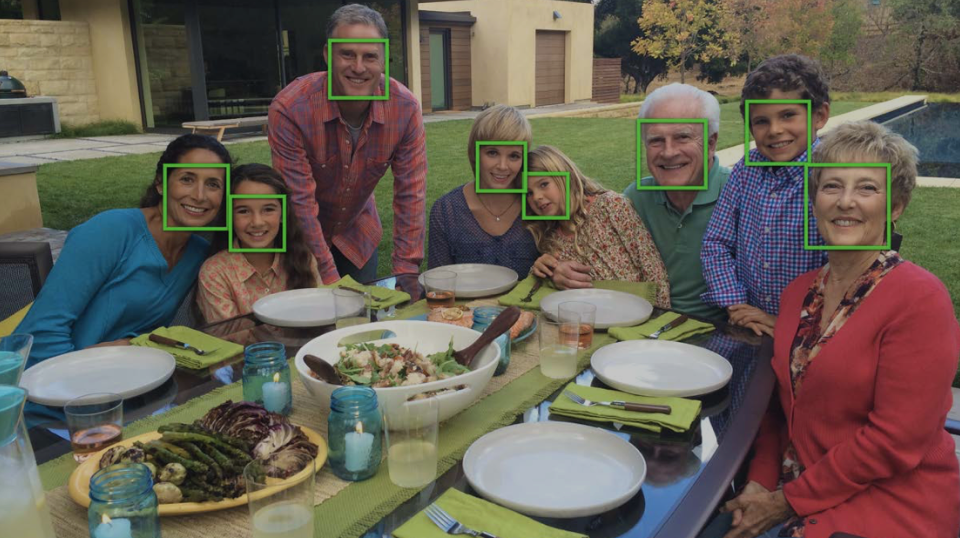
Finding faces within an image. This gives you a rectangle for each face.
Finding detailed facial features, such as the location of the eyes and the mouth, the shape of the head, and so on.
Finding things in images that are rectangular in shape, like street signs.
Tracking the movement of objects in a video.
Determining the angle of the horizon.
Transforming two images so that their content is aligned. This is useful for stitching together photos.
Detecting the regions in the image that contain text.
Detecting and recognizing bar codes.
Some of these tasks were already possible with Core Image and AVFoundation but now they’re all gathered inside one framework with a consistent API.
If your app needs to do one of these computer vision tasks, you no longer have to roll your own implementation or use someone else’s library — just use the Vision framework. You can also combine it with the Core Image framework for even more image processing power.
Even better: you can use Vision to drive Core ML, which allows you to use these computer vision techniques as preprocessing steps for your neural network. For example, you can use Vision to detect the position and size of a person’s face, crop the video frame to that region, and run your neural network on just the part of the image where the face is.
In fact, any time you’re using Core ML with images or video it makes sense to go through Vision. With “raw” Core ML you need to make sure your input image is in the format the model expects, but with Vision the framework takes care of resizing the image, etc. It saves a bit of extra effort on your part.
In code using Vision to drive Core ML looks like this:
// the Core ML machine learning model
let modelCoreML = ResNet50()

// link the Core ML model to Vision
let visionModel = try? VNCoreMLModel(for: modelCoreML.model)

let classificationRequest = VNCoreMLRequest(model: visionModel) {
  request, error in
  if let observations = request.results as? [VNClassificationObservation] {
    /* do something with the prediction */
  }
}

let handler = VNImageRequestHandler(cgImage: yourImage)
try? handler.perform([classificationRequest])
Note that VNImageRequestHandler takes an array of request objects, allowing you to chain several computer vision jobs together, like so:
try? handler.perform([faceDetectionRequest, classificationRequest])
Vision makes computer vision really easy to use. But the cool thing for us machine learning folks is that you can take the output of those computer vision tasks and feed it into your Core ML model. Combined with the power of Core Image that makes for one hell of an image processing pipeline!
Metal Performance Shaders
The last major topic I want to talk about is Metal, Apple’s GPU programming API.
A lot of my work for clients this year has involved building neural networks with Metal Performance Shaders (MPS) and tuning them for optimal performance. But iOS 10 only provided a few basic kernels for creating convolutional networks. Often it was necessary to write custom kernels to fill in the gaps.
So I’m happy that with iOS 11 the number of available kernels has grown a lot, but even better: we now have an API for building graphs!
Note: Why would you use MPS instead of Core ML? Good question! The biggest reason is when Core ML doesn’t support what you want to do, or when you want full control over the process and squeeze out the maximum possible speed.
The big changes in MPS for machine learning are:
Recurrent neural networks. You can now create RNN, LSTM, GRU, and MGU layers. These work on sequences of MPSImage objects but also on sequences of MPSMatrix objects. That’s interesting because all the other MPS layers deal with images only — but obviously that’s not very convenient for when you’re working with text or other non-image data.
More datatypes. Previously weights were supposed to be 32-bit floats but now can be 16-bit floats (half precision), 8-bit integers, or even binary. Convolution and fully-connected layers can be done with binary weights and binarized inputs.
More layers. Up until now we had to make do with plain-old regular convolution and max/average pooling, but as of iOS 11 MPS lets you do dilated convolution, subpixel convolution, transposed convolution, upsampling and resampling, L2-norm pooling, dilated max pooling, as well as a few new activation functions. MPS doesn’t have all the Keras or Caffe layer types yet, but the gap is closing…
More convenient. Working with MPSImages is always a bit weird because Metal organizes data in slices of 4 channels at a time (due to images being backed by MTLTexture objects). But now MPSImage has methods for reading and writing data that don’t break your brain as much.
Also convenient is that MPSCNNConvolutionDescriptor has a new method that lets you set the batch normalization parameters on the layer. This means you no longer have to fold the batch normalization into the convolution layer weights yourself but MPS will do this for you. Very handy!
Performance improvements. The existing kernels have become faster. That’s always good news. 🏎
Graph API. This is the big news as far as I’m concerned. Creating all the layers and (temporary) images by hand was always a nuisance. Now you can describe a graph, just like you would in Keras. MPS will automatically figure out how large the images need to be, how to deal with padding, how to set the offset of your MPS kernels, and so on. It can even optimize the graph behind the scenes by fusing layers.
It looks like all MPS kernels are now serializable with NSSecureCoding, which means you can save a graph to a file and later restore it. And doing inference with this graph is now just a single method call. It’s not as easy as Core ML just yet, but using MPS is definitely a lot less work than before.
One thing that is not clear to me yet is whether you can write your own compute kernels and stick them into this graph. In my client work I’ve found that often there’s a need for a preprocessing step, which requires a custom shader written in the Metal Shading Language. As far as I can tell, there does not seem to be an “MPSNNCustomKernelNode” class. This needs more investigating!
Conclusion: the Metal Performance Shaders for machine learning have become a lot more powerful with iOS 11, but most developers should probably stick with Core ML (which uses MPS under the hood).
Note: The new graph API makes my Forge library pretty much obsolete, unless you want to keep supporting iOS 10 in your apps. I will be porting the example apps to the new graph API soon and I’ll write a more detailed blog post about it then.
Odds and ends
Some other new stuff that was announced:
Accelerate: It seems that BNNS in the Accelerate framework didn’t get much of a functionality update. It finally has a Softmax layer but none of the new layer types that MPS got. Maybe that’s all right: using the CPU for deep neural networks isn’t probably a good idea anyway. That said, I love Accelerate and it’s got loads of goodies. And this year it did get more support for sparse matrices, so that’s cool.
Natural Language Processing: Core ML is not just for images, it can handle lots of different kinds of data including text. The API to use is the NSLinguisticTagger class that has been around for a while but has become much more efficacious with iOS 11. NSLinguisticTagger now does language identification, tokenizing, part-of-speech tagging, lemmatization, and Named Entity Recognition.
I don’t have a lot of experience with NLP, so I can’t really say how it stacks up against other NLP frameworks but NSLinguisticTagger looks quite powerful. This API seems like a good place to get started if you want to add NLP to your apps.
Is it all good news?
It’s great that Apple provides all these new tools to us developers, but there is an important “problem” with most Apple APIs:
- they are not open source
- they have limitations
- they’re only updated with new OS releases
These three things together mean that Apple’s APIs will always lag behind other tools. If Keras adds a cool new layer type, you won’t be able to use this with Core ML until Apple updates their framework and their OS.
And if some part of the API doesn’t quite work the way you want, you can’t go in and fix it — you’ll have to work around it (not always possible) or wait until the next OS release (and require all your users to upgrade).
Of course I don’t expect Apple to give away their secret sauce, but as most other machine learning toolkits are open source, why not make Core ML open source too? 🙏
Knowing Apple this probably isn’t going to happen any time soon, but at least keep the above in mind when you decide to add machine learning to your own apps.
First published on Sunday, 11 June 2017.
If you liked this post, say hi on Twitter @mhollemans or LinkedIn.
Find the source code on my GitHub.
 New e-book: Code Your Own Synth Plug-Ins With C++ and JUCE
Interested in how computers make sound? Learn the fundamentals of audio programming by building a fully-featured software synthesizer plug-in, with every step explained in detail. Not too much math, lots of in-depth information! Get the book at Leanpub.com