
In this series of blog posts we’re taking a deep dive into the new on-device model personalization features from Core ML 3. I’ll show how to create a customizable image classifier using k-Nearest Neighbors as well as a deep neural network, right from inside an iOS app.
This is the last part of a four-part series:
- Introduction to on-device training
- Rock, Paper, Scissors (Lizard? Spock?)
- k-Nearest Neighbors
- Training a Neural Network
Follow along with the source code on GitHub.
In this last installment, we’ll finally bring out the big guns: a deep neural network.
Training a neural network
Even though Core ML 3 allows you to train advanced neural networks on the iPhone, I should point out that k-Nearest Neighbors is often the better choice!
Developers should probably use k-NN for many, if not most, of their on-device personalization tasks. Usually in combination with a neural network that acts as a feature extractor, like we did in part 3.
The advantages of k-NN are that it’s simple and fast to train, only requires a few training examples per class, and it can handle any number of classes that can be defined by the user.
A neural network is usually quite complex, is slower to train because it needs many training examples, and the architecture is set in stone: if your neural network can only predict 3 classes, you cannot add a 4th class later.
If it is at all possible for the number of classes to change at runtime, you already need to take that into account when you design the architecture of the neural net and make its classification layer large enough.
For example, the dataset we’ve been using only has three classes — rock ✊, paper ✋, scissors ✌️ — but we allow the user to add new gestures. To accomodate this, the network’s classification layer actually contains 10 instead of 3 neurons so that it can predict up to 10 classes, even if they’re not all used by the app.
So why use a neural network? Well, it’s way more powerful than k-NN and can give better results.
k-NN doesn’t really “learn” anything — it just memorizes — and so it might not generalize as well as a model type that is truly capable of learning.
k-NN models are also not very robust against noisy data, or when there are outliers, or when the data contains irrelevant features. Neural networks are much better at that sort of thing.
Even though k-NN in general can also be used for regression, in Core ML it only does classification. If your model is not a classifier, you’ll need to use a neural network. (But note that you can’t just train any neural network in Core ML — there are still many limitations.)
My recommendation is to start out with a k-NN model first if you’re interested in doing on-device training. If this works well enough for your kind of data, great. I’d only switch to a full neural network if k-NN’s predictions aren’t good enough.
How does training work again?
You probably already know how neural networks are trained but here’s a quick refresher.
Assuming that you have a large-enough dataset of images and their labels, you present all the training examples to the model one after the other.
- The model makes predictions (the forward pass),
- the loss function computes how wrong these predictions are,
- based on how wrong the model is, using backpropagation the optimizer slightly adjust the learned parameters (the backward pass),
- so that the next time the model’s predictions will be slightly better.
Each run through the dataset is called an epoch. This is repeated tens or even hundreds of times, and on every one of these epochs the model becomes a bit better at making predictions.
Usually you don’t train one image at a time but using mini-batches of, say, 32 images. Ideally you’d compute the loss over all the images at once but this is impractical as it would require way too much RAM. So instead, you approximate the loss for the entire dataset with the loss over a much smaller mini-batch.
Using mini-batches works better than using single images and is a little more efficient too.
Note: Exactly how large mini-batches should be is a matter of some debate. A typical batch size is 32. In practice it depends on how much RAM you have to spare, and on mobile RAM is often quite limited. That’s why in the demo app we’ll use a mini-batch size of 8. But be aware that on models that use batch normalization layers, the mini-batch size should not be too small.
Core ML takes care of pretty much all this stuff, so you don’t need to know how backpropagation or loss functions or optimizers work. But you do need to set up the hyperparameters for the training process properly.
The model architecture
The neural network we’ll be using is a SqueezeNet v1.1 image classifier. I chose SqueezeNet for this blog post because it’s quite small and also because it’s what you get when you train an image classifier with Turi Create.
Yep, it’s the exact same model that we’ve used with k-NN, except this time we won’t strip off the classifier layer.
Just like Turi Create and Create ML, our app will be using transfer learning. Instead of training the entire model from scratch — which I think we agreed is a bad idea on mobile — only the last layer of SqueezeNet will be (re-)trained. This is the layer that does the actual classification work.
The rest of SqueezeNet was pre-trained on the ImageNet dataset (photos of 1000 types of objects). Just like with the k-NN model, this part of SqueezeNet acts as a feature extractor.

Unlike with k-NN, you can’t easily add new classes to the neural network. So you need to decide beforehand how many classes your model will have. In our case, it’s 10 classes max.
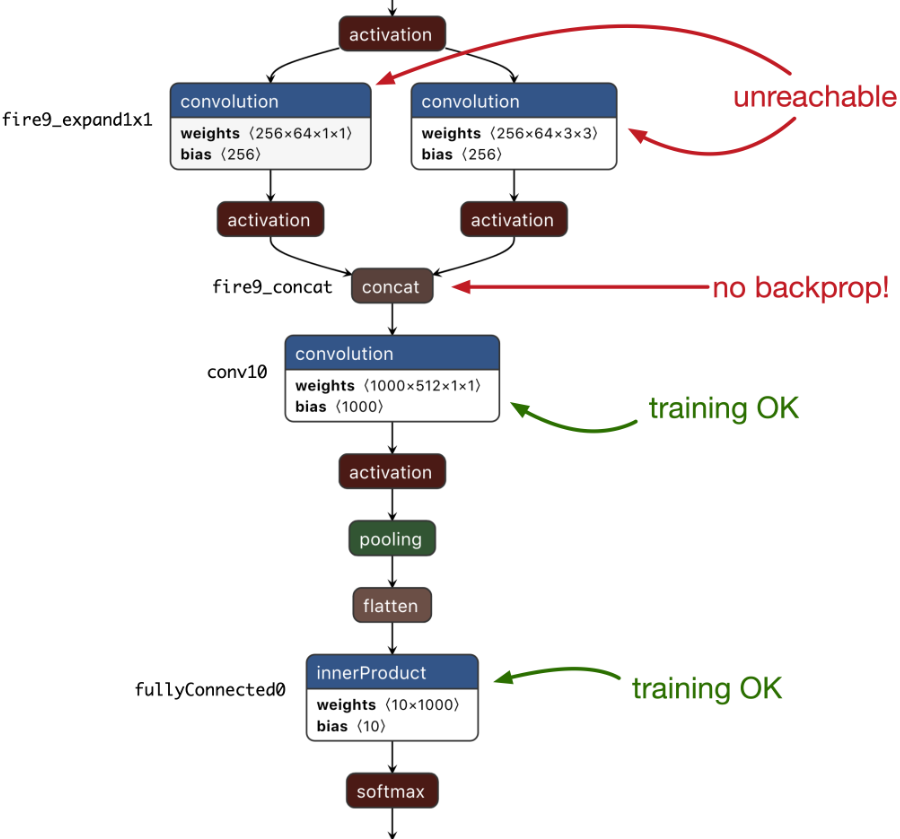
The layer that we’ll be training is a fully-connected layer, also known as an inner product or affine layer. It has 1000 input neurons and 10 output neurons (because 10 classes). Our neural network will therefore need to learn 1000 × 10 = 10,000 weights plus 10 bias values.
The illustration above also shows other layers: softmax, flatten, pooling, activation. These layers do not have any learnable parameters and therefore do not need to be trained.
A quick aside about logistic regression
If you only train the very last layer like we’re going to be doing here, you’re basically just training a logistic regression model on top of a feature extractor.
Logistic regression can be trained very quickly using an optimizer such as L-BFGS. In fact, that is what Turi Create does for its image classifiers. That is much faster than training a neural network.
Core ML currently doesn’t support training logistic regression but you could roll your own. So why are we using a neural network instead?
One downside of logistic regression is that it’s harder to apply data augmentation. Logistic regression must always be trained on the entire dataset at once, so you’d need to precompute all the augmented images and their feature vectors (this is what Create ML does). Neural networks are trained on small batches of data at a time, allowing us to do data augmentation on-the-fly.
Also, with a neural network we’re not limited to just training the last layer: we can also train other layers in order to fine-tune parts of the feature extractor on the user’s data too. This usually gives much better results.
That said, using the neural network as a feature extractor, followed by logistic regression, is definitely a plausible alternative for doing on-device training. You’ll just have to implement the training logic for this yourself.
Creating the mlmodel
In order to train on the device we need to start out from a previously trained mlmodel. Two of these are included in the app:
- HandsTuri.mlmodel, made by Turi Create
- HandsEmpty.mlmodel, the same model but with an untrained classifier layer
Both these models are derived from TuriOriginal.mlmodel. As you may recall from part 2, as a proof-of-concept I first trained a SqueezeNet model using Turi Create. This model, which is TuriOriginal.mlmodel, gets 80% accuracy on the test set. (See the Scripts/TuriCreate.ipynb notebook for more details.)
The starter models are created by the Python script Scripts/make_nn.py. It first loads TuriOriginal.mlmodel, makes it updatable and saves this as HandsTuri. Next, it resets the weights of the classifier layer and saves that as HandsEmpty.mlmodel.
Let’s take a look at how make_nn.py works.
import coremltools
model = coremltools.models.MLModel("TuriOriginal.mlmodel")

spec = model._spec
layer = spec.neuralNetworkClassifier.layers[-2]

num_classes = 10
layer.innerProduct.outputChannels = num_classes

weights = np.zeros((num_classes - 3) * 1000)
biases = np.zeros(num_classes - 3)
labels = ["user" + str(i) for i in range(num_classes - 3)]

layer.innerProduct.weights.floatValue.extend(weights)
layer.innerProduct.bias.floatValue.extend(biases)
spec.neuralNetworkClassifier.stringClassLabels.vector.extend(labels)
This loads the original mlmodel and makes a few changes to the classifier layer. In Turi Create, I only trained the model on 3 classes. That means the fully-connected layer also has 3 neurons. But because we want to user to add their own classes, we have to give this layer more neurons.
For this app, I decided there can be at most 10 gestures. 10 possible classes is 10 output neurons, or outputChannels as Core ML calls them. (k-NN models don’t have this kind of limit on the number of classes.)
More neurons also means the layer needs to have more weights. The above code adds these extra weights to the layer. Because we don’t want these to interfere with the existing learned parameters of this model, the new weights are set to 0.
We must also add placeholder names for the new classes, which I named user0, user1, and so on.
OK, that was a bit of model surgery to make the neural network capable of learning more than three classes. Now let’s make this model updatable. First, put the model into a NeuralNetworkBuilder:
from coremltools.models.neural_network import NeuralNetworkBuilder
builder = NeuralNetworkBuilder(spec=model._spec)
Previously, NeuralNetworkBuilder could only be used to create new models, but as of coremltools 3.0 you can also use it to make changes to existing models, which is less effort than messing around with the protobuf objects yourself.
To make an mlmodel trainable on the device,
- its
isUpdatableproperty must be set to true - any neural network layers that can be trained must also have their
isUpdatableproperty set to true - the mlmodel file must have a specification version of at least 4
- the neural network must include a loss function
- the model must have training inputs in addition to the regular inputs
- the model must have an optimizer
- the mlmodel file must contain default values for hyperparameters such as the mini-batch size and the learning rate
The NeuralNetworkBuilder makes it easy to do all of these things.
Note: You might also be able to use the Core ML converters to make your models updatable. Currently, only the Keras converter supports this. With the option respect_trainable=True, any layers that were trainable in the original model also become trainable in the Core ML model. (Unfortunately, the Keras converter only does half a job and you still need to add the training inputs by hand.) But because we’re starting from a Turi Create mlmodel, not a Keras model, we have to make it trainable by hand using NeuralNetworkBuilder.
Choose which layers are updatable
To mark the model and any layers as being updatable, write the following:
builder.make_updatable(["fullyconnected0"])
Here, we’re saying that "fullyconnected0", which is the final classification layer from our model, will be trainable.
For this simple demo app we’re only training the last layer of the neural network, but of course it’s possible to train more than one layer. Simply pass in a list of layer names, for example ["fullyconnected0", "conv10"].
Currently, only fully-connected (also known as inner-product or affine) layers and convolution layers can be made trainable. But, as I mentioned, a lot of layer types don’t need training — such as softmax, flatten, pooling, and activation layers. You don’t need to specify those when you call builder.make_updatable().
There is another important limitation: Core ML cannot yet backpropagate through all layer types. Between "conv10" and the preceding convolution layers is a concat layer. Unfortunately, Core ML cannot backprop through such a concat layer, which means that training "fullyconnected0" and "conv10" is the best you can do for SqueezeNet. The other convolution layers are not reachable.
make_updatable() also automatically sets the specificationVersion of the mlmodel to 4. This version number is important, so that apps won’t try to use updatable models with older iOS versions. (The downside is that you can’t use a model that is updatable on iOS 12 or earlier, even if you’re not using any of the training stuff.)
The loss function and training inputs
Next, we’ll need to add a loss function to the neural network.
Core ML currently offers two loss functions:
- cross-entropy loss
- mean squared error loss
You can’t define your own loss functions, so this limits neural networks to multi-class classification and basic regression tasks.
Since our model is a classifier, we need to use cross-entropy loss:
builder.set_categorical_cross_entropy_loss(name="lossLayer",
                                           input="labelProbability")
The input argument is the name of the output from the softmax layer. Because our model is a standard Core ML classifier, it has the following outputs:
"label": the class label of the best prediction"labelProbability": a dictionary with the predicted probabilities for all classes
The cross-entropy loss layer needs to be connected to the dictionary output, "labelProbability". The loss layer reads the predicted probabilities from this output and compares those to the training example’s true label in order to compute the loss.
Speaking of the true labels… where do those come from? Well, besides adding a loss layer, set_categorical_cross_entropy_loss() also adds so-called training inputs to your model.
Before, our SqueezeNet model had the following input:
"image": a 227x227 RGB image
set_categorical_cross_entropy_loss() adds two new inputs:
"image": a 227x227 RGB image"label": a string
These are called the training inputs because Core ML uses these during training instead of the regular inputs. Note that "image" appears in both the regular inputs and the training inputs — after all, you’ll also need the image during training.
The new addition is the input for the true label, named simply "label".
At this point — if you’re curious — you can look at the loss layer by doing print(builder.spec.neuralNetworkClassifier.updateParams). This prints the following:
lossLayers {
  name: "lossLayer"
  categoricalCrossEntropyLossLayer {
    input: "labelProbability"
    target: "labelProbability_true"
  }
}
shuffle {
  defaultValue: true
}
As expected, the model now has a categoricalCrossEntropyLossLayer.
Note: The lossLayers structure is actually a list of layers. This means a Core ML neural network can have more than one loss layer, for example to combine a cross-entropy loss for classification with an MSE loss for regression (perhaps of bounding box coordinates or something similar). However, there is currently no way to weight the different loss terms so that the classification loss counts heavier than the regression loss or vice versa.
A loss layer usually has two inputs:
- the predicted value, given here by
input, and - the true value, also known as the
target.
The input to this layer is the predicted probabilities from the softmax. The target will receive the training example’s true label.
You may wonder why the target is called "labelProbability_true", even though the training input for the true label is named "label"? It certainly confused me… I had expected that these two things needed to be the same. How else would Core ML know which training input to connect to the loss layer?
It turns out, classifiers are a bit special in Core ML.
Core ML models can have a predictedFeatureName property. This is the primary predicted output feature. In the case of a classifier, predictedFeatureName is set to the output that predicts the best-scoring class label. In our model, that is the "label" output.
(There also is a predictedProbabilitiesName property that has the name of the output with the probabilities dictionary. This allows you to rename your outputs to whatever you like but Core ML will still know which is which.)
By setting the name of the training input to the value from predictedFeatureName, which in our case is "label", Core ML lets you pass in the true label as a string. That’s actually quite convenient, as the cross-entropy loss normally doesn’t accept string values! Core ML will automatically map the string to the correct categorical index and then pass it into the target of the cross-entropy loss layer.
Mystery solved: for a classifier, the name the loss layer’s target is set to isn’t actually important. Core ML sees that the training input is a string and has the name from predictedFeatureName, and so it will internally connect it to the cross-entropy layer’s target.
Note: If your labels aren’t strings, you’ll need to pass in the true label using an MLMultiArray that contains just a single element. This element is the categorical index of the label (there’s no need to one-hot encode the labels). The data type of the MLMultiArray can be .int32, .float32, or .double. In this case, the name of the loss layer’s target is important and must match the name of a training input. If you’re not training a classifier, i.e. if you’re using the MSE loss, you’ll also have to pass in the target using an MLMultiArray.
Back to make_nn.py. Even though the training inputs were added automatically, they don’t have a human-readable description yet, so give them one:
builder.spec.description.trainingInput[0].shortDescription = "Example image"
builder.spec.description.trainingInput[1].shortDescription = "True label"
The optimizer and its hyperparameters
As is usual in supervised learning, after computing the loss for a mini-batch of training examples, Core ML will backpropagate through the neural network and use an optimizer to adjust the model’s learned parameters.
Core ML supports two optimizers:
- SGD (Stochastic Gradient Descent)
- Adam
To add an SGD optimizer to the model, you’d do the following:
from coremltools.models.neural_network import SgdParams
sgd_params = SgdParams(lr=0.001, batch=8, momentum=0)
sgd_params.set_batch(8, [1, 2, 8, 16])
builder.set_sgd_optimizer(sgd_params)
Creating an Adam optimizer is very similar:
from coremltools.models.neural_network import AdamParams
adam_params = AdamParams(lr=0.001, batch=8, beta1=0.9, beta2=0.999, eps=1e-8)
adam_params.set_batch(8, [1, 2, 8, 16])
builder.set_adam_optimizer(adam_params)
The main difference is that Adam has more options. make_nn.py uses SGD but I’ve included the Adam code here in case you want to experiment with which optimizer works best.
The values you pass into the SgdParams or AdamParams constructor are the default settings for the different optimizer hyperparameters. Here, the learning rate or lr is 0.001 by default and the mini-batch size is 8.
Inside the app you can override these default values, but any new value you choose must meet the constraints defined in the mlmodel file.
For the learning rate, momentum, beta1, beta2, and epsilon, the range of allowed values is between 0 and 1. The mini-batch size by default only allows the value you passed into SgdParams or AdamParams. To change these constraints, you have to call set_batch() or set_lr(), etc. Here, we’re telling Core ML that we will allow mini-batches of size 1, 2, 8, and 16.
There are other hyperparameters that you need to set as well, most notably the number of epochs:
builder.set_epochs(10, [1, 10, 50])
When you tell Core ML to train the neural network, it always runs for the number of epochs that is defined in the mlmodel file. Here, we set the number of epochs to be 10 by default, but we’ll allow the app to change this to 1 epoch or 50 epochs too.
Another hyperparameter you can set is shuffle. By default this is true, which means Core ML will automatically randomly reorder the training examples each epoch. You can also set the random seed used for shuffling.
All right, now the mlmodel is updatable and can be trained by Core ML on the device! Finally, save the model to a new mlmodel file:
coremltools.utils.save_spec(builder.spec, "HandsTuri.mlmodel")
Brainwashing the classifier
OK, that was step one: we made the Turi Create version of the model updatable.
That’s usually what you’d do for your own apps: take an existing model that already works well on generic data, and make it updatable so that it can be trained on the user’s own data.
But for the purposes of this demo app, we also want to have a version of the model whose classifier layer is not trained yet at all. That way, we can see how hard it is to train a classifier layer from scratch on the device.
To do this, we’ll take the Turi model, leave the SqueezeNet part of the network as-is, but overwrite the learned parameters — also known as the weights and biases — of the fully-connected layer.
Before training, layers are usually initialized with small random values. To create an untrained version of the fully-connected layer, we’ll simply replace its learned parameters with random values.
We start out from the HandsTuri model because it has all the stuff we need. (The following code is also in make_nn.py.)
model = coremltools.models.MLModel("HandsTuri.mlmodel")
model.short_description = ""
spec = model._spec
layer = spec.neuralNetworkClassifier.layers[-2]
The fully-connected layer is the second-to-last one, so we can get it with layers[-2]. The last layer, layers[-1], is the softmax layer. We don’t need to change that because softmax has no learnable parameters.
To replace the learned parameters of the fully-connected layer, do the following:
import numpy as np

W_old = np.array(layer.innerProduct.weights.floatValue)
B_old = np.array(layer.innerProduct.bias.floatValue)

fan_in = layer.innerProduct.inputChannels
bound = np.sqrt(6.0 / fan_in)
W_new = np.random.uniform(-bound, bound, W_old.shape)

bound = 1 / np.sqrt(fan_in)
B_new = np.random.uniform(-bound, bound, B_old.shape)

layer.innerProduct.weights.ClearField("floatValue")
layer.innerProduct.weights.floatValue.extend(W_new)

layer.innerProduct.bias.ClearField("floatValue")
layer.innerProduct.bias.floatValue.extend(B_new)

coremltools.utils.save_spec(spec, "HandsEmpty.mlmodel")
The type of initialization we’re using here is so-called “Kaiming” initialization. It’s typical for fully-connected layers (although any kind of small random numbers would have worked here).
Thanks to this random initialization, if you try out the untrained model in the app’s Evaluate screen, it will only get around 10% accuracy — it is just randomly guessing between the ten possible classes.
Note: The exact accuracy from the untrained model can vary as it largely depends on the random numbers picked by make_nn.py. Every time you run make_nn.py, the random initialization will be slightly different, and so will the predictions made by HandsEmpty.mlmodel. Sometimes you may get less than 10% accuracy, sometimes more. The more test images you have, the more likely it is that you’ll end up at exactly 10%.
And that’s it, now we have two new mlmodel files, one that was trained for a bit already with Turi Create, and one whose classifier is still completely untrained.
If you open HandsEmpty.mlmodel or HandsTuri.mlmodel in Xcode, it looks like this:
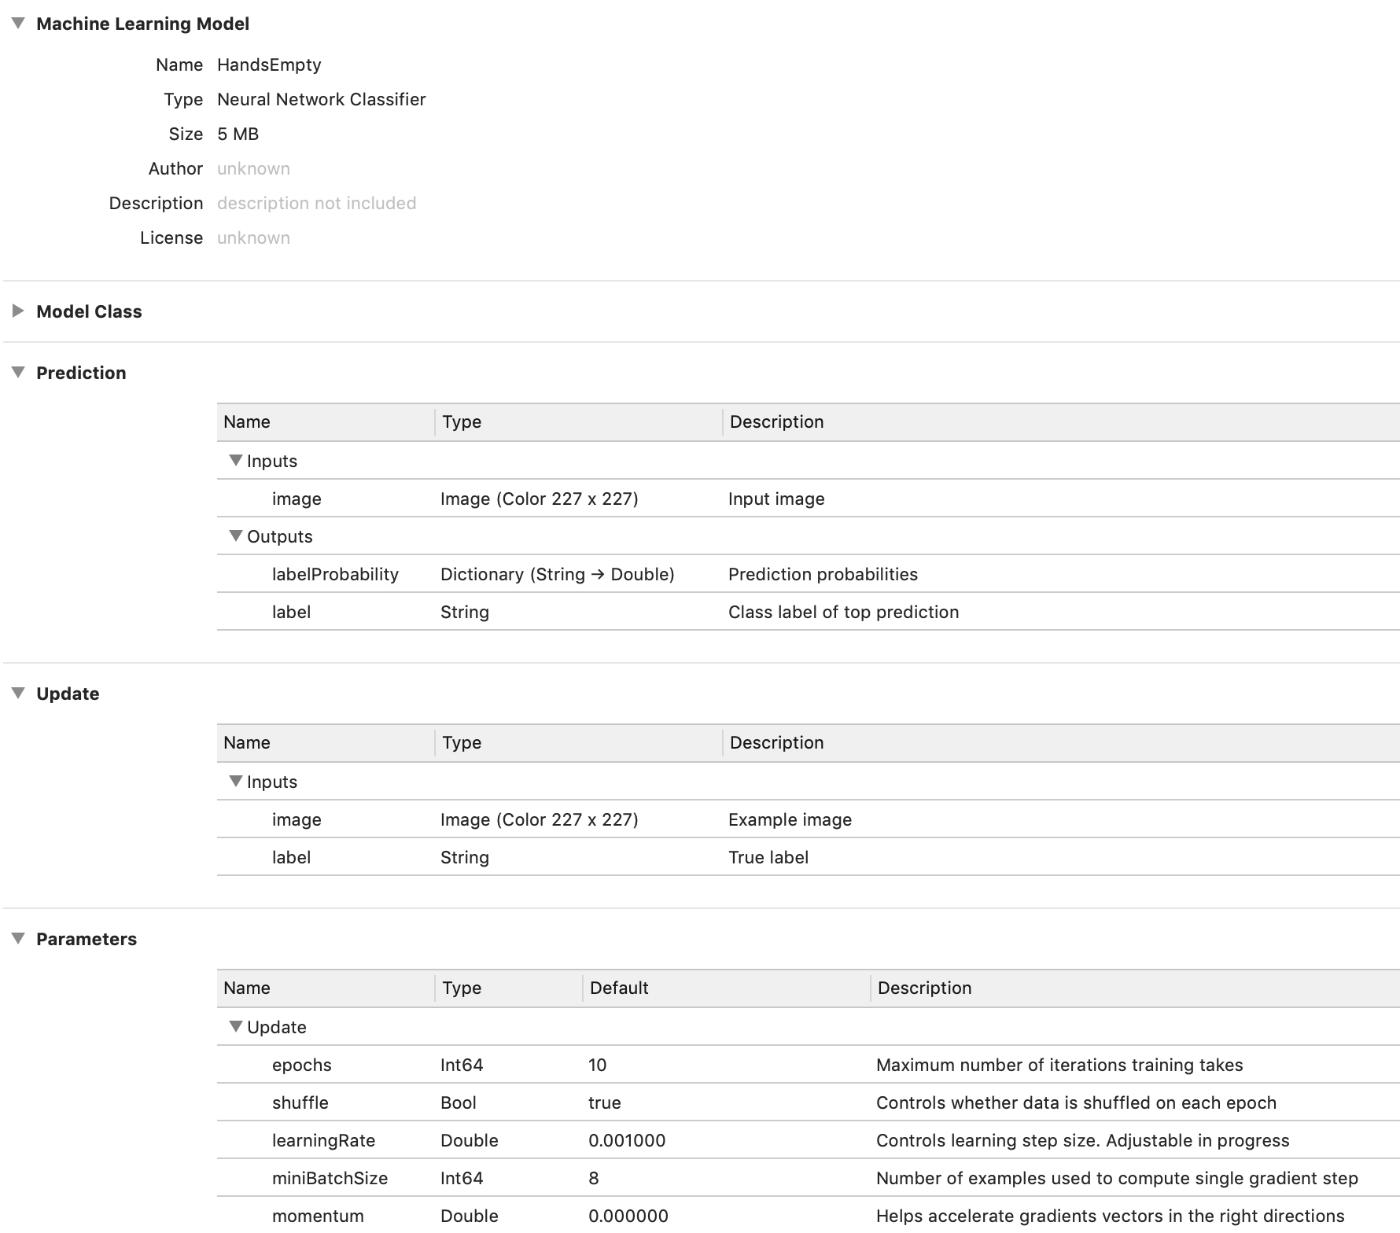
The Update section shows the training inputs for the model.
The Parameters section lists all the hyperparameters. While for the k-NN model this had just one parameter — the number of neighbors — for a neural network it shows a lot more stuff.
Note: Just as with the k-NN version, the demo app won’t make changes directly to HandsEmpty or HandsTuri.mlmodel. The first time you run the app, it copies HandsEmpty.mlmodelc from the app bundle into the Documents directory as NeuralNetwork.mlmodelc. The app also does this if you tap Reset to Empty Model, allowing you to restart training on a fresh copy of the model. It is NeuralNetwork.mlmodelc that will actually be trained. To continue training the model from Turi Create, tap Reset to Turi Model to copy HandsTuri.mlmodelc from the app bundle on top of NeuralNetwork.mlmodelc instead.
Back to the app
Over the course of this series we’ve been building a simple demo app that lets you collect training data and test data, and lets you evaluate the different models on the test set. Last time we added training for the k-NN model, this time we’ll add the training code for the neural network.
If you haven’t yet, grab the code from the GitHub repo and follow along. (The app runs fine on the iOS Simulator in case you don’t have a compatible device.)
The Training screen for the neural network looks like this:
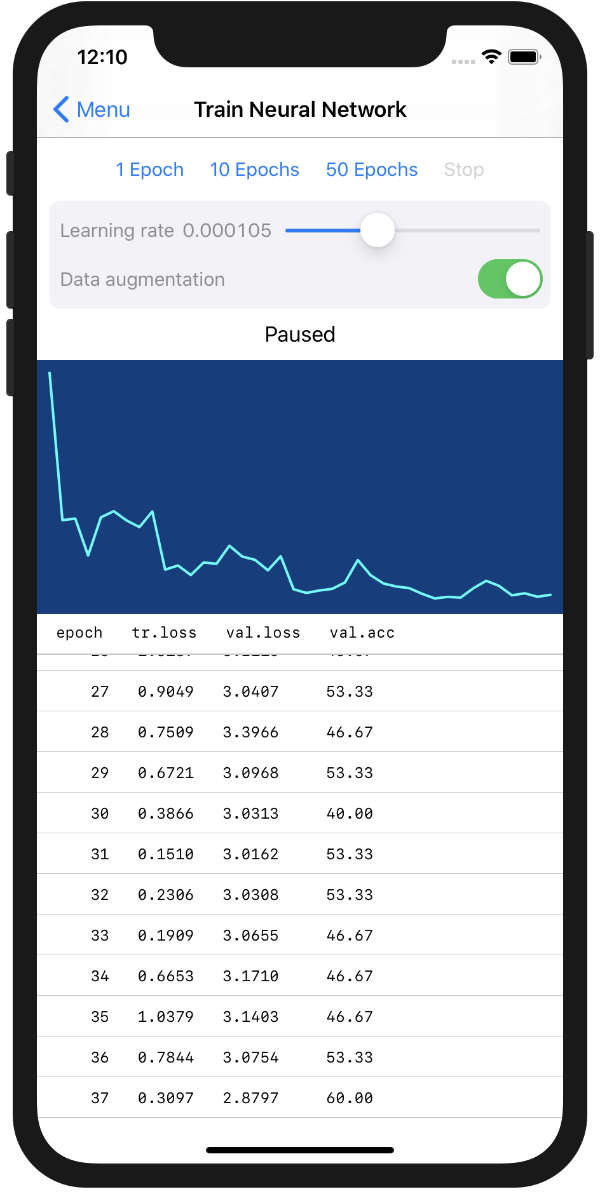
There are buttons to start and stop training, a slider that lets you set the learning rate, a graph of the training loss, and a table with statistics for every epoch.
The training loss (tr.loss in the table) is what Core ML reports back to us after each epoch. This is also what is plotted in the graph.
The validation loss (val.loss) and accuracy (val.acc) are computed on the test set. This uses the same Predictor class that’s also used by the Evaluate screen, see part 2 for more info.
The screenshot above shows a model that has been trained for a number of epochs. If you haven’t trained yet (or after you press Reset to Empty Model), the screen is mostly empty.
The UI of this screen is implemented by TrainNeuralNetworkViewController.swift. As usual, the view controller code isn’t really interesting. All the good stuff happens in NeuralNetworkTrainer.swift plus a handful of helper classes.
Try it out! Run the app, press Train to go to the Train Neural Network screen. Tap 10 Epochs to start training and see what happens. :–)
Tip: Recall that when you run the app for the first time, it copies the mlmodel files from the app bundle into the app’s Documents folder. If you made any changes to make_nn.py or the mlmodel files, first press Reset to Empty Model in the app’s home screen. This will copy the latest version of the model from the app bundle again. Without this, the app will keep using the old version.
After training completes, the previous version of the model is overwritten by the updated one. The training history is saved to a file as well, so you can come back to this screen to resume training later. (For reasons I’ll go into, if you press Stop to abort training, the updated model is discarded and you actually lose all the work.)
Now let’s see how the training actually works!
Loading the training data
In part 3, you’ve seen that training a k-NN model was done by creating an MLUpdateTask and giving it an MLBatchProvider with the training data. The whole thing took only a handful lines of code. Training a neural network happens in much the same way, except the process is slightly more involved.
The main difference is that k-NN simply memorizes the training examples, so you need to show it each example only once. But neural networks use an iterative learning process — a “training loop” — and so they need to see each example many times over.
Let’s begin with the MLBatchProvider. With k-NN you typically train on one or a few examples at a time. It’s easy enough to load those examples into memory and put them into an MLArrayBatchProvider object. However, for a neural network you may have more training examples than can fit into memory at a time. There’s no way you could fit them all into an MLArrayBatchProvider.
The solution is to write your own MLBatchProvider class. Even if the amount of training data is limited — as in the demo app — another good reason for creating your own batch provider is that this lets you do on-the-fly data augmentation.
The code for our own batch provider is in TrainingBatchProvider.swift. It’s simpler than you may think, here’s the entire thing:
class TrainingBatchProvider: MLBatchProvider {
  let imageLoader: ImageLoader

  init(imageLoader: ImageLoader) {
    self.imageLoader = imageLoader
  }

  var count: Int {
    imageLoader.dataset.count
  }

  func features(at index: Int) -> MLFeatureProvider {
    guard let featureValue = try? imageLoader.featureValue(at: index) else {
      print("Could not load image at index \(index)")
      return failure()
    }

    let trueLabel = imageLoader.dataset.label(at: index)

    guard let pixelBuffer = featureValue.imageBufferValue else {
      print("Could not get pixel buffer for image at \(index)")
      return failure()
    }

    return HandsEmptyTrainingInput(image: pixelBuffer, label: trueLabel)
  }

  private func failure() -> MLFeatureProvider {
    return try! MLDictionaryFeatureProvider(dictionary: [:])
  }
}
All you have to do is implement the count property and the features(at:) method.
Notice that, even though this is called a batch provider, it only returns a single training example at a time. Core ML will repeatedly call features(at:) with different indices to fill up the mini-batch. If shuffling is enabled, those indices will be picked randomly.
The MLBatchProvider actually doesn’t know anything about batches (!) or about how the images get stored inside a batch. So the name is a little misleading: it doesn’t provide batches, only things that go inside batches. (It’s also not notified when a new batch or epoch starts.)
Since we already have an ImageLoader class, our batch provider simply uses that to load the images. ImageLoader also performs the data augmentation if that is enabled (more about this later).
We also provide the true labels for each example.
Each training example consists of an image and its label. Core ML expects you to return both in a single MLFeatureProvider object. Rather than constructing the MLFeatureProvider objects from scratch, we simply use the Xcode-generated class HandsEmptyTrainingInput (which already implements MLFeatureProvider).
You could also have written the following:
let inputs: [String: Any] = [ "image": featureValue,
                              "label": trueLabel ]
return try! MLDictionaryFeatureProvider(dictionary: inputs)
Personally, I find using the generated class a bit more convenient but either works.
There’s no way to return an error but there’s always the possibility that loading an image — or whatever data you have — fails. It turns out that returning an empty MLFeatureProvider object, like we do here using the failure() function, will cause training to immediately end with a .failed state. So that’s one way you can handle data loading errors.
Note: Core ML will automatically take care of shuffling the training data if that option is enabled. My ImageLoader class has its own option to shuffle the data. When I first wrote this code during the iOS 13 beta period, the shuffle hyperparameter didn’t exist yet. I left it in the code, so you can see how to implement shuffling yourself if you ever need to.
The ImageLoader also has a way to split the data into batches, but we’re not using that during training. Instead, we let Core ML drive the batching process. So my ImageLoader class is actually more complicated than it needs to be. 😭
Creating the update task
Now that we have our training data and can load it into mini-batches, we can start the training process. This is done by making an MLUpdateTask. It’s the same class you used for training the k-NN model, but this time you’ll be using a different initializer.
The code looks something like this:
let trainingData = TrainingBatchProvider(imageLoader: trainingLoader)

let config = MLModelConfiguration()
config.computeUnits = .all

let progressHandler = { (context: MLUpdateContext) in
  /* TODO */
}

let completionHandler = { (context: MLUpdateContext) in
  /* TODO */
}

let handlers = MLUpdateProgressHandlers(
                    forEvents: [.trainingBegin, .miniBatchEnd, .epochEnd],
                    progressHandler: progressHandler,
                    completionHandler: completionHandler)

updateTask = try MLUpdateTask(forModelAt: modelURL,
                              trainingData: trainingData,
                              configuration: config,
                              progressHandlers: handlers)
updateTask?.resume()
You can find the full version of this code in NeuralNetworkTrainer.swift, in the train function.
The k-NN version of MLUpdateTask took a completion handler that was invoked almost immediately because training k-NN is very fast. But as we discussed, neural networks are trained in a loop over many epochs. That’s why you need to provide two closures here: a handler for progress updates as well as the usual completion handler.
Both handlers will receive an MLUpdateContext object that describes the current state of the training process. One of the useful things you can get from this context object is the current loss value.
You can register the progress handler for the following events:
.trainingBegin: happens once when training starts.miniBatchEnd: happens after every mini-batch.epochEnd: happens after every epoch
(There are no “epochStart” or “miniBatchStart” callbacks like in Keras.)
Besides these progress and completion handlers, the MLUpdateTask also needs:
- the URL to the mlmodelc file that will be trained,
- the
MLBatchProviderobject that will load the training data, and - an
MLModelConfigurationobject.
The configuration object has a computeUnits property that tells Core ML whether it’s allowed to use the GPU or the Neural Engine (although ultimately it’s up to Core ML to choose which processor it uses). You can also use the configuration object to change the hyperparameters (see below).
Once the MLUpdateTask is constructed, call resume() to start training.
Note: You don’t have to load the Core ML model into memory first before you can train it — i.e. there’s no need to have an active MLModel object. Training always works from the mlmodelc files that are stored somewhere in your app’s local directory.
The training flow chart
This is the flow of what happens after you call updateTask.resume():
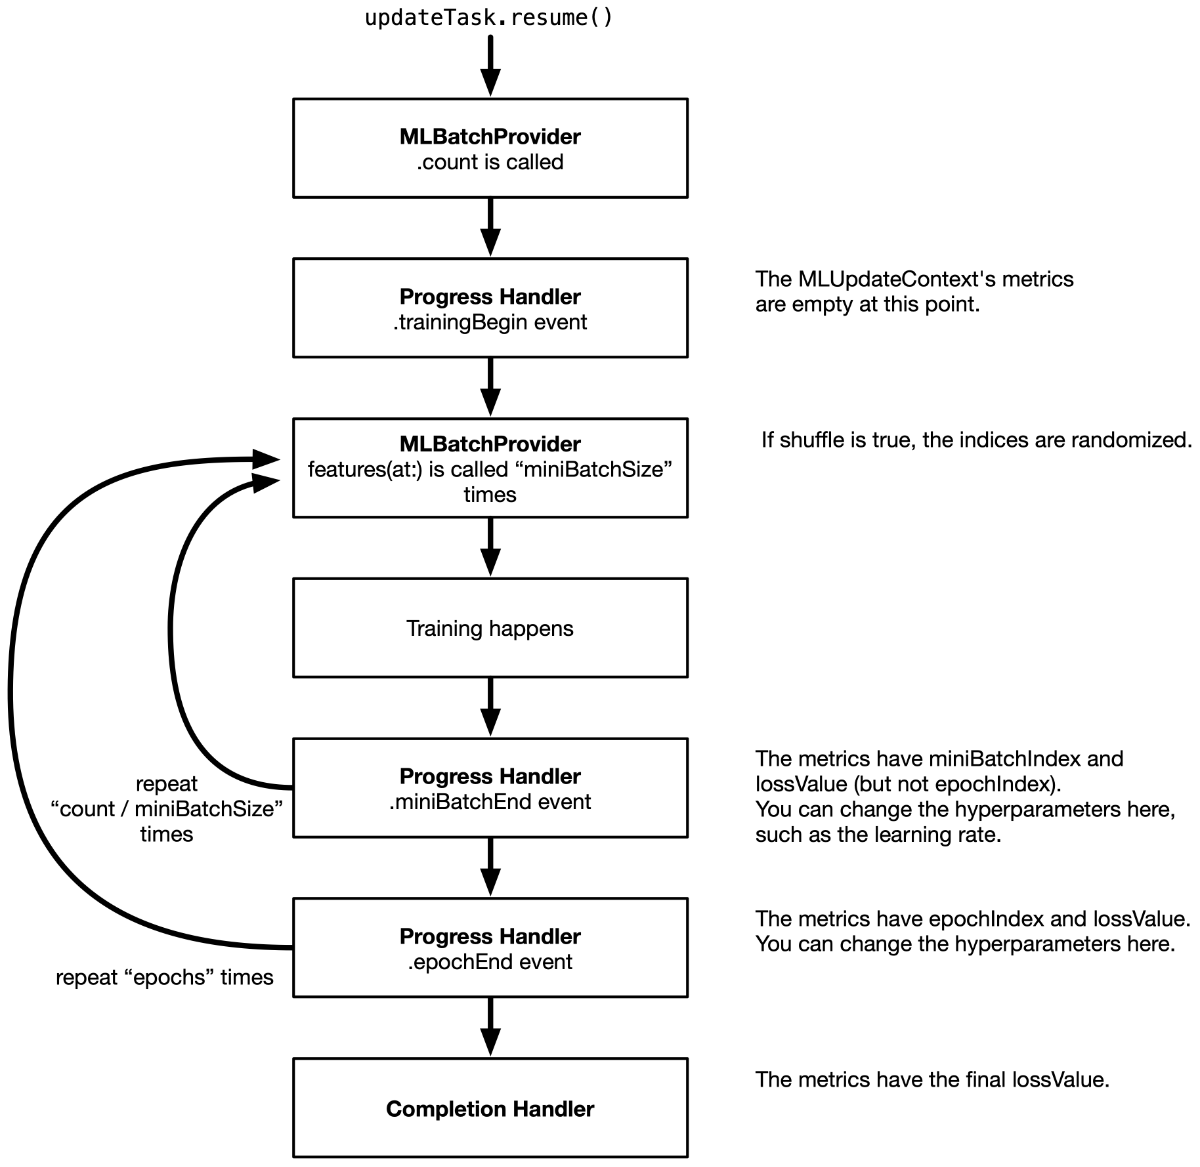
MLUpdateTask.resume() immediately returns and the training loop happens in a background thread. You don’t need to put this on a background queue yourself. The progress and completion handlers are also called on a background thread.
It’s important to realize that calling MLUpdateTask.resume() will always train for the number of epochs that is defined in the mlmodel file. In this demo app, that is 10 epochs.
The mini-batch size and whether the data is shuffled or not, is also defined in the mlmodel file. For our model, miniBatchSize is 8 and shuffle is true.
Because there are 30 images in the training set (unless you added your own), each epoch consists of 4 batches. With 30 images, you’d expect the last batch to have only 6 images instead of 8, but Core ML fills up the remainder of the batch by starting from the beginning again. This is perfectly fine, but it means the model might see some images more than once in the epoch.
Note: In the first mini-batch of the first epoch, the first image is requested twice for some reason. I’m assuming Core ML does this on purpose to inspect what the data will be like. It’s not a big deal, but the result from the very first call to your MLBatchProvider might not actually be used. Also, the batch provider’s .count is called a whole bunch of times, so make sure this method isn’t doing heavy work.
With shuffling enabled, the order of the shuffled images is always the same. That’s because the random seed is also hardcoded in the mlmodel file. In make_nn.py you could add the following line to change the seed:
builder.set_shuffle(seed=1234)
By default the seed is None. Usually a seed of None means you’re not setting the seed explicitly (for extra randomness), but I guess in Core ML if you don’t set the seed it chooses some fixed number anyway (I checked and it’s not 0).
With a fixed random seed, repeating the training several times will give the exact same results each time. You can override the seed using the model configuration parameters, just like any of the other hyperparameters. For true randomness, you can set the seed to the current time, for example.
The progress handler
In the demo app, the MLUpdateTask’s progress handler looks something like this:
let progressHandler = { (context: MLUpdateContext) in
  switch context.event {
  case .trainingBegin:
    print("Training begin")

  case .miniBatchEnd:
    let batchIndex = context.metrics[.miniBatchIndex] as! Int
    let batchLoss = context.metrics[.lossValue] as! Double
    print("Mini batch \(batchIndex), loss: \(batchLoss)")

  case .epochEnd:
    let epochIndex = context.metrics[.epochIndex] as! Int
    let trainLoss = context.metrics[.lossValue] as! Double

    let predictor = Predictor(model: context.model)
    let (valLoss, valAcc) = predictor.evaluate(loader: self.validationLoader)

    // Tell the view controller about the results for this epoch:
    callback(.epochEnd(trainLoss: trainLoss, validationLoss: valLoss,
                       validationAccuracy: valAcc))
  default:
    print("Unknown event")
  }
}
Because the progress handler can be called for different reasons, first we look at context.event to see what’s happening.
The .trainingBegin event isn’t really that interesting. You could use this to reset some counters or other properties.
The .miniBatchEnd event is useful for when you want to do something after each mini-batch. For this kind of event, the context.metrics dictionary contains two items: .miniBatchIndex tells you which mini-batch this is for the current epoch, and .lossValue gives the training loss for this mini-batch.
But other than that, there isn’t much you can do. You don’t get access to the actual mini-batch’s training data, so you can’t compute other metrics such as the training accuracy over the mini-batch. Not a major issue for on-device training, but good to be aware of these limitations.
The most useful event is .epochEnd. This is called after each run through the entire training set. This is a good time to compute some metrics across the test set. In the demo app, we’re using the Predictor class for this.
You may recall that Predictor is used by the Evaluate screen to run the model on the test set images. It needs an MLModel object for this — obviously, not just any MLModel but the one that’s currently being trained. You can get the model-under-training from the context, using context.model.
It’s important that you use the MLModel instance from the context, as that has the most recent training changes. Any MLModel instances that you created in your app before training started do not automatically get these changes!
(Also note that at this point the updated model hasn’t been saved to a file yet, so the existing mlmodelc is still the old version.)
After each epoch, the TrainNeuralNetworkViewController needs to display the training loss, validation loss, and validation accuracy in its table view, so we notify it through a closure I named the callback. This is just UI stuff and is unrelated to Core ML’s training APIs.
Computing the validation loss
For the purpose of computing the loss over the validation set, I added a new evaluate() method to Predictor. See Predictor.swift for the full details. It just loops through the test set and makes predictions in batches. (These are batches from ImageLoader, not from the MLBatchProvider we’re using for training.)
The interesting code I want to highlight is the computation of the loss value:
var runningLoss: Double = 0

while let batch = try? loader.nextBatch() {
  if let batchPredictions = predict(batch: batch) {
    ...
    let probabilityForTrueClass = batchPredictions[i].probabilities[trueLabel]!
    let crossEntropy = -log(probabilityForTrueClass.doubleValue + 1e-100)
    runningLoss += crossEntropy
  }
}

let validationLoss = runningLoss / Double(exampleCount)
Core ML automatically computes the loss over the training set for us, but to get the loss over the validation set we have to do the math ourselves. Fortunately, it’s fairly straightforward to compute the cross-entropy loss given the dictionary of predicted probabilities.
We’re only interested in the probability that the model predicts for the true label. The cross-entropy loss for a single example is the logarithm of that probability. (We add a small term to the probability to prevent log(0), which is infinity.)
The total cross-entropy loss over the entire dataset is simply the average of the losses for the individual examples.
I showed this to point out that, just because Core ML doesn’t give you an API for something, this doesn’t necessarily mean you can’t implement it by yourself. 🤓
The completion handler
The MLUpdateTask completion handler is called just once, after the last epoch completes or if training is aborted due to an error. Not sure why they didn’t add a .trainingEnd event for this and made it a separate handler, but /shrug.
The demo app’s completion handler looks like this:
let completionHandler = { (context: MLUpdateContext) in
  if context.task.state == .failed {
    callback(.error)
    return
  }

  let trainLoss = context.metrics[.lossValue] as! Double
  print("Final loss: \(trainLoss)")

  self.saveUpdatedModel(context.model, to: self.modelURL)

  // Tell the view controller we're done; also pass the new MLModel instance.
  callback(.completed(updatedModel: context.model))
}
If something went wrong, the completion handler is still called but the state of the MLUpdateTask is set to .failed. You may end up in this .failed state if the batch provider returns an invalid MLFeatureProvider object, for example. If this happens we’ll tell the UI that there was an error (through the callback closure).
Assuming all went well, the completion handler is a good place to save the updated model to a file. We’re using the following helper function:
private func saveUpdatedModel(_ model: MLModel & MLWritable, to url: URL) {
  do {
    let tempURL = urlForModelInDocumentsDirectory("tempNeuralNetwork")
    try model.write(to: tempURL)
    _ = try FileManager.default.replaceItemAt(url, withItemAt: tempURL)
  } catch {
    print("Error saving neural network model to \(url):", error)
  }
}
I wanted to show this because of the MLModel & MLWritable. The model object from context.model also conforms to the MLWritable protocol, which means you can call model.write(to:) on it. A regular MLModel is not MLWritable, so this only works from within an update context.
In the demo app we’re simply overwriting the existing mlmodelc files, but there’s nothing stopping you from saving several different checkpoints.
Tip: If you’re training for many epochs, the .epochEnd event is also a good point to save a model checkpoint file (after every 10 epochs, for example). We’re not doing that in the demo app, but feel free to add this logic yourself.
The final thing that happens in the completion handler is a callback to let the TrainNeuralNetworkViewController know that training has completed. Note that we pass along the MLModel instance from context.model. The view controller has its own MLModel instance but that is the previous version that hasn’t been updated yet. You could tell the view controller to instantiate the MLModel again but it’s easier (and more efficient) to grab the latest version from the update context.
But which training loss?
As you’ve seen above, you can get the training loss from the context object using context.metrics[.lossValue] as! Double. The docs say this is the “current loss”, but what exactly does that mean?
It looks like the reported loss at the end of an epoch is just the loss from the most recent batch, not the average loss over the batches. Likewise, the reported loss at the end of training is just the loss from the last batch in the last epoch.
In theory, if you give Predictor in NeuralNetworkTrainer.swift the training set instead of the validation set, the “validation loss” that is computed after each epoch should be similar to the training loss reported by Core ML. After all, they’re both computed using the same formula on the same set of images (although not exactly at the same time).
As it turns out, the two losses are not the same… On the first few epochs this makes some sense: you’d expect there to be a difference as training is really unstable in the beginning. But over time the two losses should converge.
Taking an average over the mini-batch losses seems to be closer to the loss computed by hand, so from this I’m concluding that Core ML doesn’t keep a running loss but just reports whatever the loss was on the very latest mini-batch it processed.
Anyway, it’s probably not very important to know this but I was curious.
The loss is the only metric we get. There’s no way to compute the classification accuracy of a mini-batch, at least not one without resorting to hacks. I guess this is fine — we mainly just care about the training loss going down as indicator that the model is actually learning something, and we can compute the validation metrics ourselves to make sure it’s learning the right thing.
Changing the hyperparameters
Training a neural network involves plenty of hyperparameters that you, as the model designer, need to choose in advance.
The models used in this blog post have the following hyperparameters:

(If you changed make_nn.py to use Adam instead of SGD, you’ll see different hyperparameters here.)
The values for these hyperparameters are set in the mlmodel file. This is useful because Core ML can simply use these settings when you tell it to train. The app developer won’t need to worry about choosing good values for these parameters.
Invoking the MLUpdateTask will train for the number of epochs specified, using mini-batches of the given size, using the specified learning rate.
However, you may want a bit more control over the training process. That’s what the MLModelConfiguration object is for. You can use this class to choose between running the model on the CPU / GPU / Neural Engine, but it also has a parameters dictionary for overriding the hyperparameters.
This is how you use it:
let parameters: [MLParameterKey: Any] = [
  .miniBatchSize: 2,
  .epochs: 3,
  .shuffle: false,
  .seed: 4321,
  .learningRate: learningRate,
]

let config = MLModelConfiguration()
config.computeUnits = .all
config.parameters = parameters
And then you create the MLUpdateTask with this config object.
In the demo app, this is used to let the user set the learning rate (using the slider) and number of epochs.
Note that config.parameters is initially nil. To override the hyperparameters from the model, you need to create the parameters dictionary yourself.
(If you already have an MLModel instance, you can also use model.configuration to get its MLModelConfiguration object. But remember that Core ML never trains the MLModel instance directly, only its mlmodelc files.)
When you set the hyperparameters, keep in mind that you can’t just choose any values here. Remember that in make_nn.py we wrote,
sgd_params.set_batch(8, [1, 2, 8, 16])
This sets the default value for the .miniBatchSize parameter to 8, and we tell Core ML that batch sizes of 1, 2 or 16 are also allowed. If you choose any other number in the app for .miniBatchSize, Core ML will throw an exception when you start training.
In make_nn.py we also set the allowed values for the number of epochs to 1, 10 and 50. The learning rate by default is allowed to be between 0.0 and 1.0, but you can change this with sgd_params.set_lr(). Likewise for the other optimizer hyperparameters.
Note: If you change any of these values in make_nn.py and run the script again, don’t forget to tap on Reset to Empty Model in the app. Otherwise it still keeps using the previous version of the model.
Inspecting the hyperparameters
The Xcode mlmodel viewer only shows the default values of the hyperparameters, but not their allowed values. Fortunately, there is an API that lets you inspect this at runtime, but it’s a little weird.
Recall from part 3 that modelDescription.trainingInputDescriptionsByName lets you see what the names and datatypes of the training inputs are. These are also shown in the Xcode mlmodel viewer.
I also mentioned that model.modelDescription.parameterDescriptionsByKey, which should give information about the hyperparameters, always returns an empty dictionary. It turns out that parameterDescriptionsByKey only works from inside the MLUpdateTask progress handler. 🤯
Try it out, add print(model.modelDescription.parameterDescriptionsByKey) inside the progress handler and now it will print out the following:
[shuffle:
parameterKey: shuffle
defaultValue: 1, miniBatchSize:
parameterKey: miniBatchSize
defaultValue: 8
numericConstraint:
minValue: 1
maxValue: 16
enumeratedNumbers: {(
    2,
    16,
    8,
    1
)}, ...
This doesn’t tell you what the current values are for these hyperparameters, only what the default and allowed values are. For some strange reason, this information is only filled in when the model is actively being trained.
Another fun thing you can do inside the MLUpdateTask’s progress or completion handler is grab the weights and biases of a layer in the model, for example by writing:
do {
  let multiArray = try context.model.parameterValue(for:
        MLParameterKey.weights.scoped(to: "fullyconnected0")) as! MLMultiArray
  print(multiArray.shape)
} catch {
  print(error)
}
You now get an MLMultiArray object containing the weights of the layer named "fullyconnected0". You can also do this for .biases.
This only seems to work for the layers that are trainable. If you use another layer name, for example "conv10", this crashes somewhere deep inside Core ML.
These weights and biases appear to be read-only. You can change the contents of the returned MLMultiArray but this has no effect on the model or the training procedure (it’s most likely a copy of the actual weights).
Not sure why you’d need this, except maybe for debugging or visualizations, but it’s nice to have anyway.
Changing the hyperparameters during training
You’ve seen how to change the values of the hyperparameters before training starts, but you can also change some of them during training.
A typical hyperparameter you’d want to change during training is the learning rate. It’s common to start with a high learning rate and to make it gradually smaller over time — known as learning rate annealing — although other schemes are used too (cyclic learning rates, for example).
Inside the progress handler, you can access the MLModel object through context.model. From the MLModel object you can get the MLModelConfiguration, which lets you access the hyperparameters. However, the following won’t work:
let newParameters: [MLParameterKey: Any] = [ . . . ]
context.model.configuration.parameters = newParameters
Core ML simply ignores the new parameters and keeps using the old ones. Instead, what you’re supposed to do is resume the MLUpdateTask from within the progress handler, like so:
let progressHandler = { (context: MLUpdateContext) in
  switch context.event {
    /* previous code omitted */
  }

  // Simple learning rate annealing:
  var newParameters = context.parameters
  let annealed = (newParameters[.learningRate] as! Double) * 0.99
  newParameters[.learningRate] = annealed
  context.task.resume(withParameters: newParameters)
}
To see the current values of the hyperparameters, don’t look at context.model.configuration.parameters — those are the ones training started out with and will never change. Instead, look at context.parameters, this has the active values.
You can’t change all hyperparameters this way, only the optimizer settings: the learning rate, momentum, etc. Shuffle, mini-batch size, and number of epochs are fixed once training starts.
Cancelling training
In the demo app, we cancel training when the user taps the Stop button, goes back to the main menu, or puts the app into the background.
Given the MLUpdateTask instance, you can call cancel() on it to interrupt the training process. This immediately stops training. However, be aware that the completion handler does not get called now!
In the progress or completion handler it is possible to look at context.task.state to determine whether the task is still running or not. As far as I can tell, inside the progress handler the state always seems to be “suspended” (i.e. paused) and in the completion handler it is either “completed” or “failed”.
I think it would have been useful to get a completion event with the state set to .cancelling — which is an existing state flag — but that’s not the case.
Oh well, at least you can use KVO or Combine to keep track of changes to the state property.
Because the completion handler isn’t called when cancelling, this also means that any changes to the model will not be saved. So you lose all your work. One way to prevent this is to save a checkpoint after every N epochs — I didn’t bother with this in the demo app but it should be trivial to add.
If you don’t stop the training task when going into the background, Core ML will automatically pause the task and resume when the app becomes active again. I’m not sure I really trust that 100%. I need to experiment more with this to see what happens when the GPU or Neural Engine is used, for example. (On my iPhone XS, Core ML never used the GPU or Neural Engine for training, only the CPU.)
That’s why in the demo app, we cancel the learning task when the app becomes inactive.
Training while in the background is certainly possible, but you’ll need to use the new BackgroundTasks framework for that (more on this below).
How well does it work?
Here’s the graph from one of my training runs:

As you can see, the training loss goes down quite nicely. This means training the model worked!
But the real question is: how good are the predictions from this model on the test set? As you can see from the val.acc column, in this particular training session it reached 53.33% accuracy. That’s 8 out of 15 correct.
Doesn’t sound too impressive, but it is evidence that the model has learned something!
The untrained model only gets 10% correct by random guessing. And even with just 3 classes in the test set, if the model was lazily predicting the same label for all examples, it still wouldn’t score higher than 33%. Therefore, anything over 33% means we’re doing better than guesswork!
To get these results, I played around a bit with different learning rates. To start with a clean slate, I also tapped Reset to Empty Model before doing each experiment.
Using the SGD optimizer, if I put the learning rate at 0.01 and train for 20 epochs, the training loss bounces up and down quite a bit but eventually drops to 0. The validation accuracy is 66.67% but the validation loss is really high.
With the learning rate at 0.001, the training loss doesn’t go down to 0 as quickly, but the validation loss is much lower than before. The validation accuracy also seems to be a bit better, occasionally going up to 80% and eventually settling on 73.33%.
With a learning rate of 0.0001, both the training loss and validation loss are much more stable. Naturally, it also takes more epochs to get a good accuracy score. This is the curve from the above picture. Interestingly enough, the validation score now isn’t as good as with the higher learning rates, only 53.33%. But the validation loss is lower than before (more about this in a sec).
At an even lower learning rate, 0.00001, the loss curve becomes smoother again, but the validation accuracy never goes over 40%. This learning rate is too low now.
For this model — and the current dataset — 0.0001 seems to be a good learning rate when using the SGD optimizer. That may seem like a low learning rate, but keep in mind we’re only fine-tuning a single layer.
Disclaimer: I must add a warning that you can’t really put too much stock in these numbers because my training set and test set are so small. Does the model really score 80% accuracy or did it just get lucky on this particular handful of images? Answering that question is out of the scope of this blog post series — we’re just messing around with the new Core ML APIs here, not building a state-of-the-art Rock, Paper, Scissors model. Just know that for real world scenarios you’ll need to use a lot more data for both training and validation to get dependable results!
Is training the classifier from scratch better than the Turi Create model, which scored 80% on the test set? To be honest, it’s hard to say. It’s possible to get a model that also scores 80% but there is just too little test data to conclude whether that’s a better model or not.
The way Turi Create trains the model is different: it uses L-BFGS to train a logistic regression and then turns that into a neural network afterwards. Our method of training uses gradient descent and backpropagation. It’s quite possible that L-BFGS finds a better solution than SGD.
On the plus side, we have more flexibility. For example, instead of just training the classifier layer, you can also train the convolution layer right before it, "conv10". That’s not something Turi Create can do. We can also do more data augmentation.
If you go to the Evaluate screen after training, you can see which test images the model has problems with. It’s mostly the images from the ✌️ category, especially the ones that are rotated or flipped. That’s something that should be fixable with data augmentation.
What’s up with the validation loss?
You may be wondering why the validation loss on the test set is often so high? The training loss goes to almost zero, while the validation loss stays at something like 3.0 or even higher. That seems odd.
For a classification problem with 10 classes, the expected loss for a classifier that just randomly guesses the answers is -log(1/10) = 2.3026. So how come our validation loss is higher?
This happens because the cross-entropy loss only looks at the predicted probability of the true label. If that probability is high (close to 1), the loss value is close to 0. But the lower this predicted probability, the higher the loss value.
In Predictor.evaluate() there is a commented-out print statement. If you enable this, it prints something like the following after training an epoch:
...
✋ correct? √, prob: 1.00000, loss: 0.00000
✌️ correct? ×, prob: 0.00000, loss: 26.52718
✌️ correct? ×, prob: 0.00000, loss: 17.05890
✌️ correct? √, prob: 1.00000, loss: -0.00000
✌️ correct? ×, prob: 0.00000, loss: 26.36917
✌️ correct? √, prob: 0.79783, loss: 0.22586
Notice that the predictions that are correct (the ones with the √ checkmark) have high probabilities. That’s good. The loss for these is very small.
But on predictions that are not correct (the ones with ×), the predicted probability for the true label is often close to 0 (rounded off to 5 decimals in the output). The model is really wrong about these predictions because we’d expect these predicted probabilities to be close to 1. For these examples, the model predicted a very high probability for some other class.
The loss is the average over all the examples. Even though 80% of the predictions are correct in this particular epoch, because the wrong predictions are very wrong, the loss still ends up being quite high. You can also see this in the Evaluate screen: the model has very high confidence in the predictions it got wrong.
Here’s an experiment you can do: In NeuralNetworkTrainer.swift, in the instantiation of validationLoader, use the trainingDataset instead of validationDataset. Now after every epoch the app will compute the accuracy on the training set instead of the test set.
Once the training loss becomes really small (0.001 or smaller), you’ll see that the accuracy on the training set is 100%. We’re overfitting! Not so strange due to the very small amount of data that we have.
There is no way to add weight decay or other regularization with Core ML (and no dropout layer) so you’ll have to be very careful to either have enough data, or design your model so that overfitting is less of an issue — smaller models with fewer learned parameters suffer less from overfitting than very large models, for example.
Try it for yourself!
I encourage you to run the app and do some experiments yourself.
Try training for a number of epochs, then lower the learning rate using the slider and train some more. What learning rates give good results? Too high and the loss will explode, too low and the model won’t learn anything.
Switch the model to use the Adam optimizer to see what kind of results that gives (you’ll need to modify make_nn.py for this, as described earlier).
Also try making more layers trainable. The more layers are trained, the better the neural network can adapt to our data. So far, we’ve only trained the very last layer, "fullyconnected0". The layer that immediately precedes that is a convolutional layer named "conv10". Change make_nn.py to also make this layer updatable:
builder.make_updatable(["fullyconnected0", "conv10"])
Note: For this particular model, that’s as far as it goes. You can’t train more layers, because of the concatenation layer between "conv10" and the preceding convolutional layers. Currently, Core ML cannot backpropagate through concat layers.
Add more training data. Part 2 has links to some other datasets you can use.
If you’re up for a challenge, try adapting one of the other image classifiers from developer.apple.com/machine-learning/models, such as MobileNetV2 or ResNet50. Make them updatable and give the classifier layer 10 output neurons. How well do these train on our dataset? (Tip: You may need to change the names of the model’s inputs and outputs to make them compatible with the demo app.)
It’s a bit leaky…
Training does take up a lot of extra RAM. This is not surprising, as for training Core ML will need to store a lot of intermediate data: the activations during the forward pass, the gradients during the backwards pass.
In the demo app, running the MLUpdateTask takes up about 250 MB. That’s not so bad, except Core ML never seems to give this memory back. Each time you start a new MLUpdateTask, it eats up another 250 MB. Yikes.
Instruments tells me that this is all memory owned by Core ML, and it does not appear to be released ever. It’s not hard to make the device run out of memory this way and crash the app. This seems like a serious bug!
(When you cancel the task, the memory also isn’t freed. I thought maybe you’re supposed to re-use MLUpdateTask objects, i.e. call resume() again on the same instance to train for another set of epochs, but this does not seem to be the case. Once the task has completed, you can’t start it again.)
Data augmentation
One way to get more training data is to artifically enlarge your training set with data augmentation. The image loader is the ideal place for that.
By randomly flipping images, you instantly get twice the amount of training data. For the purposes of demonstration, we’ll add some data augmentation that does random horizontal and vertical flips. Each epoch will still have the same amount of training images, but some of these images are now mirrored.
In ImageLoader.swift, the featureValue(at:) method loads the image into an MLFeatureValue object. From this you can grab the CVPixelBuffer with the image data and modify it however you like:
func featureValue(at index: Int) throws -> MLFeatureValue {
  ...
  let featureValue = try MLFeatureValue(imageAt: imageURL,
                                        constraint: imageConstraint,
                                        options: imageOptions)

  if augment, let pixelBuffer = featureValue.imageBufferValue {
    if Bool.random() {
       flipHorizontally(pixelBuffer: pixelBuffer)
    }
    if Bool.random() {
       flipVertically(pixelBuffer: pixelBuffer)
    }
  }
  return featureValue
}
We use Bool.random() to toss a coin. It this returns true, we flip the image. In case you’re curious, here’s how flipHorizontally is implemented:
private func flipHorizontally(pixelBuffer: CVPixelBuffer) {
  var image = CIImage(cvPixelBuffer: pixelBuffer)
  image = image.transformed(by: CGAffineTransform(scaleX: -1, y: 1))
  image = image.transformed(by: CGAffineTransform(
                                    translationX: image.extent.width, y: 0))
  ciContext.render(image, to: pixelBuffer)
}
This uses Core Image to transform the image, and then renders it back into the same CVPixelBuffer object.
After training with data augmentation enabled, the model does seem to perform a bit better on test images that are upside-down and mirrored, so I think it helped!
Other image augmentations that are typically used are random rotations, zooming in or out, and color shifts. Usually the more augmentation, the better. Keep in mind that with a lot of data augmentation, you also need to train for enough epochs so that the model sees all the different variations of each image.
Training in the background
I was going to add a section on how to train models when the app isn’t running. However, this blog post is already long enough, so I’ll just mention the basics.
Training in the background isn’t necessary for k-NN, as training these kinds of models is pretty much instantaneous. But it might make sense for a neural network if you have a lot of data and want to train for many epochs. Or if your model is rather big and you want to train only when the device isn’t being used for anything.
You’ll need to use the new BackgroundTasks framework. With the classes
BGTaskSchedulerandBGProcessingTaskRequestyou can schedule the Core ML update task to run in the background. This will wake up your app at an opportune moment and give it some processing time to run a few training epochs. I believe you can even schedule your training updates to run at night or when the device is plugged into power.Background training most likely uses the CPU only, as the GPU and the Neural Engine are off-limits to background processes. But in my experiments, Core ML always used the CPU for training anyway, even when the app was active.
I might do a more detailed blog post on this topic in the future.
The end
Thanks for reading all the way to the end! 😄
I think it’s pretty cool that we can train neural networks on the device now. Of course, it was always possible to do this by writing your own code or, since iOS 11.3, using Metal Performance Shaders. But it’s very convenient that you can directly train Core ML models now!
Training support is still a bit limited — only two loss functions, backprop doesn’t work through all layer types, etc. — but no doubt more functionality will be added in the future.
And remember, just because you can use machine learning to solve this kind of problem, doesn’t mean that you should. Here is a cool blog post that shows how to do hand gesture recognition without machine learning.
First published on Sunday, 1 December 2019.
If you liked this post, say hi on Twitter @mhollemans or LinkedIn.
Find the source code on my GitHub.
 New e-book: Code Your Own Synth Plug-Ins With C++ and JUCE
Interested in how computers make sound? Learn the fundamentals of audio programming by building a fully-featured software synthesizer plug-in, with every step explained in detail. Not too much math, lots of in-depth information! Get the book at Leanpub.com