
Apple’s new Core ML framework has made it really easy to add machine learning models to iOS apps. But a big disadvantage has been that Core ML only supported a limited number of neural network layer types. Even worse… as an app developer it was impossible to extend Core ML’s functionality.
Good news: as of iOS 11.2, Core ML now supports custom layers! In my opinion, this makes Core ML ten times more useful.
In this post I’ll show how to convert a Keras model with a custom layer to Core ML.
The steps are as follows:
- create a Keras model with a custom layer
- use coremltools to convert from Keras to mlmodel
- implement a Swift class for the custom layer
- put the Core ML model in the iOS app and run it
- profit! 💰💰💰
As always, you can find the source code on GitHub. It requires Python 2, Keras with TensorFlow, coremltools, and Xcode 9.
Note: I chose Keras for this blog post because it’s easy to use and explain, but making custom layers works the same way regardless of the tool you used to train your model.
Swish!
As an example of how to make a custom layer, let’s implement a new activation function called Swish.
“Wait…”, you might say, “I thought this article is about custom layers, not custom activation functions?!” Well, it depends on how you look at things.
You may think of an activation function as being the nonlinearity that gets applied to the output of a layer, but you can also consider activation functions to be layers of their own. And in many deep learning packages, including Keras, the activation functions are in fact treated as separate layers.
Core ML only supports a fixed set of activation functions, such as the standard ReLU and sigmoid activations. (The complete list is in NeuralNetwork.proto, which is part of the mlmodel specification.)
But every so often someone invents a fancy new activation function, and if you want to use that in a Core ML model you’re out of luck — unless you write your own custom layer. So that’s what we’re going to do.
We’re going to implement the Swish activation function. The formula is:
swish(x) = x * sigmoid(beta * x)
where sigmoid is the well-known logistic sigmoid function 1 / (1 + exp(-x)). Thus, the full definition of Swish is:
swish(x) = x / (1 + exp(-beta * x))
Here, x is the input value and beta can be a constant or a trainable parameter. Varying beta changes how curved the Swish function is.
Swish with beta = 1.0 looks like this:
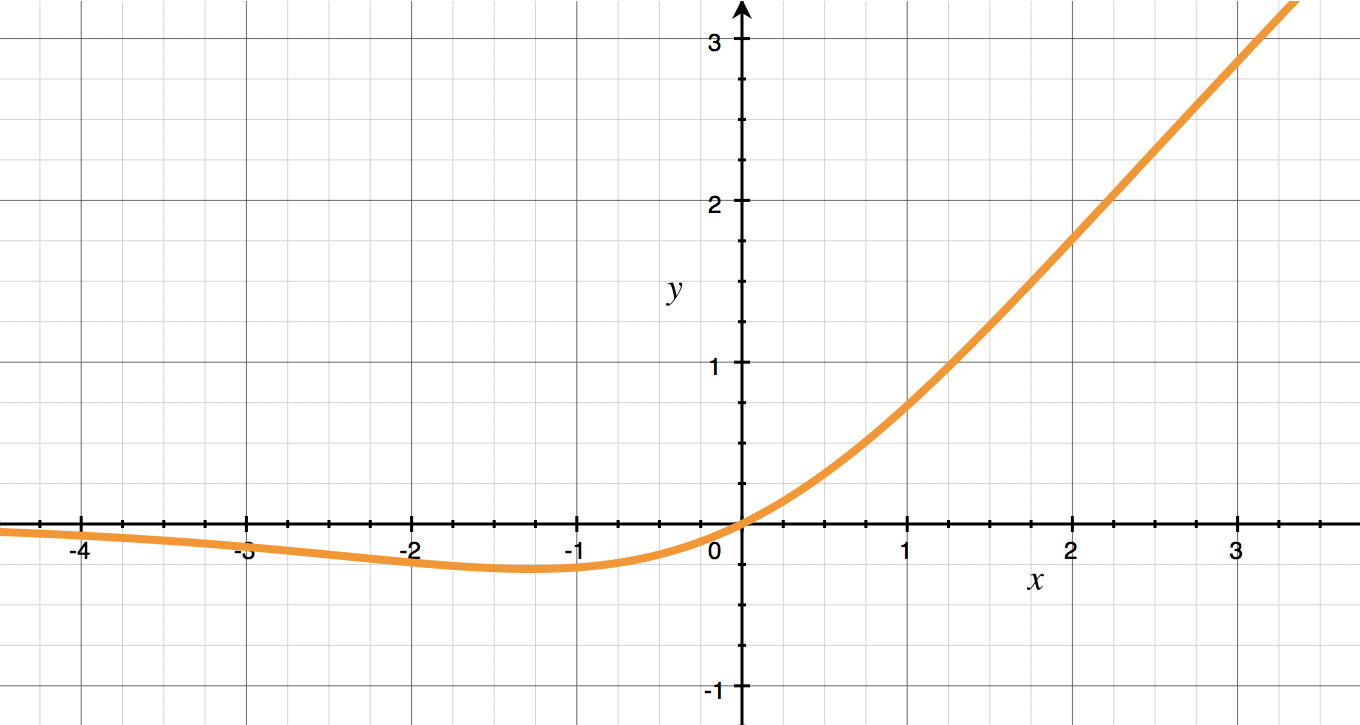
This should remind you of the ubiquitous ReLU activation function, but the left-hand side is smooth rather than making an abrupt change at x = 0 (this gives Swish a nice and clean derivative, unlike ReLU).
The larger the value of beta, the more Swish looks like ReLU. The closer beta gets to 0, the more Swish looks like a straight line. (If you’re curious, try it out.)
Apparently this Swish activation makes it easier for your neural networks to learn than ReLU does and also gives better results. You can read more about Swish in the paper Searching for Activation Functions.
To keep the example simple, initially we’ll work with beta = 1, but later on we’ll make beta a (learnable) parameter.
The Keras model
At this point of writing, Swish isn’t popular enough yet to have made it into Keras. So we’re also going to write a custom Keras layer. It’s easy enough to implement:
from keras import backend as K

def swish(x):
    return K.sigmoid(x) * x
Here, x is a tensor and we simply multiply it with the result from the K.sigmoid function. K is a reference to Keras’s backend, which is typically TensorFlow. I’ve left beta out of the code for now (which is the same as saying beta = 1).
To use this custom activation function in a Keras model we can write the following:
import keras
from keras.models import *
from keras.layers import *

def create_model():
    inp = Input(shape=(256, 256, 3))
    x = Conv2D(6, (3, 3), padding="same")(inp)
    x = Lambda(swish)(x)                       # look here!
    x = GlobalAveragePooling2D()(x)
    x = Dense(10, activation="softmax")(x)
    return Model(inp, x)
This is just a silly model with a few basic layer types thrown in. The important part is x = Lambda(swish)(x). This calls our new swish function on the output of the previous layer, which in this case is a convolution layer.
A Lambda layer is a special Keras class that is very handy for writing quick-and-dirty layers using just a function or a lambda expression (similar to a closure in Swift). Lambda is useful for layers that don’t have state, and are commonly seen in Keras models for doing basic computations.
Note: You can also make more advanced custom layers in Keras by creating a Layer subclass, and we’ll see an example of this later.
What about Activation?
If you’re a Keras user you might be used to specifying the activation function for a layer like this:
x = Conv2D(..., activation="swish")(x)
Or like this:
x = Conv2D(6, (3, 3), padding="same")(inp)
x = Activation(swish)(x)
In Keras we typically don’t use Lambda for activation functions but the special Activation layer type.
Unfortunately, version 0.7 of coremltools cannot convert custom activations, only custom layers. 😞 If you try to convert a model that contains an Activation(...) that does not use one of Keras’s built-in activation functions, coremltools will give an error message:
RuntimeError: Unsupported option activation=swish in layer Activation
The workaround is to use a Lambda layer instead of Activation.
I point this out because it’s a slightly annoying limitation. We can use custom layers to implement unsupported activation functions, but not if they are encoded in the model using Activation(func) or activation="func". You will have to replace those with Lambda layers first before you can use the coremltools Keras converter.
Note: Alternatively, you can use coremltools’s NeuralNetworkBuilder class to create the model from scratch. That way you’re not limited by what the Keras converter understands, but it’s also less convenient.
Before we can convert this model to Core ML, we should first give it some weights.
“Training” the model
In the source code for this blog post, I create the Keras model in the same script that does the conversion, convert_lambda.py. In practice you’d probably have different scripts for training and converting, but for this example we won’t bother with training. (It’s a silly model anyway.)
First we create an instance of the model using the create_model() function you’ve just seen:
model = create_model()
model.compile(loss="categorical_crossentropy", optimizer="adam",
              metrics=["accuracy"])
model.summary()
Instead of training the model, we’ll just give it random weights:
import numpy as np

W = model.get_weights()
np.random.seed(12345)
for i in range(len(W)):
    W[i] = np.random.randn(*(W[i].shape)) * 2 - 1
model.set_weights(W)
Normally the training process would fill up those weights, but for the purposes of this blog post we’re just pretending.
To get some output, we test the model on an input image:

This is a 256×256 pixel RGB image. You can use any image you want but my cat volunteered for the job. Here is the code that loads the image, feeds it into the neural network, and prints out the results:
from keras.preprocessing.image import load_img, img_to_array

img = load_img("floortje.png", target_size=(256, 256))
img = np.expand_dims(img_to_array(img), 0)
pred = model.predict(img)

print("Predicted output:")
print(pred)
The predicted output is:
[[  2.24579312e-02   6.99496120e-02   7.55519234e-03   1.38940173e-03
    5.51432837e-03   8.00364137e-01   1.42883752e-02   3.57461395e-04
    5.40433871e-03   7.27192238e-02]]
These numbers don’t mean anything… After all, this is only a very basic model and we did not train it. That’s OK — at this stage we just want to get some output for the input image.
After we’ve converted the model to Core ML, we want the iOS app to give the exact same output for the same input image. If it does, we know that the conversion was done correctly and that our custom layer works as it should.
Note: It’s possible you get a different output on your computer. No worries, as long as you get the same numbers every time you run the script.
Converting the model
Now let’s convert this very basic model to a Core ML mlmodel file. If all goes well, the generated mlmodel file will not just have the standard Keras layers in it, but also our custom lambda layer. We’ll then write a Swift implementation of this layer so that we can run the model on iOS.
Note: I used coremltools version 0.7 to do this conversion. As the software is continuously being improved, it may behave slightly differently for you by the time you read this. For usage and installation instructions, check out the docs.
Converting a Keras model to Core ML is pretty simple and involves just a single call to coremltools.converters.keras.convert():
import coremltools

coreml_model = coremltools.converters.keras.convert(
    model,
    input_names="image",
    image_input_names="image",
    output_names="output",
    add_custom_layers=True,
    custom_conversion_functions={ "Lambda": convert_lambda })
This takes a reference to the model we’ve just created, as well as the names of the model’s inputs and outputs.
Especially important for our purposes is add_custom_layers=True, which tells the converter to detect custom layers. But the converter also needs to know what to do once it finds such a layer — that’s what custom_conversion_functions is for.
The custom_conversion_functions parameter takes a dictionary that maps the name of the layer type to a so-called “conversion function”. We still have to write this function:
from coremltools.proto import NeuralNetwork_pb2

def convert_lambda(layer):
    # Only convert this Lambda layer if it is for our swish function.
    if layer.function == swish:
        params = NeuralNetwork_pb2.CustomLayerParams()

        # The name of the Swift or Obj-C class that implements this layer.
        params.className = "Swish"

        # The desciption is shown in Xcode's mlmodel viewer.
        params.description = "A fancy new activation function"

        return params
    else:
        return None
This function accepts a Keras layer object and should return a CustomLayerParams object. The CustomLayerParams object tells Core ML how to treat this layer.
CustomLayerParams is defined in NeuralNetwork.proto. It has the following fields:
classNamedescriptionparametersweights
At the very least you should fill in the className field. This is the name of the Swift or Objective-C class that implements this layer on iOS. I’ve chosen to simply call this class Swish.
If you don’t fill in className, Xcode will show the following error and you can’t use the model:

The other fields are optional. The description is shown in Xcode’s mlmodel viewer, parameters is a dictionary with additional customization options, and weights contains the learned parameters of the layer (if any).
Now that we have the conversion function, we can run the Keras converter with coremltools.converters.keras.convert() and it will call convert_lambda() for any Lambda layer that it encounters in the model.
Note: The convert_lambda() function will be called for every Lambda layer in the network, so if you have multiple Lambda layers with different functions, you will need to disambiguate between them. That’s why we do if layer.function == swish first.
The final step in the conversion process is to fill in the model’s metadata and save the mlmodel file:
coreml_model.author = "AuthorMcAuthorName"
coreml_model.license = "Public Domain"
coreml_model.short_description = "Playing with custom Core ML layers"

coreml_model.input_description["image"] = "Input image"
coreml_model.output_description["output"] = "The predictions"

coreml_model.save("NeuralMcNeuralNet.mlmodel")
When you run the conversion script, coremltools prints out all the layers it found and converted:
0 : input_1, <keras.engine.topology.InputLayer object at 0x1169995d0>
1 : conv2d_1, <keras.layers.convolutional.Conv2D object at 0x10a50ae10>
2 : lambda_1, <keras.layers.core.Lambda object at 0x1169b0650>
3 : global_average_pooling2d_1, <keras.layers.pooling.GlobalAveragePooling2D object at 0x1169d7110>
4 : dense_1, <keras.layers.core.Dense object at 0x116657f50>
5 : dense_1__activation__, <keras.layers.core.Activation object at 0x116b56350>
The layer named lambda_1 is the one with our swish activation function. The conversion gives no errors, so that means we’re ready to put the .mlmodel file into an app!
Note: You don’t have to use a conversion function. Another way to fill in the details for your custom layer is to pass custom_conversion_functions={}. (Leaving it out gives an error but an empty dictionary is OK.) Then call coremltools.converters.keras.convert(). This will include your custom layer in the model but not give it any properties. Then afterwards, do the following:
layer = coreml_model._spec.neuralNetwork.layers[1]
layer.custom.className = "Swish"
This grabs the layer and changes its properties directly. Either way is OK, as long as you have filled in the className by the time you save the mlmodel file.
Putting the model into the app
Adding a Core ML model into an app is really simple: just drag-and-drop the mlmodel file into your Xcode project.
The Xcode mlmodel viewer for our converted model looks like this:
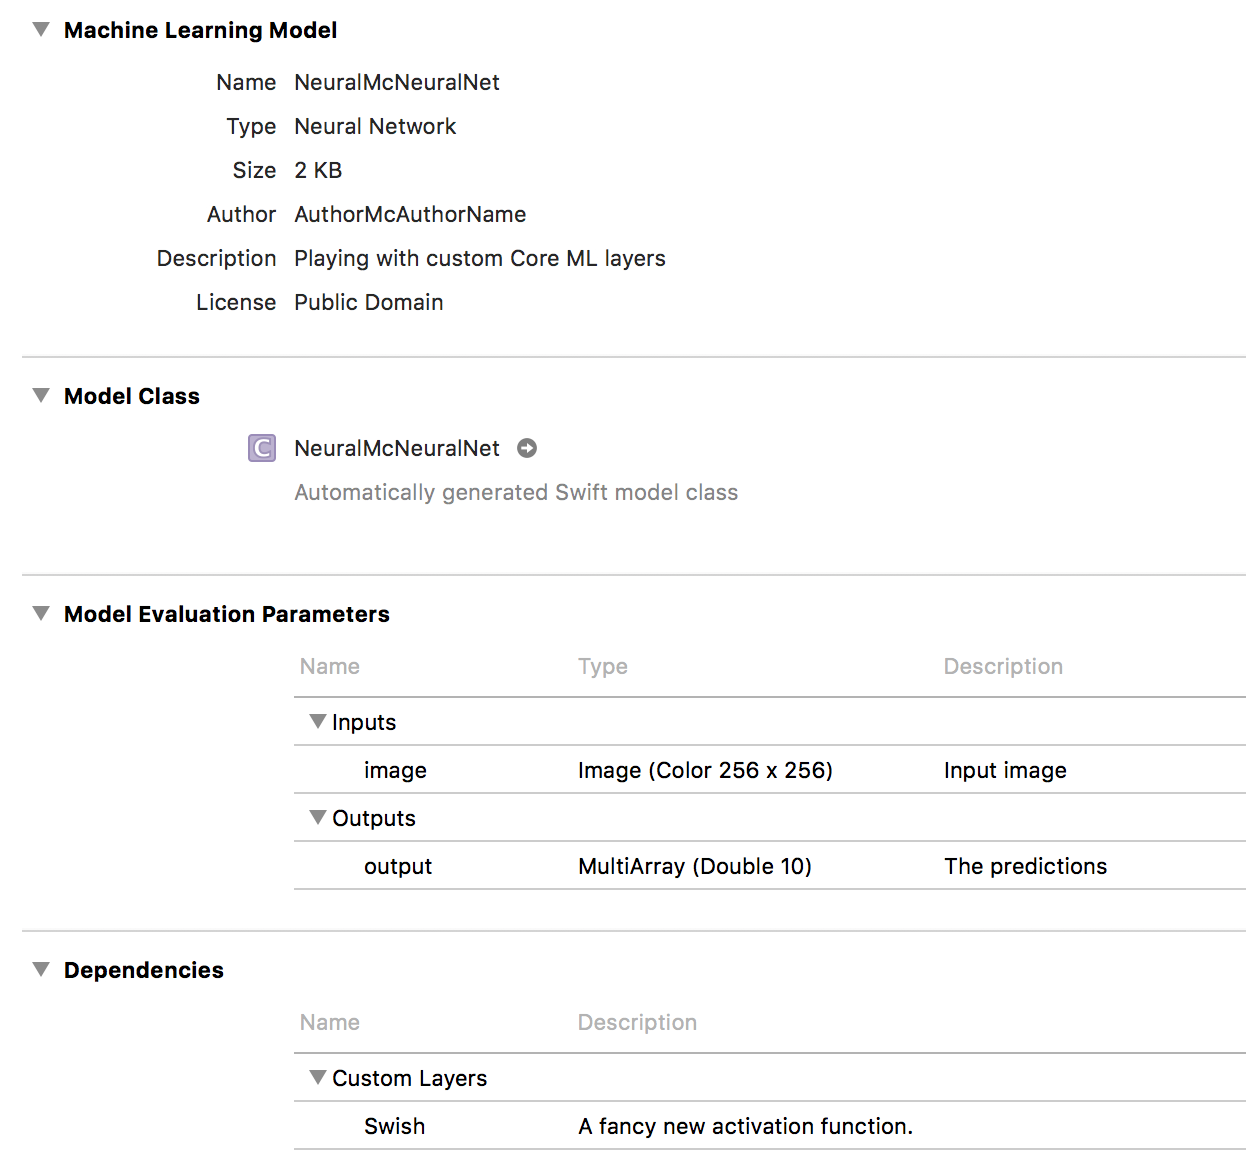
It shows the inputs and outputs as usual, and the new Dependencies section lists the custom layers and which classes implement them.
I’ve created a demo app that uses the Vision framework to run the model on the exact same picture we used in the Python script. It prints the predicted numbers to the Xcode output pane. Recall that the model doesn’t actually compute anything meaningful — because we haven’t trained it — but it should give the same results as in Python.
After adding the mlmodel file to the app, you need to provide a Swift or Objective-C class that implements the custom layer. If not, you’ll get the following error as soon as you try to instantiate the MLModel object:
[coreml] A Core ML custom neural network layer requires an implementation
named 'Swish' which was not found in the global namespace.
[coreml] Error creating Core ML custom layer implementation from factory
for layer "Swish".
[coreml] Error in adding network -1.
[coreml] MLModelAsset: load failed with error Error Domain=com.apple.CoreML
Code=0 "Error in declaring network."
Core ML tried to instantiate a class named Swish — since that’s what we told the conversion script what the className was — but it cannot find this class. So we need to write it, in Swish.swift:
import Foundation
import CoreML
import Accelerate

@objc(Swish) class Swish: NSObject, MLCustomLayer {
  required init(parameters: [String : Any]) throws {
    print(#function, parameters)
    super.init()
  }

  func setWeightData(_ weights: [Data]) throws {
    print(#function, weights)
  }

  func outputShapes(forInputShapes inputShapes: [[NSNumber]]) throws
       -> [[NSNumber]] {
    print(#function, inputShapes)
    return inputShapes
  }

  func evaluate(inputs: [MLMultiArray], outputs: [MLMultiArray]) throws {
    print(#function, inputs.count, outputs.count)
  }
}
This is the bare minimum you need to do. The class needs to extend NSObject, have an @objc() modifier to make it visible to the Objective-C runtime, and implement the MLCustomLayer protocol. This protocol consists of four required methods and one optional:
init(parameters). The constructor.parametersis a dictionary with additional configuration options for the layer (more about this later).setWeightData(). For layers with trainable weights (more about this later).outputShapes(forInputShapes). This determines how the layer modifies the size of the input data. Our Swish activation function doesn’t change the size of the layer and so we simply return the input shape.evaluate(inputs, outputs). This performs the actual computation — it is where the magic happens! This method is required and gets called when the model is run on the CPU.encode(commandBuffer, inputs, outputs). This method is optional. It also implements the computation but on the GPU.
So there are two different functions that provide the implemention of the layer: one for the CPU and one for the GPU. The CPU method is required — you must always provide at least a CPU version of your layer. The GPU method is optional, but recommended.
Currently the Swish class doesn’t do anything but it’s enough to actually run the model on the device (or in the simulator). Given the 256×256 pixel input image, the print statements in Swish.swift print out the following:
init(parameters:) ["engineName": Swish]

setWeightData []

outputShapes(forInputShapes:) [[1, 1, 6, 256, 256]]
outputShapes(forInputShapes:) [[1, 1, 6, 256, 256]]
outputShapes(forInputShapes:) [[1, 1, 6, 256, 256]]
outputShapes(forInputShapes:) [[1, 1, 6, 256, 256]]
outputShapes(forInputShapes:) [[1, 1, 6, 256, 256]]

evaluate(inputs:outputs:) 1 1
Obviously, init(parameters) is called first. Its parameters dictionary contains one item, "engineName" with the value Swish. Soon I’ll show you how to add your own parameters to this dictionary.
This is followed by a call to setWeightData(), which gets an empty array. That’s because we did not put any learnable weights into this layer (we will later).
Then outputShapes(forInputShapes:) is called several times in a row. I’m not sure why it gets called so often, but it’s no big deal since we don’t do a lot of work in that method anyway.
Note that the shapes are given in five dimensions. This uses the convention of:
[ sequence, batch, channel, height, width ]
Our Swish layer is receiving one image of 256×256 pixels that contains 6 channels. (Why 6 channels? Recall from the model definition that this Swish layer is applied to the output of a Conv2D layer, and that convolution layer has 6 filters.)
Finally, evaluate(inputs, outputs) is called to perform the computation for this layer. It takes an array of MLMultiArray objects as input and produces an array of new MLMultiArray objects as the output (these output objects have already been allocated, so that’s handy — we only need to fill them up).
The reason it gets arrays of MLMultiArray objects is that some types of layers may accept multiple inputs or produce multiple outputs. In the debug output above you can see that we only got one of each, since our model is very straightforward.
All right, let’s implement this Swish activation function for real:
func evaluate(inputs: [MLMultiArray], outputs: [MLMultiArray]) throws {
  for i in 0..<inputs.count {
    let input = inputs[i]
    let output = outputs[i]

    assert(input.dataType == .float32)
    assert(output.dataType == .float32)
    assert(input.shape == output.shape)

    for j in 0..<input.count {
      let x = input[j].floatValue
      let y = x / (1 + exp(-x))        // look familiar?
      output[j] = NSNumber(value: y)
    }
  }
}
Since Swish, like most activation functions, is an element-wise operation, this loops through all the values in the input array, computes x / (1 + exp(-x)) and writes the result to the output array.
An important point: MLMultiArray supports different data types. In this case we’re assuming the datatype is .float32, i.e. single precision floating point numbers, which is correct for our model. However, MLMultiArray can also support int32 and double, so you need to make sure that your layer class can handle whatever datatypes Core ML throws at it. (Here I used a simple assert to crash the app but it would be better to throw an error and let Core ML clean up properly.)
If we now run the app, the predicted output is:
[0.02245793305337429, 0.06994961202144623, 0.007555192802101374,
 0.00138940173201263, 0.005514328368008137, 0.8003641366958618,
 0.01428837608546019, 0.0003574613947421312, 0.005404338706284761,
 0.07271922379732132]
This matches the Keras output exactly!
So are we done now? Yes, but only if you like your code slow. 😝 We can speed this up a little (a lot, actually).
Using Accelerate to speed up the code
The evaluate(inputs, outputs) function is performed on the CPU, and we used a simple for loop. That’s useful for implementing and debugging a first version of the layer’s algorithm, but it’s not exactly a speed monster.
What’s worse, when we use the MLMultiArray in this way, we get NSNumber objects for every value we access. It’s much faster to directly access the floating point values in the MLMultiArray’s memory.
Instead of the for loop we’ll use vectorized CPU functions. Fortunately, the Accelerate framework makes this easy — but we do have to work with pointers, which makes the code a little less readable.
func evaluate(inputs: [MLMultiArray], outputs: [MLMultiArray]) throws {
  for i in 0..<inputs.count {
    let input = inputs[i]
    let output = outputs[i]

    let count = input.count
    let iptr = UnsafeMutablePointer<Float>(OpaquePointer(input.dataPointer))
    let optr = UnsafeMutablePointer<Float>(OpaquePointer(output.dataPointer))

    // output = -input
    vDSP_vneg(iptr, 1, optr, 1, vDSP_Length(count))

    // output = exp(-input)
    var countAsInt32 = Int32(count)
    vvexpf(optr, optr, &countAsInt32)

    // output = 1 + exp(-input)
    var one: Float = 1
    vDSP_vsadd(optr, 1, &one, optr, 1, vDSP_Length(count))

    // output = x / (1 + exp(-input))
    vvdivf(optr, ip, optr, &countAsInt32)
  }
}
With the for loop we applied the formula output = input / (1 + exp(-input)) to every array value invidually. But here we split up this formula in separate steps, and we apply each step to all array values at once.
First, we use vDSP_vneg() to compute -input for all values in the input array at once. The intermediate results are written into the output array. Then vvexpf() exponentiates every value in the array in one go. We use vDSP_vsadd() to add 1 to each value, and finally vvdivf() performs the division that gives the end result.
The result is exactly the same as before, but it’s done in a much more efficient fashion by exploiting the CPU’s SIMD instruction set. If you’re going to write your own custom layers, I recommend you use the Accelerate framework as much as possible (it’s also what Core ML uses internally for its own layers).
Even with optimizations enabled, the for loop version took 0.18 seconds on an iPhone 7. The Accelerate version took 0.0012 seconds. That’s 150 times faster!
You can find this code in the CPU only folder in the repo. You can run this app on a device or in the simulator. Try it out!
Even more speed: running on the GPU
An advantage of using Core ML over other machine learning frameworks is that Core ML can run the model on the CPU as well as on the GPU, without any extra work from you. For large neural networks it will typically try to use the GPU but on older devices that don’t have a very powerful GPU it will fall back to using the CPU.
It turns out that Core ML can also mix-and-match. If your custom layer only has a CPU implementation (like we just made) then it will still run the other layers on the GPU, switch to the CPU for your custom layer, and then switch back to the GPU for the rest of your neural network.
So having only a CPU implementation in your custom layer doesn’t degrade the performance of the rest of the model. However, why not take advantage of the GPU as well?
For the Swish activation function, the GPU implementation is really straightforward. Here is the Metal shader code:
#include <metal_stdlib>
using namespace metal;

kernel void swish(
  texture2d_array<half, access::read> inTexture [[texture(0)]],
  texture2d_array<half, access::write> outTexture [[texture(1)]],
  ushort3 gid [[thread_position_in_grid]])
{
  if (gid.x >= outTexture.get_width() ||
      gid.y >= outTexture.get_height()) {
    return;
  }

  const float4 x = float4(inTexture.read(gid.xy, gid.z));
  const float4 y = x / (1.0f + exp(-x));                  // recognize this?
  outTexture.write(half4(y), gid.xy, gid.z);
}
We will invoke this compute kernel once for every data element in the input array. Since Swish is an element-wise operation, we can simply write the familiar formula x / (1.0f + exp(-x)) here.
Unlike before when we used MLMultiArrays, here the data is placed inside Metal texture objects. The data type of the MLMultiArray was 32-bit float, but here we’re actually dealing with 16-bit floats or half. Note that even though the texture is of type half, we do the actual computation with float values, otherwise we lose too much precision and the answer is actually totally wrong.
Recall that the data is 6 channels deep. That is why the compute kernel uses texture_array, which is a Metal texture that consists of multiple “slices”. In our demo app, the texture array only contains 2 slices (for a total of 8 channels, so the last 2 channels are simply ignored) but the above compute kernel will work with any number of slices / channels.
To use this GPU compute kernel, we have to add some code to our Swift class:
@objc(Swish) class Swish: NSObject, MLCustomLayer {
  let swishPipeline: MTLComputePipelineState

  required init(parameters: [String : Any]) throws {
    // Create the Metal compute kernels.
    let device = MTLCreateSystemDefaultDevice()!
    let library = device.makeDefaultLibrary()!
    let swishFunction = library.makeFunction(name: "swish")!
    swishPipeline = try! device.makeComputePipelineState(
                                    function: swishFunction)
    super.init()
  }
This is a bit of boilerplate for loading the Metal swish kernel function into an MTLComputePipelineState object. We also need to add the following method:
func encode(commandBuffer: MTLCommandBuffer,
            inputs: [MTLTexture], outputs: [MTLTexture]) throws {
  if let encoder = commandBuffer.makeComputeCommandEncoder() {
    for i in 0..<inputs.count {
      encoder.setTexture(inputs[i], index: 0)
      encoder.setTexture(outputs[i], index: 1)
      encoder.dispatch(pipeline: swishPipeline, texture: inputs[i])
      encoder.endEncoding()
    }
  }
}
If this method is present in your MLCustomLayer class, then the layer will run on the GPU. Inside this method you encode your “compute pipeline state” into the MTLCommandBuffer. It’s mostly boilerplate again. The encoder.dispatch() method makes sure the compute kernel is invoked once for every pixel in every channel in the input texture. See the source code for more details.
Now when you run the app (on a fairly recent device), this encode(commandBuffer, inputs, outputs) function is called instead of evaluate(inputs, outputs) and the GPU has the honor of computing the swish activation function.
You should get the same output as before. That makes sense — you want the CPU and GPU versions of your custom layer to compute the exact same answers!
Note: You cannot run Metal apps on the simulator, so this version of the app only works on an actual device. An iPhone 6 or better will do. If the device is too old, Core ML will still run the model using the CPU, not the GPU.
Advanced: If you’ve used MPSCNN before, then note there are a few differences with how Core ML uses the GPU. With MPSCNN you’re dealing with MPSImage objects but Core ML gives you an MTLTexture instead. The pixel format appears to be .rgba16Float, which corresponds to MPSImage’s .float16 channel format.
With MPSCNN, images with 4 channels or less are backed by a texture of type2D, and images of more than 4 channels have type2DArray. This means that with MPSCNN you may have to write two versions of your compute kernels: one that takes texture objects and one that takes texture_array. As far as I can tell, with Core ML the texture is always type2DArray, even if 4 channels or less, and so you need to write only one version of the compute kernel.
Parameters and weights
So now we have a custom layer with a corresponding Swift implementation. Nice, but this was only a very simple layer.
We can add parameters and weights to the layer too. “Parameters” in this context means configurable settings. For example, the kernel size of a convolution layer or the amount of padding to add around the layer would be parameters.
In our case, we can make beta into a parameter. Remember beta? The value of beta determines how steep the Swish function is. The version of Swish we have implemented so far is:
swish(x) = x * sigmoid(x)
But remember the full definition is actually,
swish(x) = x * sigmoid(beta * x)
where beta is some number. Until now we’ve assumed beta was always 1.0, but we can make it configurable and treat it as a hyperparameter — or even make the model learn the value of beta while training, in which case we’ll treat it as a weight.
To add parameters or weights to a custom layer, change the conversion function as follows:
def convert_lambda(layer):
    if layer.function == swish:
        params = NeuralNetwork_pb2.CustomLayerParams()

        . . .

        # Set configuration parameters
        params.parameters["someNumber"].intValue = 100
        params.parameters["someString"].stringValue = "Hello, world!"

        # Add some random weights
        my_weights = params.weights.add()
        my_weights.floatValue.extend(np.random.randn(10).astype(float))

        return params
    else:
        return None
Now when you run the app, the Swish class will receive a parameters dictionary with these integer and string values in its init(parameters) method, and the weights as a Data object in setWeightData().
Let’s add beta as a (hyper)parameter. For this purpose we should move away from the Lambda layer and turn our Swish activation function into a proper Keras layer object. Lambda layers are great for simple computations, but now we want to give the Swish layer some state (the value of beta) and creating a Layer subclass is a better approach for that.
In the Python script, convert_subclass.py, we now define the Swish function as a subclass of Layer:
from keras.engine.topology import Layer

class Swish(Layer):
    def __init__(self, beta=1., **kwargs):
        super(Swish, self).__init__(**kwargs)
        self.beta = beta

    def build(self, input_shape):
        super(Swish, self).build(input_shape)

    def call(self, x):
        return K.sigmoid(self.beta * x) * x

    def compute_output_shape(self, input_shape):
        return input_shape
Notice how this takes a beta value in its constructor. Inside the call() function, which is the Keras equivalent of evaluate(inputs, outputs), we compute the Swish formula — this time including beta.
The new model definition looks like this:
def create_model():
    inp = Input(shape=(256, 256, 3))
    x = Conv2D(6, (3, 3), padding="same")(inp)
    x = Swish(beta=0.01)(x)                     # look here!
    x = GlobalAveragePooling2D()(x)
    x = Dense(10, activation="softmax")(x)
    return Model(inp, x)
The value of beta is a hyperparameter; it is defined at model build time. Here I’ve chosen to use beta=0.01 so that we’ll get a different answer than before for the predictions.
By the way, here’s what Swish looks like with beta 0.01, it’s almost a straight line:

To convert this layer to Core ML, we need to give it its own conversion function:
def convert_swish(layer):
    params = NeuralNetwork_pb2.CustomLayerParams()
    params.className = "Swish"
    params.description = "A fancy new activation function"

    # Add the hyperparameter to the dictionary
    params.parameters["beta"].doubleValue = layer.beta

    return params
This is very similar as before, except that now we read the beta property from the layer (which is an instance of the new Swish class we just made) and stick it into the CustomLayerParams’s parameters dictionary. Note that this dictionary does not support 32-bit floats, only 64-bit doubles (as well as integers and booleans), so we use .doubleValue.
When we call the Keras converter, we have to tell it about this new conversion function:
coreml_model = coremltools.converters.keras.convert(
    model,
    input_names="image",
    image_input_names="image",
    output_names="output",
    add_custom_layers=True,
    custom_conversion_functions={ "Swish": convert_swish })
This is all very similar to what we did before, except now Swish is not a basic Python function wrapped inside a Lambda object, but a full-fledged class that derives from the Keras Layer base class.
On the iOS side, we’ll need to tweak Swish.swift to read this “beta” value out of the parameters dictionary and apply it in the computation.
@objc(Swish) class Swish: NSObject, MLCustomLayer {
  let beta: Float

  required init(parameters: [String : Any]) throws {
    if let beta = parameters["beta"] as? Float {
      self.beta = beta
    } else {
      self.beta = 1
    }
    ...
  }
In evaluate(inputs, outputs) we now multiply the input with self.beta.
Likewise for the Metal compute shader. In encode(commandBuffer, inputs, outputs) we can pass self.beta into the compute kernel as follows:
var beta = self.beta
encoder.setBytes(&beta, length: MemoryLayout<Float>.size, index: 0)
and then inside the Metal kernel it’s just a matter of:
kernel void swish(
  texture2d_array<half, access::read> inTexture [[texture(0)]],
  texture2d_array<half, access::write> outTexture [[texture(1)]],
  constant float& beta [[buffer(0)]],
  ushort3 gid [[thread_position_in_grid]])
{
  ...
  const float4 y = x / (1.0f + exp(-x * beta));
  ...
}
See the source code for the full set of changes. I hope it’s clear that it’s pretty easy to add such configuration parameters to your custom layers.
Note: When I ran this new version of the iOS app, the prediction results did not 100% match the results from Keras. This is actually not uncommon when Core ML uses the GPU. The convolution layer runs on the GPU with 16-bit floats, which have reduced precision, while Keras uses 32-bit floats for everything. So you’re bound to see differences between the predictions from your iOS model and those from the original Keras model. As long as the differences are small — around 1e-3 or smaller — you’re good.
Learnable weights
One final thing I want to show you. The whole point of machine learning is to learn things, and so for many custom layers you want to be able to give them learnable weights. So let’s change up the implementation of the Swish layer one more time to make beta learnable. This lets the model learn what the most optimal shape of the activation function is.
The Swish layer is still a subclass of Layer but this time we give it a learnable weight by calling add_weight():
class LearnableSwish(Layer):
    def __init__(self, **kwargs):
        super(LearnableSwish, self).__init__(**kwargs)

    def build(self, input_shape):
        self.beta = self.add_weight(
                name="beta",
                shape=(input_shape[3], ),
                initializer=keras.initializers.Constant(value=1),
                trainable=True)
        super(LearnableSwish, self).build(input_shape)

    def call(self, x):
        return K.sigmoid(self.beta * x) * x

    def compute_output_shape(self, input_shape):
        return input_shape
Instead of a single beta value we’ll actually create a learnable weight for each channel in the input data, which is why we use shape=(input_shape[3], ). In the example, the layer will learn 6 different values for beta, since the output from the preceding Conv2D layer has 6 channels. The initial value for beta is 1, which seems like a reasonable default.
Now when you call model.fit(...) to train the model, it will learn the optimal values for beta for each of the channels.
In the conversion function, we have to do the following to put these learned weights into the mlmodel file:
def convert_learnable_swish(layer):
    params = NeuralNetwork_pb2.CustomLayerParams()
    . . .

    beta_weights = params.weights.add()
    beta_weights.floatValue.extend(layer.get_weights()[0].astype(float))

    return params
And that’s all that is needed on the Keras side.
When you run the iOS app, you’ll notice that setWeightData() now receives a single Data object with 24 bytes in it. That’s those 6 channels times 4 bytes for each floating point number.
It’s fairly straightforward to adapt the Swish.swift layer code to read beta from this weights array and use that in its calculations. The main difference with before is that we know have as many different beta values as there are channels in the data. I will leave this as an exercise for the reader. 🤘
First published on Monday, 11 December 2017.
If you liked this post, say hi on Twitter @mhollemans or LinkedIn.
Find the source code on my GitHub.
 New e-book: Code Your Own Synth Plug-Ins With C++ and JUCE
Interested in how computers make sound? Learn the fundamentals of audio programming by building a fully-featured software synthesizer plug-in, with every step explained in detail. Not too much math, lots of in-depth information! Get the book at Leanpub.com