
In this series of blog posts we’re taking a deep dive into the new on-device model personalization features from Core ML 3. I’ll show how to create a customizable image classifier using k-Nearest Neighbors as well as a deep neural network, right from inside an iOS app.
This is part 3 of a four-part series:
- Introduction to on-device training
- Rock, Paper, Scissors (Lizard? Spock?)
- k-Nearest Neighbors
- Training a Neural Network
Follow along with the source code on GitHub.
In this installment, we’ll finally do some training, using the good old k-NN algorithm!
k-Nearest Neighbors
If you’re reading this blog post you probably know what k-NN is. It’s one of the first and simplest algorithms taught in machine learning courses.
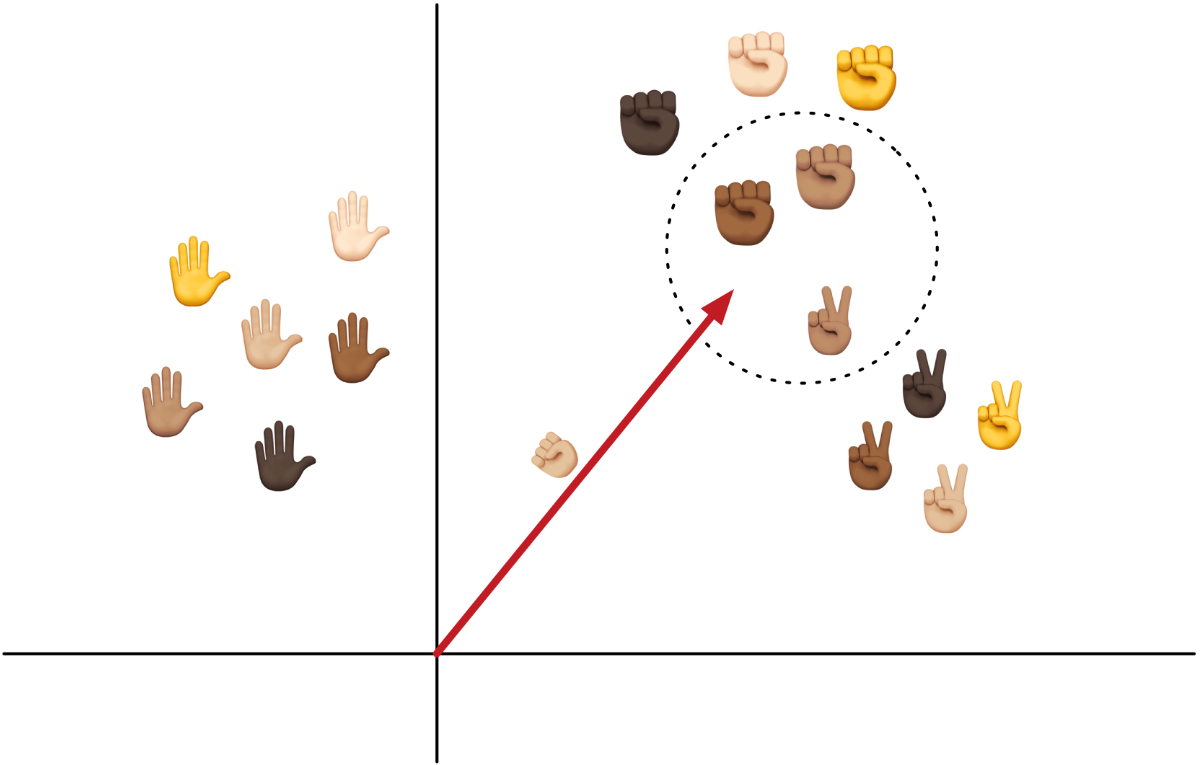
Just in case you need a refresher: k-NN is a classifier that, given a feature vector, finds the k closest training examples. So if k=3, it finds the three examples with the smallest distance to the feature vector. The predicted class is the class label that is most common among those three examples.
The k-NN classifier asks, “What is the typical class of other training examples whose feature vectors are most similar to this new feature vector?”
k-NN models are very fast to train because they don’t actually “learn” anything. They just memorize all the training examples.
Another upside is that you only need a handful of examples for each class, not the 100s of examples required to train a neural network.
The downside is that the model becomes very large — and therefore slow — when there are many examples. For every prediction, k-NN has to compute the distance between the feature vector and every memorized example.
Note: The speed of k-NN lookups is determined by the type of the index, the data structure that stores all the feature vectors. Core ML lets you choose between a linear index and a kd-tree. The kd-tree is best when you have many training examples, as it allows for more efficient lookups.
When would you use a k-NN model?
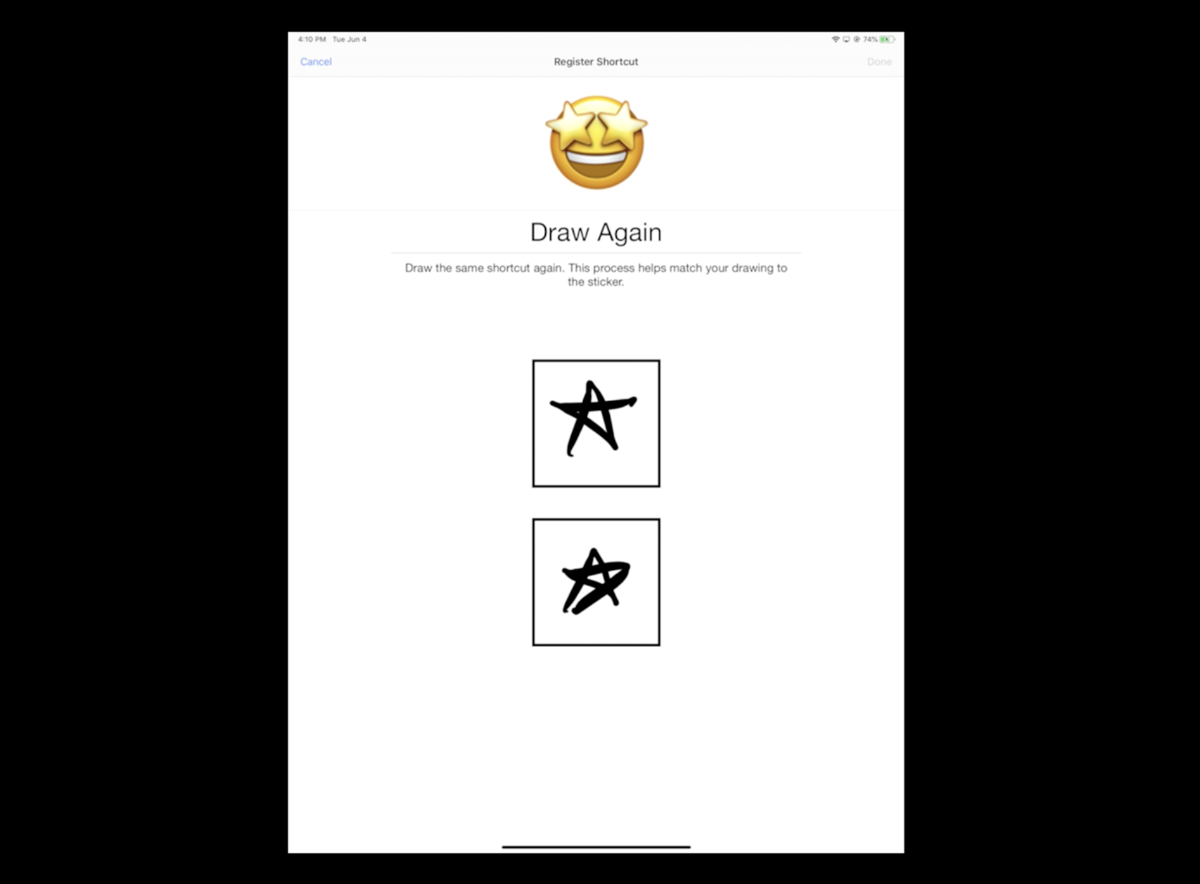
The WWDC 2019 session Core ML 3 Framework showed a cool demonstration of an app that learns to detect sketches drawn by the user. It trains a k-NN classifier to turn the sketch into an emoji. Since each user will want to draw their own sketches and associate them with their own choice of emoji, it makes sense for users to train their own completely customized model.
A big benefit of k-NN is that you can add new classes at will, whereas with a neural network the number of supported classes is fixed inside the mlmodel and needs to be decided ahead-of-time (it depends on the number of neurons in the last layer).
That’s why the sketch demo used k-NN: it lets the user decide which and how many classes there are. You can add as many new classes as you want.
k-NN also needs very few training examples to learn about a new class. The sketch app asked the user to draw each sketch just three times. So for each class, the model learns from only 3 examples. A neural net would have required many more!
If you’re thinking of adding on-device training to your app, k-NN is a good place to start:
- it’s a simple model that is easy to work with,
- it’s fast to train,
- it’s very flexible,
- and requires little data.
Sounds great! However, there are a few things to keep in mind…
Remember that the input to a k-NN classifier is a one-dimensional vector of numbers, the feature vector. If your data is already like that, you can use k-NN directly on the data. If not, you’ll need to run some kind of feature extractor to turn your data into such vectors first.
Images are obviously not one-dimensional, which is why the WWDC sketch app uses a neural network as the feature extractor. So even though they use k-NN to make the classifications, their model also has a neural network inside it.
While each model is personalized for its user, they all share a common feature extractor that was pre-trained on images of many sketches, so that the model already has some kind of prior knowledge about what a sketch is.
If that app shipped without a trained feature extractor, the model wouldn’t work very well, because it first would have to learn how to turn a sketch image into a feature vector — and that’s beyond the capabilities of a k-NN classifier.
(In case you’re wondering, using k-NN directly on the pixels of the image doesn’t work very well either.)
Just to drive it home: using k-NN on complex data such as images or sounds only makes sense if you also have a feature extractor that already understands the typical patterns in the data.
Update: Apple has released sample code for the emoji drawing app. Worth checking out!
Creating the model
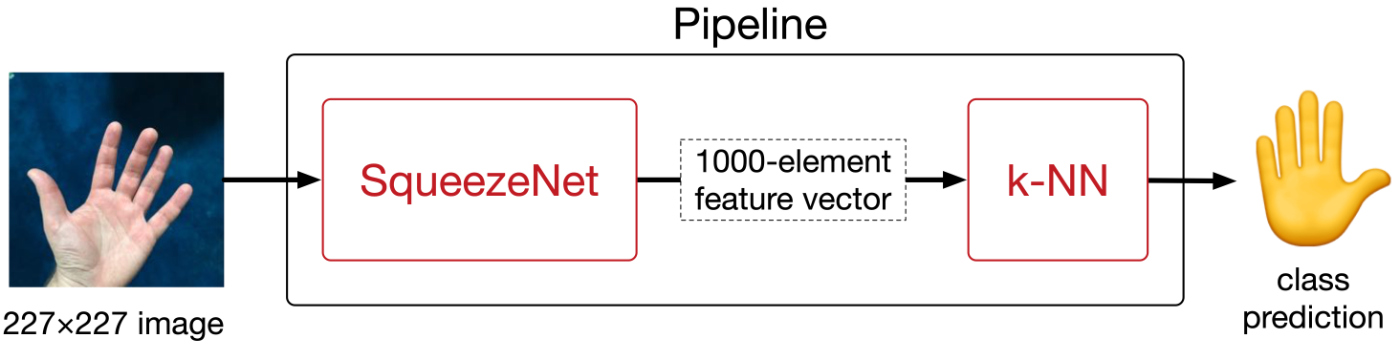
In the demo app, we’ll be using SqueezeNet 1.1 as the feature extractor. This is a well-known convolutional neural network.
This version of SqueezeNet was pre-trained on the ImageNet dataset of 1000 categories of everyday objects, so it will already know a lot about how to interpret typical photos. It wasn’t trained specifically on hand gestures, but it has certainly learned a thing or two about what humans look like — including their hands.
We’ll use SqueezeNet to turn the 227×227-pixel input image into a feature vector that consists of 1000 numbers. k-NN will then use that feature vector to perform the actual classification.
In essence, a convolutional neural network is nothing more than a fancy pattern detector that has learned to recognize (abstract) patterns in images. The feature vector tells you how well the input image matches the 1000 different patterns that SqueezeNet has learned to detect.
Why 1000? That just happens to be the number SqueezeNet gives us. If you were to use a different feature extractor, for example VisionFeaturePrint that is built into iOS 12 and up, this number would be 2048. Other neural networks may output feature vectors with 4096 numbers or more.
Note: For k-NN, smaller feature vectors tend to work better, as k-NN has issues with very high-dimensional spaces for reasons of math.
Normally, the last layer of SqueezeNet is a classification layer that connects those 1000 possible patterns to each of the classes. If you had a class “dog”, it would be connected to the feature vector elements for “pointy ears”, “tail”, “tongue sticking out”, and any other patterns the model has learned to detect in images of dogs.
But here we don’t care about that classification layer — instead, we will use k-NN to do the classification. So we’ll get rid of this layer.
The final Core ML model will be a so-called pipeline model consisting of two submodels: first SqueezeNet (without the classification layer), followed by k-NN.
The k-NN never sees the actual 227×227 input images, only the vectors coming out of SqueezeNet. When we train the k-NN model, it therefore won’t memorize the full images, only those 1000-element feature vectors.
How do you create such a model? As usual it takes a bit of Python. You can find the code in Scripts/make_knn.py from the GitHub repo.
First we need to get a pre-trained copy of SqueezeNet from somewhere. There’s a version on Apple’s developer page that you could use. But since I already trained a neural network classifier with Turi Create that is built on SqueezeNet (see also part 2 of this series), we can simply load that and throw away the classifier layer.
make_knn.py does the following:
import coremltools
base_model = coremltools.models.MLModel("../Models/TuriOriginal.mlmodel")
base_spec = base_model._spec
This loads the classifier I made with Turi Create, TuriOriginal.mlmodel, from the repo’s Models folder. (See also the Jupyter notebook Scripts/TuriCreate.ipynb for how this model was trained.)
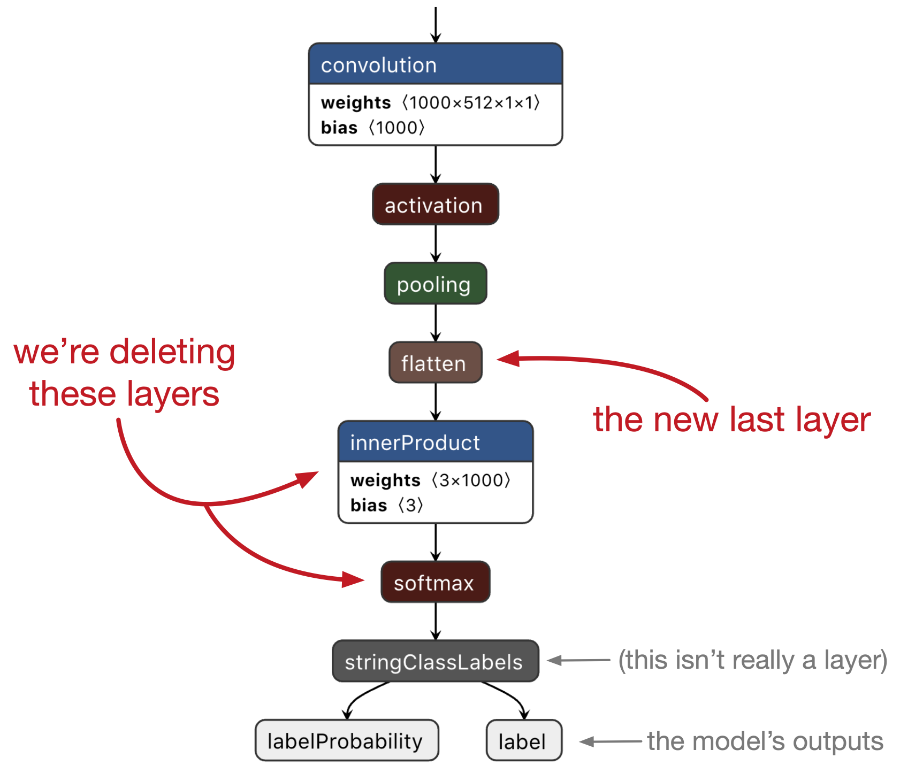
Next, it deletes the last two layers:
import copy
layers = copy.deepcopy(base_spec.neuralNetworkClassifier.layers)
del layers[-1]
del layers[-1]
These are an innerProduct layer — also known as a fully-connected layer — and a softmax layer. Together these two layers performed multinomial logistic regression on the extracted features, but we don’t want that anymore.
The new last layer is now a flatten layer that produces the 1000-element vector that I mentioned earlier.
How did I know which layers to delete? For tasks like these, I always recommend viewing the model with Netron.
In Python, you can write print(layers[i].name) to get the name of the layer at index i or print(layers[i].WhichOneof("layer")) to get the type of the layer, and compare these to the name and type shown in Netron.
Tip: To learn more about this type of model surgery — as well as lots of other Core ML tips and tricks — check out my e-book Core ML Survival Guide. It was recently updated for Core ML 3.
In Core ML terms, the model from Turi is a so-called NeuralNetworkClassifier. This is a special neural network type that is always supposed to predict a class label. However, we want to use the neural network as a feature extractor, so it should be of type NeuralNetwork — without the “classifier” part.
We can do this by deleting the layers from base_spec.neuralNetworkClassifier and assigning them to base_spec.neuralNetwork. This is why we made a copy of the layers earlier. We also copy the image preprocessing options and delete a few other classifier-related properties:
preprocessing = base_spec.neuralNetworkClassifier.preprocessing

del base_spec.neuralNetworkClassifier.layers[:]
base_spec.neuralNetwork.layers.extend(layers)

base_spec.neuralNetwork.preprocessing.extend(preprocessing)

base_spec.description.ClearField("metadata")
base_spec.description.ClearField("predictedFeatureName")
base_spec.description.ClearField("predictedProbabilitiesName")
A NeuralNetworkClassifier model always has two outputs: the predicted class label and a dictionary with all the probabilities. Because we deleted the softmax layer and turned this into a regular neural network, we should tell the model that now it only has a single output, the 1000-element feature vector.
del base_spec.description.output[:]

output = base_spec.description.output.add()
output.name = "features"
output.type.multiArrayType.shape.append(1000)

import coremltools.proto.FeatureTypes_pb2 as ft
output.type.multiArrayType.dataType = ft.ArrayFeatureType.FLOAT32

base_spec.neuralNetwork.layers[-1].output[0] = "features"
This removes the old outputs from the model and adds a new output named "features". Note that the data type of this output is FLOAT32, not DOUBLE, because Core ML’s k-NN expects the feature vectors to be made up of 32-bit floats.
The last line connects the existing flatten layer to the new "features" output.
And that’s it for the first model in our pipeline. We’ve taken a SqueezeNet classifier, stripped off the last couple of layers, and turned it into a feature extractor that outputs a 1000-element vector.
Now let’s build the k-NN model.
If you already had a trained k-NN model, you could use the scikit-learn converter tool for this. But our k-NN model will be completely untrained initially, so we’ll use KNearestNeighborsClassifierBuilder:
from coremltools.models.nearest_neighbors import \
        KNearestNeighborsClassifierBuilder

knn_builder = KNearestNeighborsClassifierBuilder(
        input_name="features",
        output_name="label",
        number_of_dimensions=1000,
        default_class_label="???",
        number_of_neighbors=3)
The arguments you need to supply are:
input_name. This is the name of the output from the feature extractor.output_name. This is the output of the k-NN model that will have the label of the predicted class.KNearestNeighborsClassifierBuilderautomatically adds another output for the dictionary with the probabilities.number_of_dimensions. How many elements are in the input feature vector. 1000 in our case.default_class_label. This is the class that gets predicted when the k-NN model is untrained. We use the string"???"here but you can also use an integer if you want to use numeric class labels instead of strings.number_of_neighbors. The number of neighbors to use for making the predictions. This is the k in k-NN.
There are also a few other optional arguments you can supply here, such as the weighting_scheme used for making the predictions (to make distant neighbors contribute less than close ones), the index_type to choose between a linear index or a kd-tree (for faster lookups), and the leaf_size for the kd-tree.
Note: Core ML 3 supports two weighting schemes: uniform weighting and inverse distance weighting. Once k-NN has found the k closest feature vectors, it takes a vote to determine the majority class label among these k vectors. With uniform weighting, each vote counts equally. With inverse distance weighting, the votes of the closer neighbors count more than the votes of far-away neighbors. In Core ML 3, the distance function that determines how far away the feature vectors are is always the squared Euclidean distance.
The key hyperparameter for k-NN is k, or number_of_neighbors as coremltools calls it. Here, we use 3 neighbors but in practice you’d experiment with this setting to find what works best for your data.
Instead of always using a fixed value for k, Core ML also lets you be flexible:
knn_builder.set_number_of_neighbors_with_bounds(3, allowed_range=(1, 10))
This lets the developer of the app change the number of neighbors at runtime from anywhere between 1 and 10, with a default of 3. You can also use the allowed_set argument to limit k to a set of allowed values, for example:
knn_builder.set_number_of_neighbors_with_bounds(3, allowed_set=[3, 5, 7])
OK, that’s really all you need to do to create an untrained k-NN model.
If you wanted to already add some examples to the model, you can now call builder.add_samples() with your training data and labels. But we’re not doing that for this app, we’ll leave the k-NN completely blank.
Let’s add some descriptions to the k-NN model’s inputs and outputs:
knn_spec = knn_builder.spec
knn_spec.description.input[0].shortDescription = "Input vector"
knn_spec.description.output[0].shortDescription = "Predicted label"
knn_spec.description.output[1].shortDescription = \
        "Probabilities for each possible label"

knn_spec.description.predictedProbabilitiesName = "labelProbability"
knn_spec.description.output[1].name = \
        knn_spec.description.predictedProbabilitiesName
Because this is a classifier model it has two outputs: the label for the predicted class and a dictionary that has the probabilities for all the classes. This last one was automatically added by KNearestNeighborsClassifierBuilder but it has the default name "labelProbs". We change this name here to "labelProbability" because that is also the output name used by the neural network models from this demo app. (It lets us use the same code for evaluating both types of model.)
Now we have our two models, the feature extractor and the k-NN model. Let’s put them together into a pipeline:
pipeline_spec = coremltools.proto.Model_pb2.Model()

pipeline_spec.description.input.extend(base_spec.description.input[:])
pipeline_spec.description.output.extend(knn_spec.description.output[:])

pipeline_spec.description.predictedFeatureName = \
     knn_spec.description.predictedFeatureName
pipeline_spec.description.predictedProbabilitiesName = \
     knn_spec.description.predictedProbabilitiesName

pipeline_spec.pipelineClassifier.pipeline.models.add().CopyFrom(base_spec)
pipeline_spec.pipelineClassifier.pipeline.models.add().CopyFrom(knn_spec)
This creates a new Model object and gives it the inputs from the SqueezeNet feature extractor (base_spec) and the outputs from the k-NN model (knn_spec).
We also copy the predictedFeatureName and predictedProbabilitiesName properties from the k-NN model.
Because we’re making a classifier, we need to copy both models into the spec’s pipelineClassifier property. (There is also a pipelineRegressor and a regular pipeline but they are the wrong choice for this app.)
It can also be useful to give the models inside the pipeline names, so we can easily refer to them later. If you don’t do this, the models are simply named “model0”, “model1”, and so on.
pipeline_spec.pipelineClassifier.pipeline.names.extend(
        ["FeatureExtractor", "kNNClassifier"])
This is enough to create the pipeline if we just want to do inference. But this blog post is about training, and you need to write some extra code to enable that.
First of all, you need to set the pipeline to be updatable. The k-NN model must be made updatable as well, but KNearestNeighborsClassifierBuilder already took care of that. The SqueezeNet feature extractor will not be updatable as it’s fully trained already — and only the last model in the pipeline can be updatable anyway.
pipeline_spec.isUpdatable = True
pipeline_spec.specificationVersion = coremltools._MINIMUM_UPDATABLE_SPEC_VERSION
Because on-device training is only available as of Core ML 3, it’s a good idea to set the specificationVersion to _MINIMUM_UPDATABLE_SPEC_VERSION, so that this mlmodel cannot be mistakenly used on older versions of iOS.
Note: If you inspect the mlmodel file in Netron, you’ll see the Core ML format is actually version 4, not 3. The spec version numbers don’t match the Core ML version number used by Apple’s marketing department.
We’re not done yet. For doing inference, all you need to provide is an image and the model will make a prediction. But training requires that you also provide the true class label for the image. Alongside the feature vector for each training image, Core ML will store the corresponding class label inside the mlmodel file as well.
To enable this, Core ML requires that an updatable model has training inputs.
The mlmodel file has regular inputs for inference and training inputs for training. When making a prediction, it uses the regular inputs. During training, it uses the training inputs. One of the training inputs must be for the target, the true label.
For the k-NN model, the training inputs look like this:
pipeline_spec.description.trainingInput.extend([base_spec.description.input[0]])
pipeline_spec.description.trainingInput[0].shortDescription = "Example image"

pipeline_spec.description.trainingInput.extend([knn_spec.description.output[0]])
pipeline_spec.description.trainingInput[1].shortDescription = "True label"
The first training input will be named "image", just like in the feature extractor. We literally copy over that name from the SqueezeNet model (base_spec).
The second training input is "label", just like the output of the k-NN model. Again, we literally copy over that name, but this time from knn_spec. This way Core ML knows that the training input "label" is supposed to deliver the true class name for the prediction output that is also named "label".
Note: In our app, the "image" input is needed for both inference and training, so it needs to be listed in the prediction inputs as well as in the model’s training inputs. But this is not necessarily true for all inputs. For inference with an object detection model you may want to pass in an IOU threshold and confidence threshold in addition to the image, but for training you would just pass in the image and the targets. (Of course, if you also need the thresholds for training, you’d need to list them as training inputs too.)
Finally, we can save the new Core ML model:
coremltools.utils.save_spec(pipeline_spec, "HandskNN.mlmodel")
If you open this mlmodel file in Xcode, it looks like this:
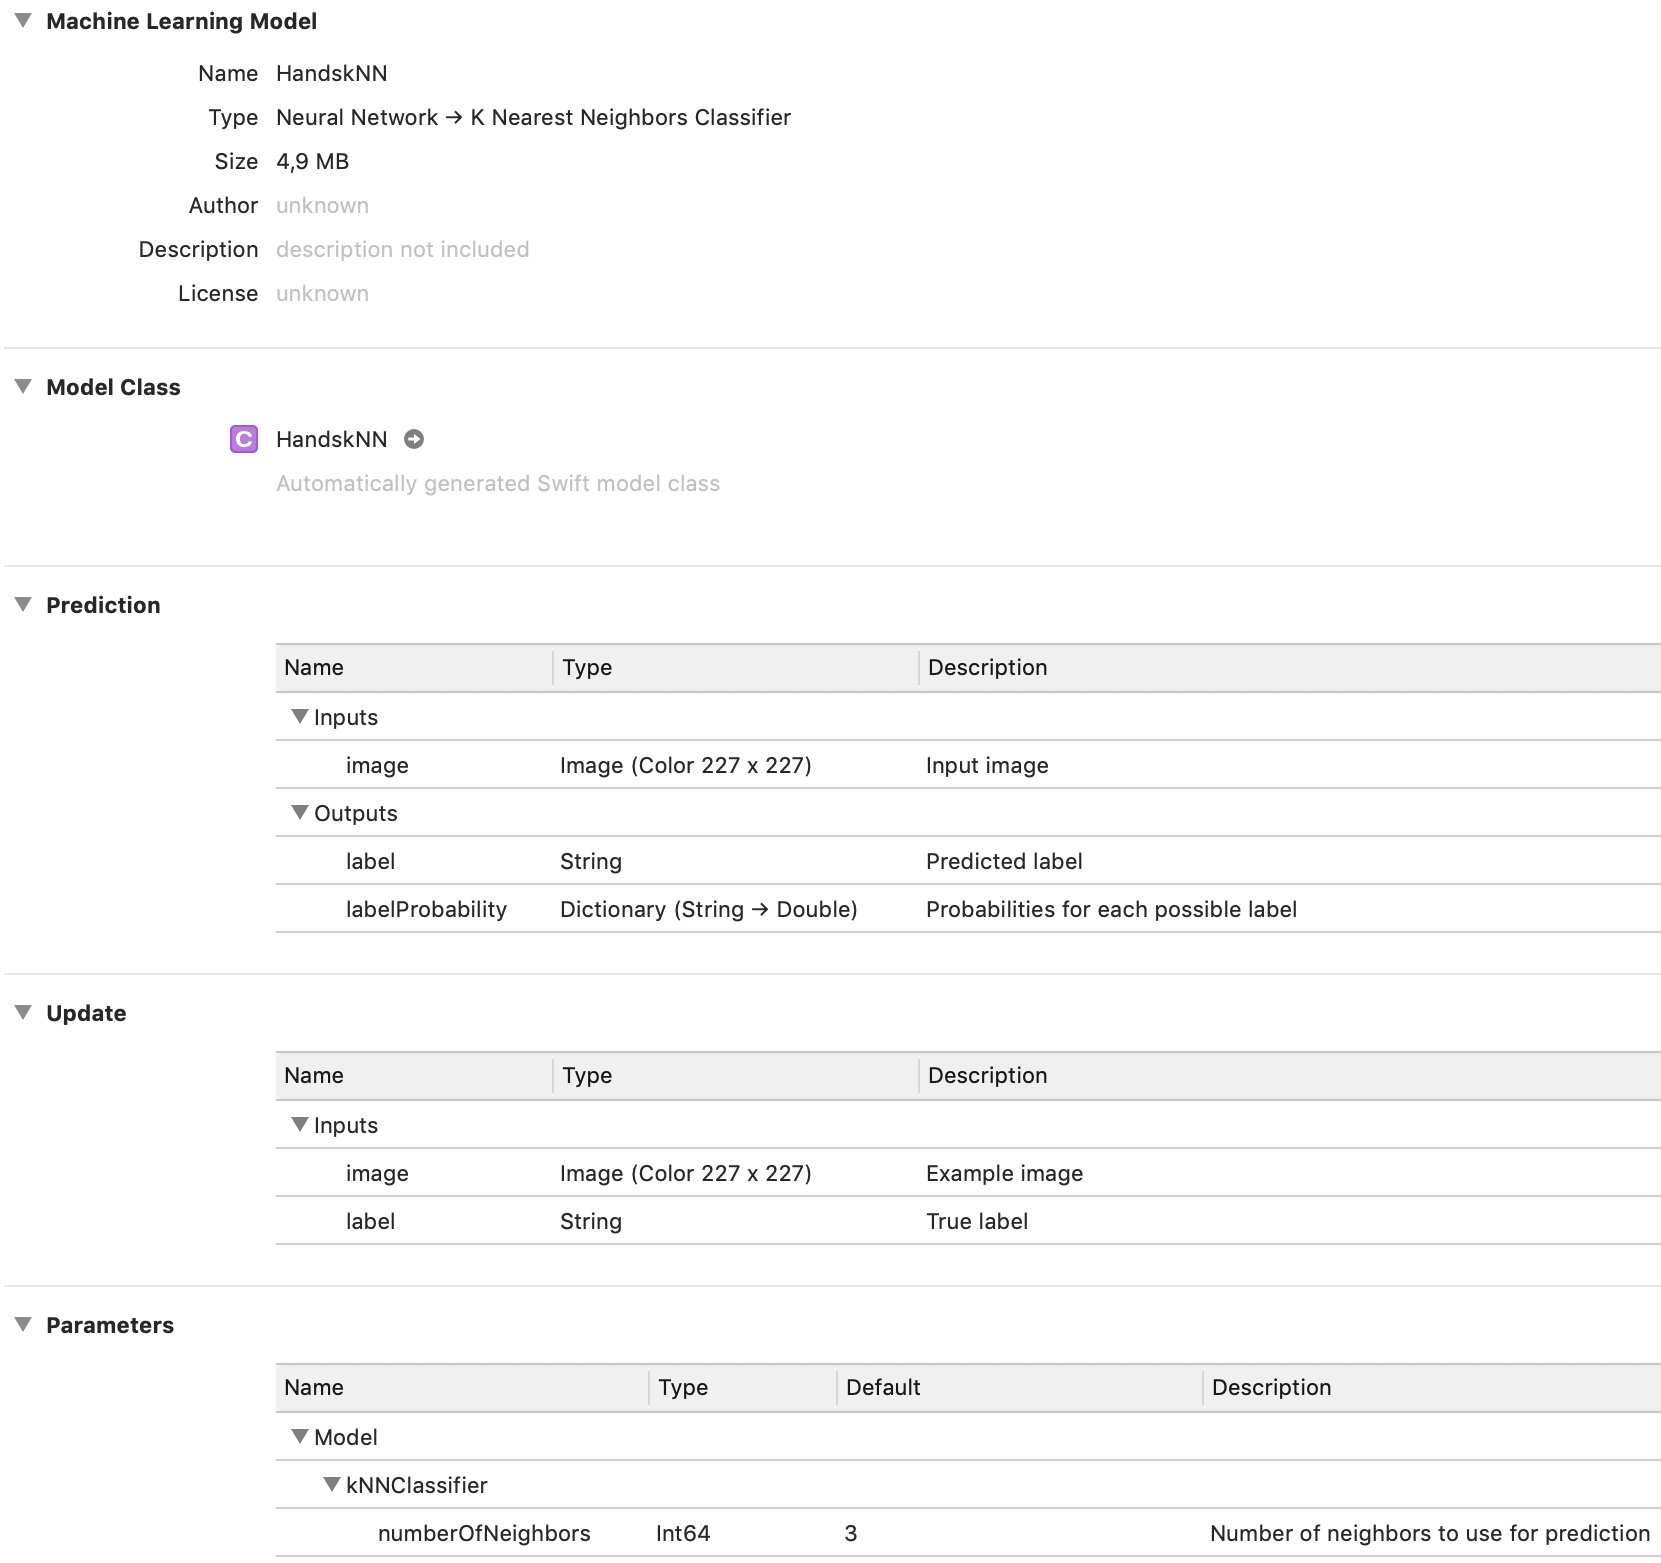
Specifically,
The Type confirms this is a classifier pipeline consisting of a neural network followed by k-nearest neighbors.
In the Prediction section it shows the model takes a color 227×227 image as input and produces the class label and the probabilities dictionary as output, just as you might expect from a classifier.
The new Update section shows the two training inputs that we added to the model in order to enable on-device training.
The Parameters section shows that the submodel named
"kNNClassifier"has one hyperparameter that can be changed by the user, the number of neighbors. (If you don’t give your models a name when you put them into the pipeline, they’re called “model0”, “model1”, etc here.)
Just like neural network models, a k-NN model has an auto-generated class. Look inside and you’ll notice that it is exactly the same as for any other Core ML model. Core ML doesn’t really care what is inside the model, it treats the inner workings as a black box. As long as you give it an input in the format that is expected, it’s happy.
By the way, to get the names and data types of the training inputs in code, you can query the MLModelDescription object, like so:
model.modelDescription.trainingInputDescriptionsByName
You should also be able to get information about the hyperparameters, such as the number of neighbors, using modelDescription.parameterDescriptionsByKey or model.parameterValue(for: .numberOfNeighbors), but for me this just returns an empty dictionary or nil.
Training the k-NN classifier
To train k-NN, you need to provide one or more training examples and their true labels. Core ML will then add the feature vectors and the corresponding labels to the k-NN’s memory.
Because we’re using a pipeline, the training examples should be images. The first model in the pipeline, the SqueezeNet feature extractor, will process the image and deliver a 1000-element feature vector. That vector gets passed to the k-NN model, and that is what it will memorize.

Along with the training image, you also provide the true label for that image. This label is also memorized by the k-NN model. Note that the feature extractor model will never see the true label, nor does it care about it.
The cool thing about k-NN is that you can add new training examples — and even new class labels — at any given time. You just say, “Hey k-NN, here is some new data,” and it will simply add that new data to its memory.
To demonstrate this, the demo app’s Train k-NN screen lets you select one or more training images before you press the Train button:
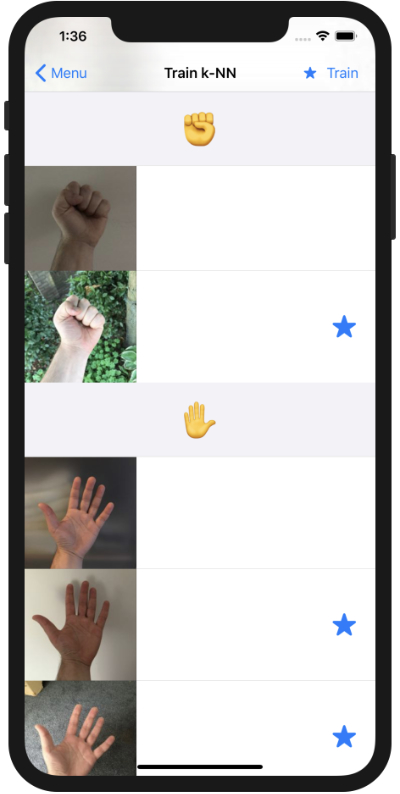
Unlike with a neural network, you don’t need to train on all the images at once. This is one reason why training k-NN is much faster than training a neural network. You can add new training examples one-by-one as they become available. (And you can usually throw away the training data as soon as you’ve given it to k-NN.)
Note: The app doesn’t remember which images you trained on, so if you leave this screen and come back you can select the same images again. In a real app you’d only train on new examples as and when they are generated by the user.
By the way, it’s OK to train on the same image more than once. It just gets added to the model multiple times. Be aware this might affect the predictions because there may be more neighbors now that all share the same feature vector.
Before you can update a Core ML model, you first need to copy it from the app bundle into your application’s Application Support directory. As the app bundle is read-only, you can’t update files inside the app bundle. You’ll always need to copy the model from the app bundle into a writable directory first.
For this demo app we’re using the app’s Documents directory but for a real app, you probably should use the Application Support directory instead. That way the trained model still gets backed up to iCloud but users will not be able to see it.
HandskNN.mlmodel is the untrained k-NN model that we created in the previous section. This file has also been added to Xcode project. However, what is inside the app bundle is actually the compiled version, HandskNN.mlmodelc.
Whereas mlmodel is supposed to be an open file format for describing machine learning models, the compiled mlmodelc is proprietary and is specific to Apple’s CoreML.framework. The original mlmodel file is not shipped with the app, only the mlmodelc. This is not a single file but a folder containing multiple files.
That means you’re not actually training the mlmodel file but the mlmodelc. Any updates made by the training process are written to the mlmodelc folder that is inside your app’s Documents or Application Support directory.
Note: There is currently no known way to convert the trained mlmodelc back to an mlmodel so that you can easily share it with others (which doesn’t mean it’s impossible but simply that no one has written a tool to do so). This is another reason why Core ML 3 training isn’t meant to be a replacement for regular training tools.
Of course, when you let users fine-tune models on their own data, you end up with a trained model that’s useful only to that user. There isn’t much point in sharing those models with other users, so the actual file format isn’t really important.
The first time the demo app starts up, or when you tap Reset to Empty Model, the app copies the untrained model HandskNN.mlmodelc from the app bundle to the Documents directory and renames it to NearestNeighbors.mlmodelc. That is what you’ll actually be training.

Show me the code!
All the logic for training is in TrainNearestNeighborsViewController.swift, in the private method train(). It’s simple enough that I put it in the view controller.
The first thing this method does is create an MLBatchProvider object. You’ve seen this object in part 2 when we talked about making batch predictions, but it’s also used for providing the training data.
The helper method batchProvider() loads the selected training images into MLFeatureValue objects, puts their labels into strings, and then sticks everything into an MLArrayBatchProvider:
var batchInputs: [MLFeatureProvider] = []

for all selected images {
  let featureValue: MLFeatureValue = /* load the image */
  let trueLabel: String = /* get the label for the image */

  if let pixelBuffer = featureValue.imageBufferValue {
    let featureProvider = HandskNNTrainingInput(image: pixelBuffer,
                                                label: trueLabel)
    batchInputs.append(featureProvider)
  }
}

return MLArrayBatchProvider(array: batchInputs)
Note: Our labels are strings but it’s also possible to use Int64 in case you prefer numeric labels. You specify this when creating the mlmodel file, by passing a numeric default_class_label to KNearestNeighborsClassifierBuilder .
As you may recall from part 2, the MLBatchProvider contains MLFeatureProvider objects. There is one MLFeatureProvider for every training example. It describes the inputs to the model for that particular example. Because we have two training inputs — the image and the label — our MLFeatureProvider must also have two MLFeatureValue objects.
It sounds like a lot of effort to set that all up, so we’re going to use the code that Xcode already wrote for us. Because we added the untrained HandskNN.mlmodel to the app, there is an auto-generated HandsKNN class but also an auto-generated HandskNNTrainingInput. This is a class that implements the MLFeatureProvider protocol specifically for our model’s training inputs.
Even though the model we’re training is really NearestNeighbors.mlmodelc from the app’s Documents directory, not HandskNN.mlmodelc from the app bundle, we can still use HandskNNTrainingInput. All that matters is that this class provides training inputs with the correct names and datatypes.
Once we have the batch provider with our images and their labels, we can write the code to do the actual training:
let trainingData = try batchProvider()

let updatableModelURL = /* url to NearestNeighbors.mlmodelc */

let updateTask = try MLUpdateTask(forModelAt: updatableModelURL,
                                  trainingData: trainingData,
                                  configuration: model.configuration,
                                  completionHandler: { context in
  // Training has finished
}

updateTask.resume()
To train, you create an MLUpdateTask object and give it the URL to the mlmodelc in the app’s Documents folder. You also pass in the batch provider with the data and an MLModelConfiguration object. Here we use the existing model’s configuration but you can also customize it, for example to force Core ML to use the CPU for training or to change the hyperparameters (useful mostly for neural networks).
The call to resume() starts the training. The completion handler is called once the training finishes. For a k-NN model this will be almost instantaneous — the only thing that takes any time is the feature extractor part of the model.
The completion handler is a good place to save the updated model:
  let tempURL = urlForModelInDocumentsDirectory("tempNearestNeighbors")
  try context.model.write(to: tempURL)

  removeIfExists(at: updatableModelURL)
  copyIfNotExists(from: tempURL, to: updatableModelURL)
  removeIfExists(at: tempURL)
The context variable contains an MLUpdateContext object with additional information about the training process. For a k-NN model the context object doesn’t provide much useful information, but for a neural network it contains metrics such as the current loss value, etc.
For us, the important property is context.model, which is a new MLModel object that represents the updated model. It’s a different instance than the MLModel object that we started from.
This new MLModel is what we should save to a file (or rather an mlmodelc folder) using context.model.write(to:). However, I found that trying to overwrite the existing mlmodelc gave errors. This is why we’re saving to a temporary URL first and then copy it over NearestNeighbors.mlmodelc afterwards.
(To be completely safe against file corruption, which could result in a model that no longer works, you may want to make a backup copy of the existing model first before overwriting it, so that you’ll always have a working version somewhere.)
And that’s all you need to do to train a k-NN model with Core ML!
Note: There is currently no way to remove training examples from Core ML’s k-NN model, you can only add examples. You’d have to reset to the untrained model and train it again, but this time leave out the examples you no longer want.
How well does the trained model do?
Try it out for yourself:
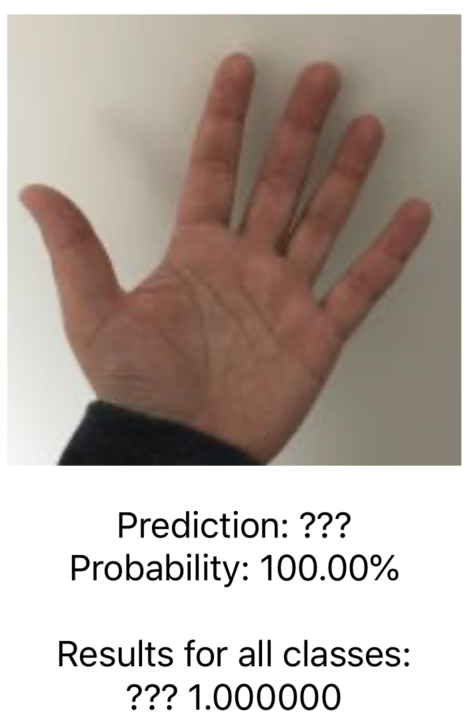
Run the app and tap Reset to Empty Model in the k-Nearest Neighbors section. Next, go to the Evaluate or Camera screen and you’ll see that every single test image gets classified as ???.
As I mentioned a few times now, a k-NN model doesn’t really care about the classes you give it. Initially, the untrained model doesn’t have any classes at all and it will respond with the “default class label” on any prediction. In make_knn.py, we chose the default label to be "???" and that’s what it predicts indeed.
Now go to the training screen, select a single image from class ✌️, and tap Train. Run the evaluation again. Now every test image should be classified as ✌️. That’s because, at this point, our model only knows about this one single feature vector and so it always gets chosen as the closest neighbor.
Now try training on an image from another class. How does that affect the results?
Also add some new gestures to the app. The k-NN model should pick these up with no problems. (Note that a new class won’t show up in the results until you trained on at least one image from that class.)
After training on all the images, Evaluate gives the following results:
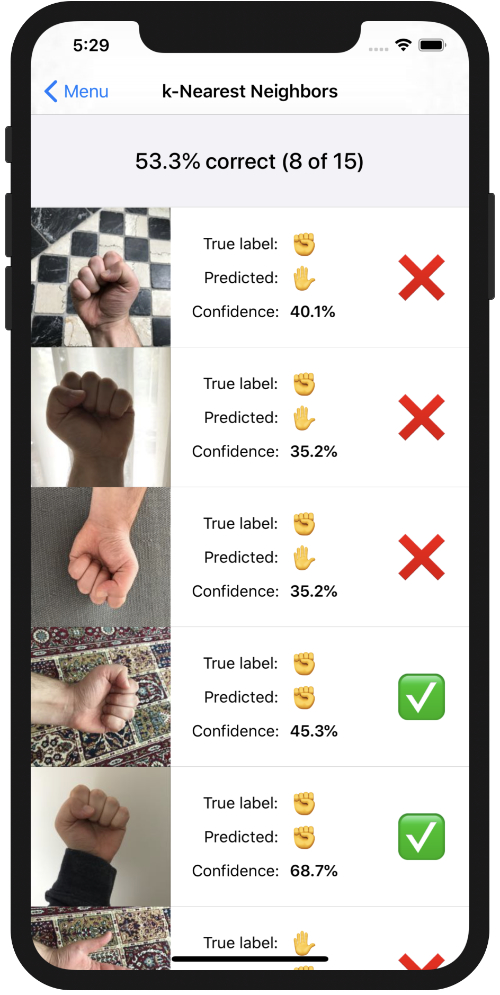
53.3% correct… That’s better than a random guess but it’s not great either. What’s going on here, is this the best we can expect from k-NN?
One thing to keep in mind is that k-NN literally remembers the features from the training examples. It will only consider two images to have the same class if their feature vectors are very similar. So it’s important to get good feature vectors for your data!
For example, the true label of the first test image is ✊ but the predicted label is ✋. Likewise for the second and third image. This means the feature vectors of these test images are somehow closer to the feature vectors for the ✋ training images than to the vectors for the ✊ training images.
That’s a problem… it means that our feature vectors aren’t as good as they should be. I can think of a few reasons:
Because my small dataset only includes pictures of the left hand, the k-NN model may not do so well on pictures of the right hand. It may also not work very well on images that are against a different background.
With a neural network classifier, the neural net can learn that it should not make a distinction between the left and right hands for this task, or that the background is not important. (The k-NN pipeline also has a neural network, of course, but it doesn’t learn.)
If you want the k-NN model to be invariant to those kinds of things too, you may need to add more training examples. It’s a little silly to make the user always take photos of both hands, but instead, we could horizontally flip each training image and also put the feature vector for the flipped image into the MLBatchProvider.
Exercise for the reader: Part 2 of this series has links to other datasets you can use. Try adding those images to the training set and see if that improves the results!
Another improvement we can make is the feature extractor itself. Right now, we’re using a very generic pretrained model as the feature extractor. It would be better to first train a neural network on a big dataset of hand gestures, then use that as the feature extractor in the app. The SqueezeNet model we’re currently using does know a bit about hands but also knows about a lot of irrelevant stuff such as dogs, fish, cars, food, etc. It could do much better if it just focused on hands.
Ideally, for two images making the same hand gesture, the feature extractor neural network should produce two very similar feature vectors, regardless of whether it’s the left hand or the right hand — or what skin color it is, what clothes the person is wearing, what the background is, and so on.
Without good feature vectors, k-NN simply isn’t going to work well.
Other things you can do to tweak the performance of a k-NN model:
- change k, the number of neighbors
- change the weighting scheme, so that closer neighbors count for more than far-away neighbors
The weighting scheme is something that must be specified in the mlmodel file but the number of neighbors can be changed at runtime. Well, at least in theory…
If I understand the API correctly, you should be able to change the hyperparameters for the model through the MLModelConfiguration object, like so:
model.configuration.parameters = [MLParameterKey.numberOfNeighbors: 5]
However, changing this parameters dictionary appears to have no effect. The only way to do this is to create a new MLModelConfiguration object and pass that into the MLModel constructor. Not sure if this is a bug or if it is intentional.
let config = MLModelConfiguration()
config.computeUnits = .all
config.parameters = [MLParameterKey.numberOfNeighbors: 5]
let model = try MLModel(contentsOf: url, configuration: config)
Unfortunately, changing the .numberOfNeighbors setting this way still doesn’t have any effect. Perhaps someone reading this has figured out how to do it?
Update: Changing the number of neighbors appears to work as of iOS 13.2.2 (it may have been fixed in an earlier update but I didn’t try it until now). Although, in my experiments, it still doesn’t seem to have any discernible effect on the model’s predictions.
OK, that’s it for this time. Stay tuned for the final part of this series, where we train a neural network!
👍 Keep reading: Continue to part 4, Training a Neural Network
First published on Saturday, 14 September 2019.
If you liked this post, say hi on Twitter @mhollemans or LinkedIn.
Find the source code on my GitHub.
 New e-book: Code Your Own Synth Plug-Ins With C++ and JUCE
Interested in how computers make sound? Learn the fundamentals of audio programming by building a fully-featured software synthesizer plug-in, with every step explained in detail. Not too much math, lots of in-depth information! Get the book at Leanpub.com