
Today I am happy to announce Forge, an open source library that makes it a bit easier to build neural networks with MPSCNN.

Why do you need Forge?
Apple’s MPSCNN framework is great for creating really fast deep learning networks on iOS devices. It uses the power of Metal to get the best possible performance out of your iPhone’s GPU.
However, using the GPU also has a downside: Metal only thinks in terms of textures and images.
Using images makes a lot of sense for convolutional networks but you’ll still have to convert the output from your network into something you can use from Swift. And what about neural nets that work on non-image data such as audio or text?
Forge makes it much easier to convert your data to and from these textures.
For example, a classification network produces a probability distribution. What you want is an array of Float values, but Metal gives you a MTLTexture object inside an MPSImage object that uses these strange 16-bit floats for storage.
With Forge you can simply write the following to get the 5 predictions with the highest scores:
let probabilities = outputImage.toFloatArray()
let top5 = probabilities.top(k: 5)
Other features of Forge:
Compute kernels. Often you need to preprocess data before it goes into the neural network, which requires you to write your own Metal compute kernel. Forge comes with a few handy preprocessing kernels and helps you write your own compute kernels.
More layers. MPSCNN only supports a limited number of layers, so Forge adds common layer types that are missing. Currently only depth-wise convolution is included but I plan to keep adding new layer types on a regular basis.
Debugging tools. When you implement a neural net in Metal you want to make sure it actually computes the correct thing. Due to the way Metal encodes the data, inspecting the contents of the
MTLTextureobjects is not always straightforward. Forge can help with this.
However, Forge’s biggest feature by far is a domain-specific language (DSL) that makes it a snap to create the layers for your network.
No more boilerplate!
In the past months I’ve implemented several deep learning networks on the iPhone (hint: you can hire me) and it always involves a lot of boilerplate code.
For example, here’s what you have to do for a single convolutional layer:
// 1) Declare image descriptors to describe the shape of the data:

let imageDesc1 = MPSImageDescriptor(channelFormat: .float16,
                    width: 112, height: 112, featureChannels: 64)
let imageDesc2 = MPSImageDescriptor(channelFormat: .float16,
                    width: 112, height: 112, featureChannels: 128)

// 2) Create the layer objects:

let relu = MPSCNNNeuronReLU(device: device, a: 0)

let desc = MPSCNNConvolutionDescriptor(kernelWidth: 3,
                                       kernelHeight: 3,
                                       inputFeatureChannels: 64,
                                       outputFeatureChannels: 128,
                                       neuronFilter: relu)
desc.strideInPixelsX = 1
desc.strideInPixelsY = 1

let conv = MPSCNNConvolution(device: device,
                             convolutionDescriptor: desc,
                             kernelWeights: weights,
                             biasTerms: bias,
                             flags: MPSCNNConvolutionFlags.none)

// 3) Create images to hold the input and output, and encode the layer:

let previousImage = MPSTemporaryImage(commandBuffer: commandBuffer,
                                      imageDescriptor: imageDesc1)
. . .
let convImage = MPSTemporaryImage(commandBuffer: commandBuffer,
                                  imageDescriptor: imageDesc2)
conv.encode(commandBuffer: commandBuffer, sourceImage: previousImage,
            destinationImage: convImage)
That’s just for one layer! This gets on your nerves really quickly, especially as you’re forced to repeat the same information several times (like the number of channels).
Apple’s sample code for the Inception-v3 network uses about 2000 lines of code to set up and run the network. Not only is that code no fun to write, it’s easy to make mistakes (because you know you’re going to copy-paste your way through this).
With Forge’s DSL you can specify an entire neural network in just a few lines:
let relu = MPSCNNNeuronReLU(device: device, a: 0)

model = Model()
    --> Resize(width: 64, height: 64)
    --> Convolution(kernel: (5, 5), channels: 20, filter: relu, name: "conv1")
    --> MaxPooling(kernel: (2, 2), stride: (2, 2))
    --> Convolution(kernel: (5, 5), channels: 40, filter: relu, name: "conv2")
    --> MaxPooling(kernel: (2, 2), stride: (2, 2))
    --> Dense(neurons: 200, name: "fc1")
    --> Activation(relu)
    --> Dense(neurons: 10, name: "fc2")
    --> Softmax()
That’s it, this is the whole thing! You create a Model() object and then add layers to it using the --> operator.
Currently this supports the basic convolution, pooling, and fully-connected layers. You can also insert your own compute kernels. Support for more layer types will be added in the future.
The nice thing about this mini-language is that it automatically infers the size of the data as it flows through the network.
The Resize() layer in the example takes an RGB image of any size and shrinks it down to 64×64 pixels. Every Convolution layer increases the depth of the data, and every MaxPooling layer cuts the spatial dimensions in half.
The data shapes in this network are (width × height × depth):
64 × 64 × 3
64 × 64 × 20
32 × 32 × 20
32 × 32 × 40
16 × 16 × 40
 1 ×  1 × 200
 1 ×  1 × 10
With “raw” MPSCNN code you’d have to create MPSImageDescriptor objects for all these different data sizes, by hand. Forge will figure all of this out on your behalf — you’ll never have to create another MPSImageDescriptor again. 😉
Compiling the model
Once you’ve specified the model, you can compile it:
let success = model.compile(device: device, inflightBuffers: 3) {
  name, count, type in
  return ParameterLoaderBundle(name: name, count: count,
                               suffix: type == .weights ? "_W" : "_b",
                               ext: "bin")
}
Compiling first calculates the shapes of the layer’s outputs and then it creates the MPSCNN objects for the layers.
An MPSCNNConvolution or MPSCNNFullyConnected object needs to know the weights and biases the network has learned during training, so you have to provide these somehow. To this end, model.compile() takes a closure that should return a ParameterData object.
This closure is called for every layer that takes parameters, once for the weights and once for the biases. The above example returns a ParameterLoaderBundle instance, an implementation of ParameterData that reads the weights and biases from files stored in the app bundle. For the layer named "conv1", this would load the files conv1_W.bin (weights) and conv1_b.bin (biases).
Because Forge uses this indirect mechanism for loading weights and biases, you can store them anywhere you want: in multiple smaller files, in one big file, in the asset catalog, in files you downloaded from a server, encrypted, etc. Forge does not force a particular storage type upon you.
After the model successfully compiles, print(model.summary()) will output a list of all the layers that are in the model. This is useful for double-checking that you specified everything correctly (and that Forge didn’t make any mistakes!).
Layer                          Type       Output Shape     Parameters
---------------------------------------------------------------------
__Resize_1__                   Resize     (64, 64, 3)      0
conv1                          Conv       (64, 64, 20)     1520
__MaxPool_3__                  MaxPool    (32, 32, 20)     0
conv2                          Conv       (32, 32, 40)     20040
__MaxPool_5__                  MaxPool    (16, 16, 40)     0
fc1                            Dense      (1, 1, 200)      2048200
__Activation_7__               Activation (1, 1, 200)      0
fc2                            Dense      (1, 1, 10)       2010
__Softmax_9__                  Softmax    (1, 1, 10)       0
---------------------------------------------------------------------
Number of layers: 9
Total parameters: 2071770
If you’ve ever used Keras this should look familiar. I’m not ashamed to admit Keras was an inspiration for Forge’s DSL. 😄 Notice how the shape for each layer’s output was automatically calculated from the layer parameters such as kernel size, stride, padding, and so on.
The Inception-v3 network now takes about 130 lines to specify — instead of 2000! See it here: Inception-v3 using Forge. There’s just one line of code for each layer.
What’s the catch?
Of course, there is a downside in using this DSL to specify your neural network: there is some unavoidable overhead because Forge needs to traverse the layer graph and assemble all the pieces. This is slower than hand-rolled code.
Naturally you want your neural network code to be as fast as possible, especially when encoding the GPU buffers. The DSL adds a little bit of overhead here too.
However, you’ll be glad to hear the speed difference is hardly noticeable in practice.
The vast majority of the time is spent on actually encoding and running the GPU commands. On current hardware, running your neural network will be a few orders of magnitude slower than anything Forge does.
Keeping the GPU happy
An obvious — but ambitious! — application of deep learning on mobile is to apply it to live video.
It’s not really possible yet to take a 30 or 60 FPS video stream and run the neural network on every single frame, but an effective frame rate of 5 – 15 FPS is within reach and is convincing enough to be considered “realtime”.
To get that kind of performance you want to keep the CPU and GPU as busy as possible. The CPU should never be waiting for the GPU and vice versa. In games and other graphics-intensive apps this is often solved using triple-buffering, and so that’s what Forge uses too.
With triple-buffering the CPU and GPU can do up to three tasks in parallel. That means the CPU can already be encoding the commands for the next video frame while GPU is still working on the previous frame. To get as much throughput as possible, we want to keep the CPU and GPU humming along at all times.
This is what the inflightBuffers parameter was for in the model.compile() call. This tells Forge that it needs to allocate 3 times as many MPSImage objects so that the CPU and GPU don’t get in each other’s way and try to read/write the same image. (This only takes up a little bit more memory as most of the images used by MPSCNN are temporary.)
Forge provides a class Runner that takes care of all the CPU-GPU synchronization stuff for you. You just create a new Runner instance:
runner = Runner(commandQueue: commandQueue, inflightBuffers: 3)

network = MyAwesomeNeuralNet(. . .)
And to run the neural network on a new input texture, you do:
let texture = . . . // grab from camera

runner.predict(network: network, texture: texture, queue: .main) { result in
  // ... do something with the result ...
}
The completion handler will be called on the specified dispatch queue, .main, with the output of the neural network. By using Runner to execute the neural network, the CPU will spend as little time as possible waiting for the GPU, and the GPU will always have something to do.
This scheme requires that you implement your neural network as a class that conforms to the NeuralNetwork protocol:
public class MyAwesomeNeuralNet: NeuralNetwork {
  public init(device: MTLDevice, inflightBuffers: Int) {
    // set up the network's layers
  }

  public func encode(commandBuffer: MTLCommandBuffer,
                     texture inputTexture: MTLTexture,
                     inflightIndex: Int) {
    // create GPU commands
  }

  public func fetchResult(inflightIndex: Int) -> NeuralNetworkResult {
    // read the output MPSImage and create a result object
  }
}
This division of labor leaves the neural network object free to do just neural network things and leaves all the CPU/GPU blood-and-guts to Runner.
Note: If you don’t want to use triple-buffering, just pass 1 as the number of in-flight buffers. Now the CPU will always wait until the GPU is done before it starts encoding a new frame.
Check out the examples
Forge comes with a number of pre-trained neural networks, such as LeNet-5 on MNIST, Inception-v3 on ImageNet, and the recently announced MobileNets.
To play with these examples, open Forge.xcworkspace in Xcode 8.3 or better and choose the target you want to run with the selection box at the top of the Xcode window:
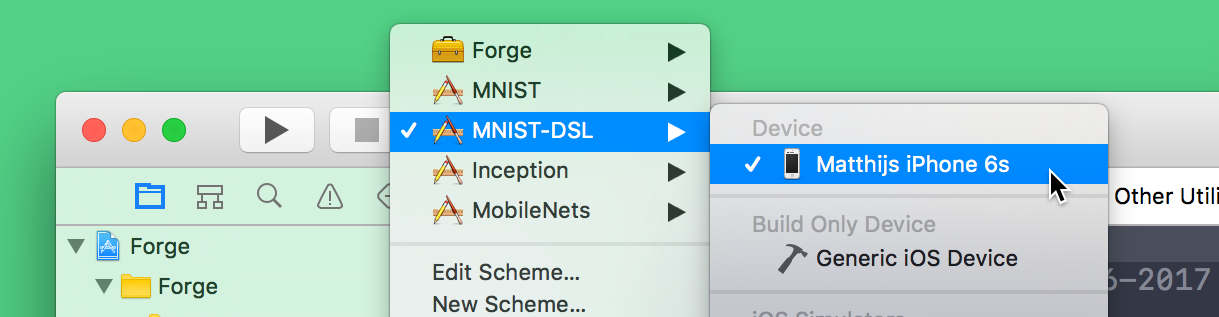
You need to run the examples on a device with an A8 processor or better and iOS 10 or later (an iPhone 6 should do). You cannot build for the simulator as it does not support Metal.
You can find Forge on GitHub. It’s an open source project, so contributions are welcome! I especially hope to add more layer types in the future. Thanks!
First published on Monday, 24 April 2017.
If you liked this post, say hi on Twitter @mhollemans or LinkedIn.
Find the source code on my GitHub.
 New e-book: Code Your Own Synth Plug-Ins With C++ and JUCE
Interested in how computers make sound? Learn the fundamentals of audio programming by building a fully-featured software synthesizer plug-in, with every step explained in detail. Not too much math, lots of in-depth information! Get the book at Leanpub.com