
Apple’s MPSCNN framework for deep learning on the GPU gives you only a few basic layer types: convolution, pooling, fully-connected, and normalization layers.
This is a great start, but is not sufficient to implement all possible deep learning networks. To do anything more than a basic convolutional neural network (CNN) you’ll need to implement your own Metal compute shaders.
Fortunately, the Metal Performance Shaders framework (MPS) also comes with a matrix multiplication kernel that lets you multiply large matrices very quickly.
Since a lot of machine learning operations can be expressed in one way or another as matrix multiplications, this gives us a very versatile tool for filling in some of the missing pieces.
In this blog post I’ll show how to use MPSMatrixMultiplication in your iOS apps, and compare it to CPU-based matrix multiplication from the Accelerate framework, as well as the fully-connected layer from MPSCNN since that does conceptually the same thing as a matrix multiplication.
Using MPSMatrixMultiplication
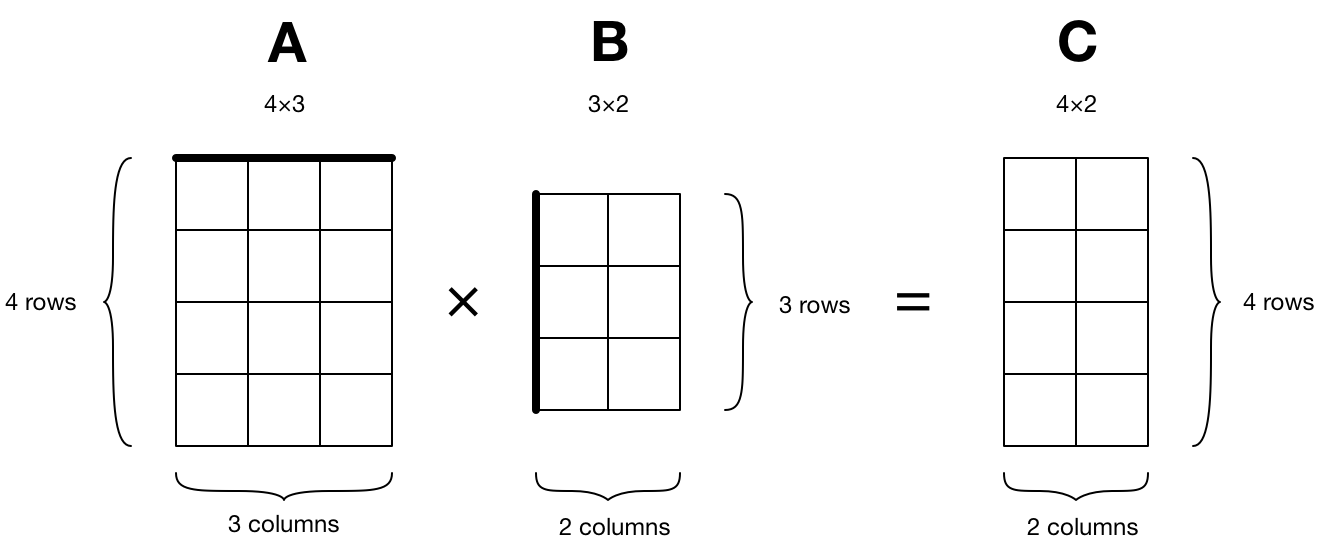
We want to multiply two matrices A and B, and put the result in a new matrix C:
The MPSMatrixMultiplication class is an MPSKernel that computes the following:
C = A × B + C
It multiplies matrix A by matrix B but it also adds the previous contents of matrix C, and then overwrites the contents of C with the new results.
To be complete, what it computes is this:
C = alpha × op(A) × op(B) + beta × C
where alpha and beta are scalar values. If you don’t want to add the contents of matrix C, you can just set beta to 0.
op() is an optional transposition that gets applied to matrix A and/or B before they are multiplied. Remember that for multiplications the sides of the matrices have to match up: A’s number of columns must equal B’s number of rows. If that’s not the case, you may have to transpose one or both of these matrices before the multiplication. It’s handy that MPSMatrixMultiplication does this for you.
Because MPSMatrixMultiplication runs on the GPU you’ll need to put your data into an MTLBuffer object. That looks something like this:
var arrayA: [Float] = ...

let bufferA = device.makeBuffer(bytes: arrayA,
                 length: rowsA * columnsA * MemoryLayout<Float>.stride,
                 options: [])
Here, arrayA is a regular one-dimensional Swift array containing the values of matrix A. We copy it into a new MTLBuffer that we obtain from the Metal device.
To compute the size of the buffer the above code does rowsA * columnsA * MemoryLayout<Float>.stride since our matrix consists of rows × columns elements and each element has the size of a Float. However, this is not necessarily the best way to arrange the data inside this buffer.
MPSMatrixMultiplication works best when each row of the matrix has a stride that is a multiple of 16 bytes. So if the number of columns in your matrix is not a multiple of 4, it is best to add a few bytes of “padding” at the end of each row inside the MTLBuffer object.
To find the optimal size for the row stride and thus how many bytes of padding you need to add after each row, you should call the MPSMatrixDescriptor.rowBytes() function (don’t assume it’s always a multiple of 16 bytes):
let rowBytesA = MPSMatrixDescriptor.rowBytes(fromColumns: columnsA,
                                             dataType: .float32)

let bufferA = device.makeBuffer(length: rowsA * rowBytesA, options: [])

let padding = columnsA * MemoryLayout<Float>.stride - rowBytesA
However, now you have to be careful when copying your Swift array into this buffer since you can only safely copy one row at a time. Because you need to skip the padding bytes at the end of each row, you can’t copy the entire contiguous array in one go. Fortunately, the above is not strictly necessary but not doing it runs the risk of slower performance.
Note: For optimal speed you want to avoid copying data altogether, especially if your matrices are large. In that case you can use device.makeBuffer(bytesNoCopy:...) but that requires the array’s data to be aligned to the system page size. To get page-aligned memory you must allocate that memory yourself, and so you can’t use regular Swift arrays for that. You also want to make sure your data is already formatted using that preferred row stride.
The numbers in the MTLBuffer are assumed to be stored in row-major order, which looks like this in memory:

If your data is in column-major order, you can tell MPSMatrixMultiplication to transpose the matrix before doing the multiplication.
Creating the MTLBuffer is not enough. This buffer object is just a container for raw bytes — it doesn’t know that it holds a matrix and it doesn’t even care that the bytes represent floats. We also have to create an MPSMatrix object:
let descA = MPSMatrixDescriptor(dimensions: rowsA, columns: columnsA,
                rowBytes: columnsA * MemoryLayout<Float>.stride,
                dataType: .float32)

let matrixA = MPSMatrix(buffer: bufferA, descriptor: descA)
The “descriptor” has the dimensions of the matrix and describes how the data is stored in memory. Currently, only 32-bit floating-point numbers are supported — you can’t choose the .float16 format even though the rest of Metal prefers such half precision floats.
You repeat the above steps to prepare matrices B and C.
Note: If you want to do repeated matrix multiplications but with different data, you’d just create the MTLBuffer and MPSMatrix objects once. To change the contents of the matrix, you can copy new data into the existing MTLBuffer object.
The final preparation step is to create the MPSMatrixMultiplication kernel. The initializer for this class doesn’t really care about the actual MPSMatrix objects yet, only about their dimensions.
matrixMultiplication = MPSMatrixMultiplication(device: device,
                           transposeLeft: false, transposeRight: false,
                           resultRows: rowsC, resultColumns: columnsC,
                           interiorColumns: columnsA, alpha: 1, beta: 0)
Here I just want to compute C = A × B, not C = A×B + C, so I’ve used alpha: 1 and beta: 0. This only does the multiply but not the add.
OK, that’s all the preparation taken care of. To actually multiply the matrices, you encode the kernel into a command buffer and commit it:
let commandBuffer = commandQueue.makeCommandBuffer()

matrixMultiplication.encode(commandBuffer: commandBuffer,
            leftMatrix: matrixA, rightMatrix: matrixB, resultMatrix: matrixC)

commandBuffer.commit()
And that’s all there is to it. Except… where do you get the results from? Well, they live in matrixC’s MTLBuffer object. To read these values from Swift we have to do some pointer magic:
let rawPointer = matrixC.data.contents()
let count = matrixC.rows * matrixC.columns
let typedPointer = rawPointer.bindMemory(to: Float.self, capacity: count)
let bufferedPointer = UnsafeBufferPointer(start: typedPointer, count: count)

for i in 0..<10 {
  print(bufferedPointer[i])
}
This creates an UnsafeBufferPointer<Float> and then uses that to print out the first 10 results from the result matrix C. If it makes sense for your app, you can also copy the contents of the output buffer into a new [Float] array.
How does it stack up against BLAS?
The Accelerate framework includes the famous BLAS library (Basic Linear Algebra Subprograms) for doing fast matrix and vector operations on the CPU.
I made a little demo project (source code on GitHub) that compares the speed of MPSMatrixMultiplication with the BLAS routine cblas_sgemm.
This is all the code you need to perform the same computation that we did above with BLAS:
cblas_sgemm(CblasRowMajor, CblasNoTrans, CblasNoTrans, Int32(rowsA),
            Int32(columnsB), Int32(columnsA), 1, ptrA, Int32(columnsA),
            ptrB, Int32(columnsB), 0, ptrC, Int32(columnsC))
where ptrA, ptrB, and ptrC are UnsafePointer<Float>s to the Swift arrays that are holding our data.
So BLAS is definitely simpler to use — once you decipher the function names and what all those parameters mean — but it must be way slower than Metal, since it runs on the lowly CPU and not on the ultra-parallel GPU, right?
Well… not quite.

For large matrices MPS is the clear winner, but for “smallish” matrices BLAS is much faster. On my iPhone 6s the tipping point seems to be around 1 billion operations. Anything larger than that and Metal wins.
To get at least a vague idea of when it makes sense to use MPS over BLAS, we can look at the total number of operations in involved in multiplying two matrices. The formula for this is:
rowsA × columnsB × (columnsA + (columnsA - 1))
It requires computing rowsA times columnsB dot products, and each dot product consists of columnsA multiplications and columnsA - 1 additions.
So if you plug in the dimensions of your matrices into that formula and you get a number greater than 1e9, you’ll probably want to use MPSMatrixMultiplication instead of cblas_sgemm.
Note: The formula only gives a theoretical upper limit on the number of operations. It’s very likely that these matrix multiplication routines use lots of optimizations under the hood. Case in point: multiplying two square 1500×1500 matrices is over 6 billion operations but BLAS is faster here than MPS, so perhaps multiplying square matrices is a special case BLAS has extra optimizations for. Different devices with different CPUs and GPUs may also give different results. You can play with the matrix sizes in the demo app to see for yourself which is faster.
Downsides and upsides of using Metal vs. BLAS:
BLAS is faster for smaller matrices, MPS is faster for larger matrices.
With MPS you need to load your data into an
MTLBufferfirst. With BLAS you can directly use your Swift arrays. A limitation to be aware of is thatMTLBuffercan hold at most 256MB of data, so if your matrix is really huge it may not fit and you may need to split it into smaller parts (the max is 64 million numbers or a 8192×8192 matrix).BLAS has
cblas_dgemm()which works onDoubles instead ofFloats, in case you need the extra precision. Even though MPS appears to use the.float32datatype, the loss of precision in the output (see the screenshot) leads me to believe it sacrifices some precision for speed.
The primary reason to use MPSMatrixMultiplication over BLAS is when you want to do a matrix multiply inside a larger compute / rendering pipeline.
You obviously can’t use BLAS in a GPU pipeline. For example, to use a BLAS matrix multiply inside a neural network of MPSCNN layers, you’ll have to wait for the GPU to finish computing the first few layers, then do BLAS on the CPU, and then resume work on the GPU. That’s just not very efficient.
It’s easier — and way faster! — in such a situation to do matrix multiplications on the GPU too, even if BLAS takes less time on the actual multiplications.
Versus a fully-connected layer
Metal Performance Shaders has built-in support for several neural network layers, including the so-called fully-connected layer.
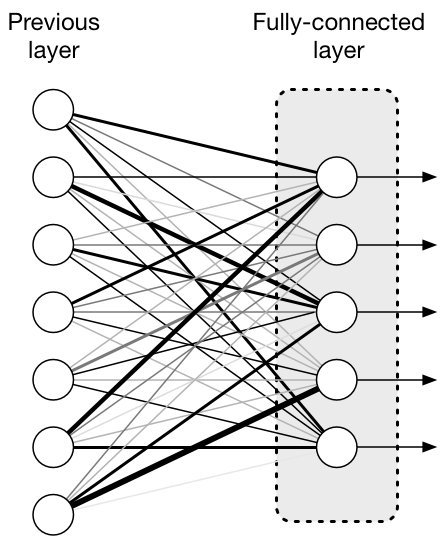
The neurons in such a layer are connected to all of the neurons in the previous layer, and each of these connections has a weight (represented by the thickness of the lines in the picture).
For example, if there are 5 neurons in this layer and there are 7 inputs coming from neurons in the previous layer, then there are 5×7 = 35 connections between these two layers. We can use a 5×7 matrix to describe the weights of these connections. (The output of the fully-connected layer is a 5-row column vector, one element for each neuron in this layer.)
If you put the weights for these connections in a matrix W and the input values coming from the previous layer in a vector x, then what a fully-connected layer does can be represented by a matrix multiplication:
fc = activation(W*x + b)
Here, b is an additional vector of so-called bias values and activation() is a mathematical function that gets applied after the matrix multiply. If we use the “identity” activation function, then this just does W*x + b.
Recall that MPSMatrixMultiplication computes C = A×B + C, so if we represent the vectors x and b as matrices with just one column and we say A=W, B=x, and C=b, then this is exactly what the fully-connected layer computes.
Note: In MPSCNN the fully-connected layer is implemented as a special case of convolution, so what happens under the hood isn’t necessarily an actual matrix multiplication. But it should give the same results as one.
For the fun of it, let’s compare the two approaches to see which one is faster. The MPSMatrixMultiplication code is the same as before, except this time we use beta: 1 so that the initial contents of matrix C are used as the bias vector and are added to the product of A and B.
To create a fully-connected layer, we have to do some setup work:
let fcDesc = MPSCNNConvolutionDescriptor(kernelWidth: 1, kernelHeight: 1,
                inputFeatureChannels: rowsB, outputFeatureChannels: rowsC,
                neuronFilter: nil)

let fc = MPSCNNFullyConnected(device: device, convolutionDescriptor: fcDesc,
                kernelWeights: arrayA, biasTerms: arrayC, flags: .none)
If you thought loading your matrix data into an MTLBuffer was annoying, then get a load of this: to use MPSCNNFullyConnected you have to copy your matrix data into an MTLTexture object. So you have to translate your data into pixels. Eeww.
What’s worse is that at this time the fully-connected layer does not like .float32 data as input, only .float16, so we’ll have to convert our Swift Floats into 16-bit floats before we can stick them into the texture. Here is the code:
let inputImgDesc = MPSImageDescriptor(channelFormat: .float16,
                      width: 1, height: 1, featureChannels: rowsB)

let inputImage = MPSImage(device: device, imageDescriptor: inputImgDesc)

let input16 = float32to16(&arrayB, count: arrayB.count)

input16.withUnsafeBufferPointer { ptr in
  for i in 0..<inputImage.texture.arrayLength {
    let region = MTLRegion(origin: MTLOriginMake(0, 0, 0),
                           size: MTLSizeMake(1, 1, 1))
    inputImage.texture.replace(region: region, mipmapLevel: 0, slice: i,
                           withBytes: ptr.baseAddress!.advanced(by: i*4),
                           bytesPerRow: MemoryLayout<Float16>.stride * 4,
                           bytesPerImage: 0)
  }
}
Fun times. Since we have a 1×1 pixel texture, the MPSImage actually uses a texture of type2DArray, which has multiple slices. We load 4 consecutive matrix elements into each slice, since one texture pixel holds 4 channels of data. It’s a bit messy but that’s just the way it is.
The output of MPSCNNFullyConnected is also an MPSImage. This time we’ll use a .float32 texture, as the fully-connected layer seems to have no issues outputting 32-bit floats (only with reading them).
let outputImgDesc = MPSImageDescriptor(channelFormat: .float32,
                       width: 1, height: 1, featureChannels: rowsC)
outputImage = MPSImage(device: device, imageDescriptor: outputImgDesc)
OK, that’s the preparation done. Running the fully-connected layer to do the actual matrix multiply is very similar to what we did before:
let commandBuffer = commandQueue.makeCommandBuffer()

fc.encode(commandBuffer: commandBuffer, sourceImage: inputImage,
          destinationImage: outputImage)

commandBuffer.commit()
To read the results from the output MPSImage’s texture, we convert them to a regular Swift [Float] array using a helper function:
let fcResults = outputImage.toFloatArray()
And now we can compare the results between these two different ways of doing matrix multiplications:
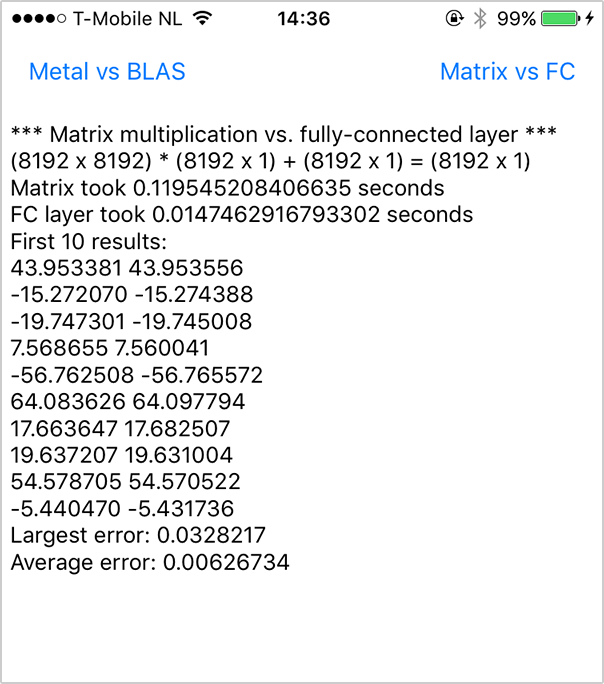
As you can see in the screenshot, the fully-connected layer is about 10 times faster than MPSMatrixMultiplication!
However… compared to the BLAS output the precision is way worse. This probably happens because MPSCNNFullyConnected doesn’t do a true matrix multiply under the hood, but only approximates it.
Upsides / downsides:
The fully-connected layer is much faster, even though you need to stuff your data into
MPSImage’s textures. But it’s also less precise — this may not be an issue for something like a convolutional neural network, but it may be for more general-purpose matrix multiplication.You can’t change the weights or bias values after you’ve created the
MPSCNNFullyConnectedlayer object. Therefore it’s only useful for repeated matrix multiplications if you’re always going to use the same weights. This is not a problem for building something like a recurrent neural network (RNN) but again it doesn’t makeMPSCNNFullyConnectedsuitable as a general-purpose replacement for matrix multiplications.The fully-connected layer also lets you apply an activation function. If you want to use an activation function with
MPSMatrixMultiplication, you’ll have to do this yourself — and in fact you’d have to write your own Metal compute kernel, since the MPSCNN functions work onMPSImageobjects and their textures, not onMTLBuffer.
If you can get away with using a fully-connected layer to do your matrix multiplies then that’s definitely the preferred approach, but it’s clearly not something that will work in all situations. So it’s nice to have MPSMatrixMultiplication to fall back on.
Conclusion
The situations where MPSMatrixMultiplication is most useful for doing matrix multiplication are:
- when you have a lot of data to multiply, or
- you need to do it as part of a larger compute or render pipeline.
To be fair, MPSMatrixMultiplication doesn’t really integrate all that well with the MPSCNN layers — they use textures to store their data while MPSMatrix uses a raw buffer.
So if you want to combine MPSMatrixMultiplication with a convolutional layer, pooling layer, or fully-connected layer in the same pipeline, you’ll need to convert between an MTLTexture and MTLBuffer at some point (using a custom compute kernel).
Anyway, I like it! It’s useful to have an API for doing matrix stuff on the GPU. Besides multiplication it would be great to have other matrix manipulation kernels as well, such as for doing (pseudo) inversion. Maybe in iOS 11?
First published on Wednesday, 22 February 2017.
If you liked this post, say hi on Twitter @mhollemans or LinkedIn.
Find the source code on my GitHub.
 New e-book: Code Your Own Synth Plug-Ins With C++ and JUCE
Interested in how computers make sound? Learn the fundamentals of audio programming by building a fully-featured software synthesizer plug-in, with every step explained in detail. Not too much math, lots of in-depth information! Get the book at Leanpub.com